Docker
Docker is an open source containerization platform. It enables developers to package applications into containers — standardized executable components combining application source code with the operating system (OS) libraries and dependencies required to run that code in any environment.
To Learn
- Containers
- Images
- Visualisation of containers using Real OS" Installation - Setup on Linux Machine Docker Registry "- Docker Registry
- Docker hub
- Docker Trusted Registry
- Images
- Pull
- Search
- Login/Logout
- Commit
- Push
- Load
- Save"
- Dockerfile "- Build Images using Docker File " Containers "- Launching a container
- View Docker process and images
- run
- publish
- Usske bad docker-compose
- Volume mount vs bind mount
- Docker network (host & bridge) in detail
- Why docker, why not hypervisor
Installation methods🔗
First let’s remove if any other previous version of docker is installed
sudo apt-get remove docker docker-engine docker.io containerd runc
run individually for each, if giving error.
sudo rm -rf /var/lib/docker
sudo rm -rf /var/lib/containerd
You can install Docker Engine in different ways, depending on your needs:
- Most users set up Docker’s repositories and install from them, for ease of installation and upgrade tasks. This is the recommended approach.
- Some users download the DEB package and install it manually and manage upgrades completely manually. This is useful in situations such as installing Docker on air-gapped systems with no access to the internet.
- In testing and development environments, some users choose to use automated convenience scripts to install Docker.
Set up the repository
- Update the
aptpackage index and install packages to allowaptto use a repository over HTTPS:
sudo apt-get update
sudo apt-get install \
    ca-certificates \
    curl \
    gnupg \
    lsb-release
Add Docker’s official GPG key:
sudo mkdir -p /etc/apt/keyrings
curl -fsSL https://download.docker.com/linux/ubuntu/gpg | sudo gpg --dearmor -o /etc/apt/keyrings/docker.gpg
Use the following command to set up the repository:
echo \
  "deb [arch=$(dpkg --print-architecture) signed-by=/etc/apt/keyrings/docker.gpg] https://download.docker.com/linux/ubuntu \
  $(lsb_release -cs) stable" | sudo tee /etc/apt/sources.list.d/docker.list > /dev/null
Install Docker Engine
Update the aptpackage index, and install the latest version of Docker Engine, containerd, and Docker Compose, or go to the next step to install a specific version:
sudo apt-get update
sudo apt-get install docker-ce docker-ce-cli containerd.io docker-compose-plugin
Receiving a GPG error when running apt-get update?
Your default umask may not be set correctly, causing the public key file for the repo to not be detected. Run the following command and then try to update your repo again: sudo chmod a+r /etc/apt/keyrings/docker.gpg
To install a specific version of Docker Engine, list the available versions in the repo, then select and install:
a. List the versions available in your repo:
apt-cache madison docker-ceInstall a specific version using the version string from the second column, for example, 5:20.10.16~3-0~ubuntu-jammy
sudo apt-get install docker-ce=<VERSION_STRING> docker-ce-cli=<VERSION_STRING> containerd.io docker-compose-pluginVerify that Docker Engine is installed correctly by running the hello-world image.
sudo docker run hello-worldcontainer
A container is a standard unit of software that packages up code and all its dependencies so the application runs quickly and reliably from one computing environment to another. A Docker container image is a lightweight, standalone, executable package of software that includes everything needed to run an application: code, runtime, system tools, system libraries and settings.
Containers isolate software from its environment and ensure that it works uniformly despite differences for instance between development and staging.
To do this, containers take advantage of a form of operating system (OS) virtualization in which features of the OS (in the case of the Linux kernel, namely the namespaces and cgroups primitives) are leveraged to both isolate processes and control the amount of CPU, memory, and disk that those processes have access to.
Comparing Containers and Virtual Machines
Containers and virtual machines have similar resource isolation and allocation benefits, but function differently because containers virtualize the operating system instead of hardware. Containers are more portable and efficient.
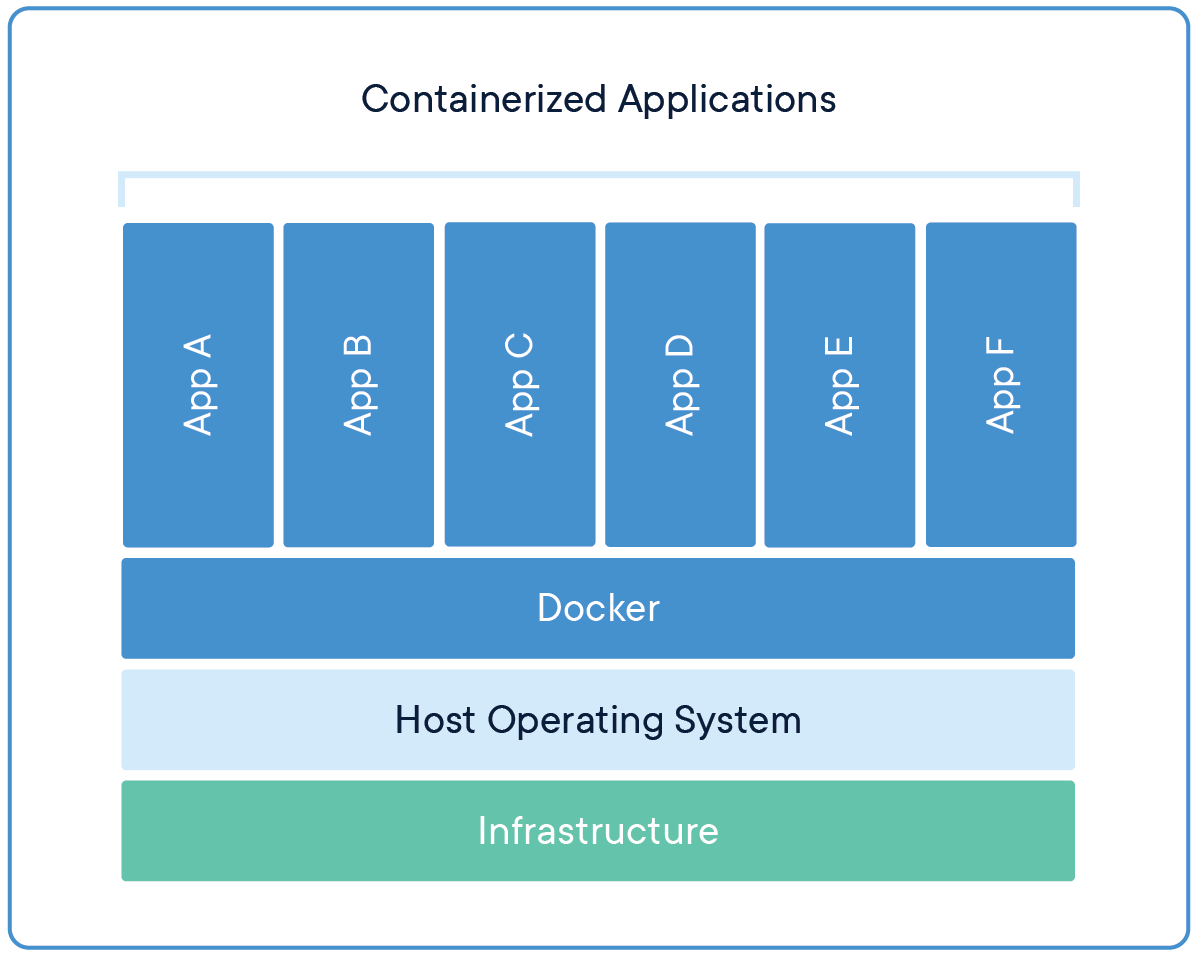
Containers are an abstraction at the app layer that packages code and dependencies together. Multiple containers can run on the same machine and share the OS kernel with other containers, each running as isolated processes in user space. Containers take up less space than VMs (container images are typically tens of MBs in size), can handle more applications and require fewer VMs and Operating systems.
VIRTUAL MACHINES
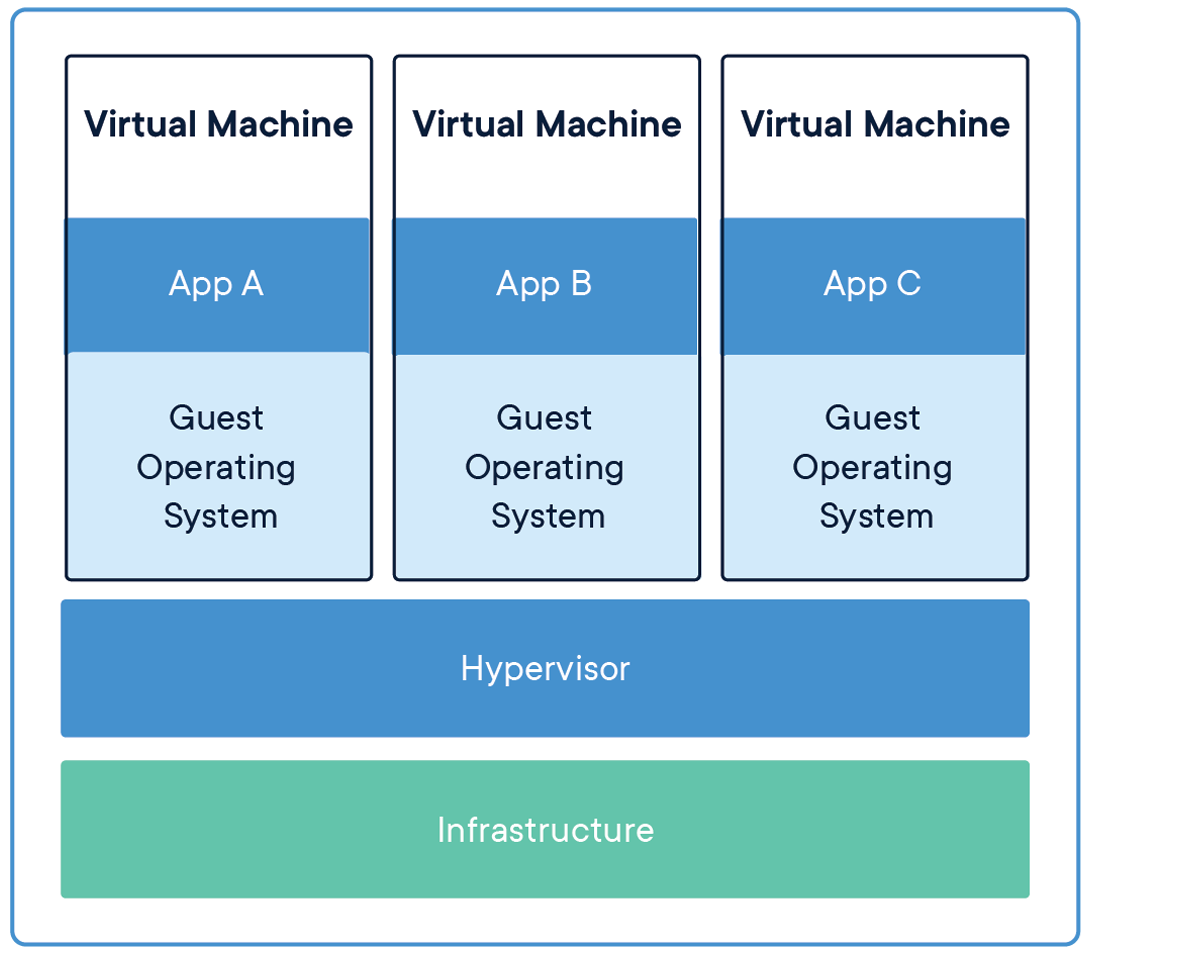
Virtual machines (VMs) are an abstraction of physical hardware turning one server into many servers. The hypervisor allows multiple VMs to run on a single machine. Each VM includes a full copy of an operating system, the application, necessary binaries and libraries – taking up tens of GBs. VMs can also be slow to boot.
In traditional virtualization—whether it be on-premises or in the cloud—a hypervisor is leveraged to virtualize physical hardware. Each VM then contains a guest OS, a virtual copy of the hardware that the OS requires to run, along with an application and its associated libraries and dependencies.
Instead of virtualizing the underlying hardware, containers virtualize the operating system (typically Linux) so each individual container contains only the application and its libraries and dependencies. The absence of the guest OS is why containers are so lightweight and, thus, fast and portable.
Benefits of containerization
- Lightweight: Containers share the machine OS kernel, eliminating the need for a full OS instance per application and making container files small and easy on resources. Their smaller size, especially compared to virtual machines, means they can spin up quickly and better support cloud-native applications that scale horizontally.
- Portable and platform independent: Containers carry all their dependencies with them, meaning that software can be written once and then run without needing to be re-configured across laptops, cloud, and on-premises computing environments.
- Supports modern development and architecture: Due to a combination of their deployment portability/consistency across platforms and their small size, containers are an ideal fit for modern development and application patterns—such as DevOps, serverless, and microservices—that are built are regular code deployments in small increments.
- Improves utilization: Like VMs before them, containers enable developers and operators to improve CPU and memory utilization of physical machines. Where containers go even further is that because they also enable microservice architectures, application components can be deployed and scaled more granularly, an attractive alternative to having to scale up an entire monolithic application because a single component is struggling with load.
use cases of containers
- Microservices: Containers are small and lightweight, which makes them a good match for microservice architectures where applications are constructed of many, loosely coupled and independently deployable smaller services.
- DevOps: The combination of microservices as an architecture and containers as a platform is a common foundation for many teams that embrace DevOps as the way they build, ship and run software.
- Hybrid, multi-cloud: Because containers can run consistently anywhere, across laptop, on-premises and cloud environments, they are an ideal underlying architecture for hybrid cloud and multicloud scenarios where organizations find themselves operating across a mix of multiple public clouds in combination with their own data center.
- Application modernizing and migration: One of the most common approaches to application modernization starts by containerizing them so that they can be migrated to the cloud.
What are microservices?
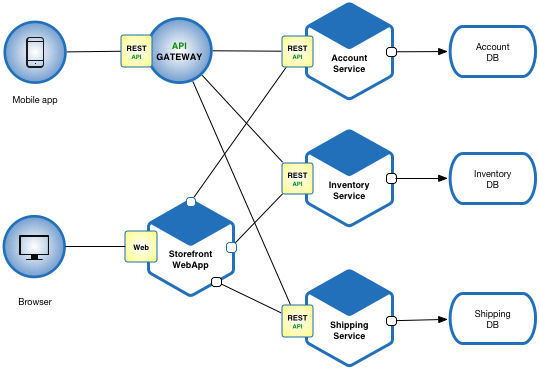
Microservices - also known as the microservice architecture - is an architectural style that structures an application as a collection of services that are
- Highly maintainable and testable
- Loosely coupled
- Independently deployable
- Organized around business capabilities
- Owned by a small team
The microservice architecture enables the rapid, frequent and reliable delivery of large, complex applications. It also enables an organization to evolve its technology stack.
containerization
When containerizing an application, the process includes packaging an application with its relevant environment variables, configuration files, libraries, and software dependencies. The result is a container image that can then be run on a container platform.
Container orchestration with Kubernetes
As companies began embracing containers—often as part of modern, cloud-native architectures—the simplicity of the individual container began colliding with the complexity of managing hundreds (even thousands) of containers across a distributed system.
To address this challenge, container orchestration emerged as a way managing large volumes of containers throughout their lifecycle, including:
- Provisioning
- Redundancy
- Health monitoring
- Resource allocation
- Scaling and load balancing
- Moving between physical hosts
While many container orchestration platforms (such as Apache Mesos, Nomad, and Docker Swarm) were created to help address these challenges, Kubernetes, an open source project introduced by Google in 2014, quickly became the most popular container orchestration platform, and it is the one the majority of the industry has standardized on.
Kubernetes enables developers and operators to declare a desired state of their overall container environment through YAML files, and then Kubernetes does all the hard work establishing and maintaining that state, with activities that include deploying a specified number of instances of a given application or workload, rebooting that application if it fails, load balancing, auto-scaling, zero downtime deployments and more.
What Are Namespaces and cgroups, and How Do They Work?
https://www.nginx.com/blog/what-are-namespaces-cgroups-how-do-they-work/
“Namespaces are a feature of the Linux kernel that partitions kernel resources such that one set of processes sees one set of resources while another set of processes sees a different set of resources.”
In other words, the key feature of namespaces is that they isolate processes from each other. On a server where you are running many different services, isolating each service and its associated processes from other services means that there is a smaller blast radius for changes, as well as a smaller footprint for security‑related concerns.
types of namespaces : user namespace, process ID(PID) namespace, network namespace, mount namespace, IPC namespace, UTS namespace.
A control group (cgroup) is a Linux kernel feature that limits, accounts for, and isolates the resource usage (CPU, memory, disk I/O, network, and so on) of a collection of processes.
Cgroups provide the following features:
- Resource limits – You can configure a cgroup to limit how much of a particular resource (memory or CPU, for example) a process can use.
- Prioritization – You can control how much of a resource (CPU, disk, or network) a process can use compared to processes in another cgroup when there is resource contention.
- Accounting – Resource limits are monitored and reported at the cgroup level.
- Control – You can change the status (frozen, stopped, or restarted) of all processes in a cgroup with a single command.
So basically you use cgroups to control how much of a given key resource (CPU, memory, network, and disk I/O) can be accessed or used by a process or set of processes. Cgroups are a key component of containers because there are often multiple processes running in a container that you need to control together. In a Kubernetes environment, cgroups can be used to implement resource requests and limits and corresponding QoS classes at the pod level.
Run the Docker daemon as a non-root user (Rootless mode)
Rootless mode allows running the Docker daemon and containers as a non-root user to mitigate potential vulnerabilities in the daemon and the container runtime.
Method 1 – Add user to Docker group
1. To run Docker as a non-root user, you have to add your user to the docker group.
2. Create a docker group if there isn’t one:
$ sudo groupadd docker
3. Add your user to the docker group:
$ sudo usermod -aG docker [non-root user]
eg. sudo usermod -aG docker gourav
4. Log out and log back in so that your group membership is re-evaluated.
I’ve just installed docker but I have to run it with sudo every time. If I don’t add sudo I get the following error:
Got permission denied while trying to connect to the Docker daemon socket at unix:///var/run/docker.sock: Get http://%2Fvar%2Frun%2Fdocker.sock/v1.40/containers/json: dial unix /var/run/docker.sock: connect: permission deniedsolution: →
sudo chmod 666 /var/run/docker.sockMethod 2 – Using Dockerfile (USER instruction)
Docker provides a simple yet powerful solution to change the container’s privilege to a non-root user and thus thwart malicious root access to the Docker host. This change to the non-root user can be accomplished using the -u or –user option of the docker run subcommand or the USER instruction in the Dockerfile.
1. Edit the Dockerfile that creates a non-root privilege user and modify the default root user to the newly-created non-root privilege user, as shown here:
##########################################
# Dockerfile to change from root to
# non-root privilege
###########################################
# Base image is CentOS 7
FROM Centos:7
# Add a new user "john" with user id 8877
RUN useradd -u 8877 john
# Change to non-root privilege
USER john
2. Proceed to build the Docker image using the “docker build” subcommand, as depicted here:
$ sudo docker build -t nonrootimage .3. Finally, let’s verify the current user of our container using the id command in a docker run subcommand:
$ sudo docker run --rm nonrootimage id
uid=8877(john) gid=8877(john) groups=8877(john)
Evidently, the container’s user, group, and the groups are now changed to a non-root user.
docker images
https://www.tutorialspoint.com/docker/docker_images.htm
In Docker, everything is based on Images. An image is a combination of a file system and parameters. Let’s take an example of the following command in Docker
display all docker images :
docker images
display image id only
docker images -q
docker run hello-world
Now let’s look at how we can use the CentOS image available in Docker Hub to run CentOS on our Ubuntu machine. We can do this by executing the following command on our Ubuntu machine −
sudo docker run –it centos /bin/bash
We used this command to create a new container and then used the Ctrl+P+Q command to exit out of the container. It ensures that the container still exists even after we exit from the container.
Now there is an easier way to attach to containers and exit them cleanly without the need of destroying them. One way of achieving this is by using the nsenter command.
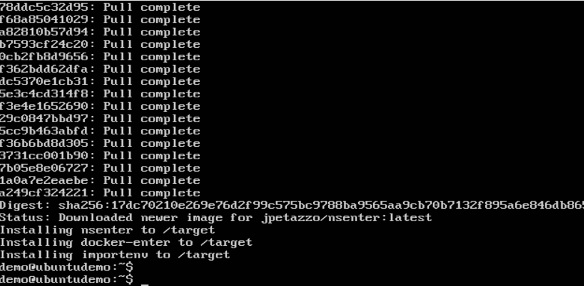
Before we run the nsenter command, you need to first install the nsenter image. It can be done by using the following command −
docker run --rm -v /usr/local/bin:/target jpetazzo/nsenter
Before we use the nsenter command, we need to get the Process ID of the container, because this is required by the nsenter command. We can get the Process ID via the Docker inspect command and filtering it via the Pid.
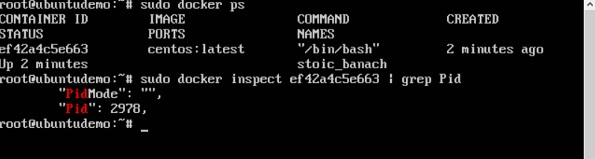
As seen in the above screenshot, we have first used the docker ps command to see the running containers. We can see that there is one running container with the ID of ef42a4c5e663.
We then use the Docker inspect command to inspect the configuration of this container and then use the grep command to just filter the Process ID. And from the output, we can see that the Process ID is 2978.
Now that we have the process ID, we can proceed forward and use the nsenter command to attach to the Docker container.
nsenter
This method allows one to attach to a container without exiting the container.
Syntax
nsenter –m –u –n –p –i –t containerID command
Options
- u is used to mention the Uts namespace
- m is used to mention the mount namespace
- n is used to mention the network namespace
- p is used to mention the process namespace
- i s to make the container run in interactive mode.
- t is used to connect the I/O streams of the container to the host OS.
- containerID − This is the ID of the container.
- Command − This is the command to run within the container.
Return Value
None
Example
sudo nsenter –m –u –n –p –i –t 2978 /bin/bashOutput
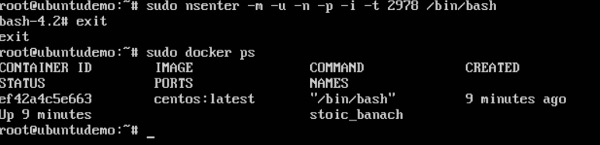
From the output, we can observe the following points −
- The prompt changes to the bash shell directly when we issue the nsenter command.
- We then issue the exit command. Now normally if you did not use the nsenter command, the container would be destroyed. But you would notice that when we run the nsenter command, the container is still up and running.
remove an image
docker rmi ImageID
docker image rm centos:latest --force
This command is used see the details of an image or container.
docker inspect Repository
- Repository − This is the name of the Image
docker containers
https://www.tutorialspoint.com/docker/docker_containers.htm
sudo docker run –it centos /bin/bash
docker ps
docker ps -a
With this command, you can see all the commands that were run with an image via a container.
docker history imageID
run a docker container in the background or detached mode in the terminal
To run a docker container in the background or the detached mode from the terminal, you can use the docker run command followed by the -d flag (or detached flag) and followed by the name of the docker image you need to use in the terminal.
# Run docker container in the background
# or detached mode in the terminal
docker run -d <YOUR_DOCKER_IMAGE_NAME>
Docker - Working with Containers
With this command, you can see the top processes within a container.
docker top ContainerIDdocker stop ContainerIDThis command is used to delete a container.
docker rm ContainerID
stat about container
docker stats ContainerID
attach to a container
This command is used to attach to a running container. → brings detached docker container in foreground
docker attach ContainerID
pause container
docker pause ContainerID
docker unpause ContainerID
This command is used to kill the processes in a running container.
docker kill ContainerIDcheck status of docker daemon
service docker status
stop docker daemon
sudo service docker stop
service docker start
docker file
Docker gives you the capability to create your own Docker images, and it can be done with the help of Docker Files. A Docker File is a simple text file with instructions on how to build your images.
Step 1 − Create a file called Docker File and edit it using vim. Please note that the name of the file has to be "Dockerfile" with "D" as capital.
sudo vim DockerfileStep 2 − Build your Docker File using the following instructions.
#This is a sample Image
FROM ubuntu
MAINTAINER demousr@gmail.com

RUN apt-get update
RUN apt-get install –y nginx
CMD [“echo”,”Image created”]
save and exit the file :wq command
We created our Docker File . It’s now time to build the Docker File. The Docker File can be built with the following command −
docker builddocker build -t ImageName:TagName dir
- t − is to mention a tag to the image
- ImageName − This is the name you want to give to your image.
- TagName − This is the tag you want to give to your image.
- Dir − The directory where the Docker File is present.
When you run the Docker images command , you would then be able to see your new image.
Docker - Public Repositories | Docker hub or Create Docker Images for Docker Hub
https://www.pluralsight.com/guides/create-docker-images-docker-hub
pulling an image:
docker pull alpine
docker pull jenkins/jenkins
Managing Ports
if you want to access the application in the container via a port number, you need to map the port number of the container to the port number of the Docker host. Let’s look at an example of how this can be achieved.
In our example, we are going to download the Jenkins container from Docker Hub. We are then going to map the Jenkins port number to the port number on the Docker host.
docker pull jenkins/jenkins
To understand what ports are exposed by the container, you should use the Docker inspect command to inspect the image.
Let’s now learn more about this inspect command
docker inspect Container/Image
sudo docker inspect jenkins/jenkins
The output of the inspect command gives a JSON output. If we observe the output, we can see that there is a section of "ExposedPorts" and see that there are two ports mentioned. One is the data port of 8080 and the other is the control port of 50000.
To run Jenkins and map the ports, you need to change the Docker run command and add the ‘p’ option which specifies the port mapping. So, you need to run the following command −
sudo docker run -p 8080:8080 -p 50000:50000 jenkins/jenkins
The left-hand side of the port number mapping is the Docker host port to map to and the right-hand side is the Docker container port number.
When you open the browser and navigate to the Docker host on port 8080, you will see Jenkins up and running.
Private Registries - docker
https://www.tutorialspoint.com/docker/docker_private_registries.htm
You might have the need to have your own private repositories. You may not want to host the repositories on Docker Hub. For this, there is a repository container itself from Docker. Let’s see how we can download and use the container for registry.
Use the Docker run command to download the private registry. This can be done using the following command.
sudo docker run –d –p 5000:5000 –-name registry registry:2
Now let’s tag one of our existing images so that we can push it to our local repository. In our example, since we have the centos image available locally, we are going to tag it to our private repository and add a tag name of centos.
sudo docker tag 67591570dd29 localhost:5000/centosNow let’s use the Docker push command to push the repository to our private repository.
sudo docker push localhost:5000/centosNow let’s delete the local images we have for centos using the docker rmi commands. We can then download the required centos image from our private repository.
sudo docker rmi centos:latest
sudo docker rmi 67591570dd29
Now that we don’t have any centos images on our local machine, we can now use the following Docker pull command to pull the centos image from our private repository.
sudo docker pull localhost:5000/centosBuilding a Web Server Docker File - apache
https://www.journaldev.com/50585/apache-web-server-dockerfile
FROM ubuntu
RUN apt-get update
RUN apt-get install –y apache2
RUN apt-get install –y apache2-utils
RUN apt-get clean
EXPOSE 80
CMD ["apache2ctl", "-D", "FOREGROUND"]
Run the Docker build command to build the Docker file. It can be done using the following command −
sudo docker build –t="mywebserver" .
docker logs containerID
Running NGINX Open Source in a Docker Container
docker run --name mynginx1 -p 80:80 -d nginxDocker - Instruction Commands
These are commands that are put in the Docker File.
- CMD Instruction
This command is used to execute a command at runtime when the container is executed.
CMD command param1
- command − This is the command to run when the container is launched.
- param1 − This is the parameter entered to the command.
The command will execute accordingly.
Example
In our example, we will enter a simple Hello World echo in our Docker File and create an image and launch a container from it.
Step 1 − Build the Docker File with the following commands −
FROM ubuntu
MAINTAINER demousr@gmail.com
CMD [“echo” , “hello world”]
Here, the CMD is just used to print hello world.
- ENTRYPOINT
This command can also be used to execute commands at runtime for the container. But we can be more flexible with the ENTRYPOINT command.
Syntax
ENTRYPOINT command param1
Options
- command − This is the command to run when the container is launched.
- param1 − This is the parameter entered into the command.
Return Value
The command will execute accordingly.
Example
Let’s take a look at an example to understand more about ENTRYPOINT. In our example, we will enter a simple echo command in our Docker File and create an image and launch a container from it.
Step 1 − Build the Docker File with the following commands −
FROM ubuntu
MAINTAINER demousr@gmail.com
ENTRYPOINT [“echo”]- ENV
This command is used to set environment variables in the container.
Syntax
ENV key value
Options
- Key − This is the key for the environment variable.
- value − This is the value for the environment variable.
Return Value
The command will execute accordingly.
Example
In our example, we will enter a simple echo command in our Docker File and create an image and launch a container from it.
Step 1 − Build the Docker File with the following commands −
FROM ubuntu
MAINTAINER demousr@gmail.com
ENV var1=Tutorial var2=point
build, run container and then Finally, execute the env command to see the environment variables.
- WORKDIR
This command is used to set the working directory of the container.
Syntax
WORKDIR dirname
Options
- dirname − The new working directory. If the directory does not exist, it will be added.
Return Value
The command will execute accordingly.
Example
In our example, we will enter a simple echo command in our Docker File and create an image and launch a container from it.
Step 1 − Build the Docker File with the following commands −
FROM ubuntu
MAINTAINER demousr@gmail.com
WORKDIR /newtemp
CMD pwd
Container Linking
https://www.section.io/engineering-education/an-overview-of-docker-container-linking/
https://www.tutorialspoint.com/docker/docker_container_linking.htm
Although Docker introduced a Docker networking feature that enhances communication between containers, container linking is still in use. It is important to understand container linking since it is a resourceful alternative to networking.
Docker container linking allows multiple containers to be linked to each other. It allows the recipient container to get connection information relating to the source container. You should use Docker container linking when you are using default bridge networks and when you want to share environmental variables.
Docker consists of a linking system that allows multiple containers to be linked together. This linking system allows connection information to be sent from a source container to a recipient container. In container orchestration, communication between containers is essential. This is where Docker container linking comes in.
Container linking is not limited to two containers. It can be applied to as many containers as possible. The linking system can establish a link of multiple containers to enhance communication between them.
Container Linking allows multiple containers to link with each other. It is a better option than exposing ports. Let’s go step by step and learn how it works.
Step 1 − Download the Jenkins image, if it is not already present, using the Jenkins pull command.

Step 2 − Once the image is available, run the container, but this time, you can specify a name to the container by using the –-name option. This will be our source container.

Step 3 − Next, it is time to launch the destination container, but this time, we will link it with our source container. For our destination container, we will use the standard Ubuntu image.

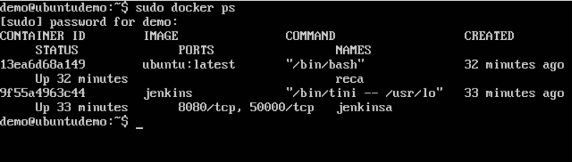
When you do a docker ps, you will see both the containers running.
Step 4 − Now, attach to the receiving container.
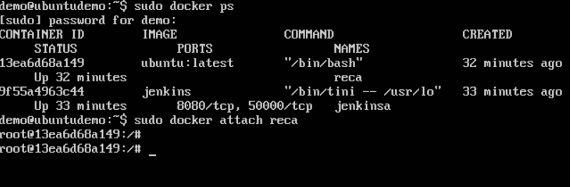
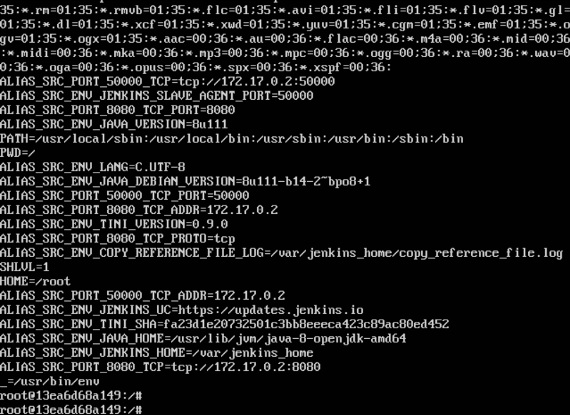
Then run the env command. You will notice new variables for linking with the source container.
Advantages and disadvantages of Docker container linking
→ Advantages
- It provides an effective way of enhancing communication between containers.
- It supports the sharing of environmental variables, unlike in Docker networks.
- After installing Docker, the default
bridgenetwork is created automatically.
- It enhances the isolation of containers that are not linked to a given bridge. Containers that are not connected to the same bridge cannot establish direct communication between them.
→ Disadvantages
- With the introduction of the Docker networks feature, container linking may be removed in the future.
- The user-defined bridges in the Docker networks feature create better isolation of containers than the default
bridgenetworks in container linking.
Communication across links is achieved through two main ways: sharing environmental variables, and updating the /etc/hosts file.
some docker commands to clean images and unused containers
See all the existing images:
docker images -a
See all the existing containers:
docker ps -a
Delete single image:
docker images -a
docker rmi <IMAGE_ID>
Stop single container:
docker ps -a
docker stop <CONTAINER_ID>
Stop multiple containers:
docker ps -a
docker stop <CONTAINER_ID1> <CONTAINER_ID2>
Delete single container:
docker ps -a
docker rm <CONTAINER_ID>
Delete multiple images:
docker images -a
docker rmi <IMAGE_ID1> <IMAGE_ID2>
Delete multiple stopped containers:
docker ps -a
docker rm <CONTAINER_ID1> <CONTAINER_ID2>
Delete images only in a single command:
docker rmi -f $(docker images -a -q)
Delete both containers and images in a single command:
docker rm $(docker ps -a -q) && docker rmi -f $(docker images -a -q)
To prune all containers:
docker container pruneDocker Storage
https://www.tutorialspoint.com/docker/docker_storage.htm
Docker has multiple storage drivers that allow one to work with the underlying storage devices. The following table shows the different storage drivers along with the technology used for the storage drivers:
overlay or overlay2,
aufs,
brtfs,
devicemanager,
vfs,
zfs
to see the storage driver being used, issue the docker info command.
The command will provide all relative information on the Docker component installed on the Docker Host.
docker infoData Volumes
In Docker, you have a separate volume that can shared across containers. These are known as data volumes. Some of the features of data volume are −
- They are initialized when the container is created.
- They can be shared and also reused amongst many containers.
- Any changes to the volume itself can be made directly.
- They exist even after the container is deleted.
sudo docker inspect Jenkins > tmp.txt
When you view the text file using the more command, you will see an entry as JENKINS_HOME=/var/Jenkins_home.
This is the mapping that is done within the container via the Jenkins image.
Now suppose you wanted to map the volume in the container to a local volume, then you need to specify the –v option when launching the container. An example is shown below −
sudo docker run –d –v /home/demo:/var/jenkins_home –p 8080:8080 –p 50000:50000 jenkinsThe –v option is used to map the volume in the container which is /var/jenkins_home to a location on our Docker Host which is /home/demo.
Now if you go to the /home/demo location on your Docker Host after launching your container, you will see all the container files present there.
Changing the Storage Driver for a Container
If you wanted to change to the storage driver used for a container, you can do so when launching the container. This can be done by using the –volume-driver parameter when using the docker run command. An example is given below −
sudo docker run –d --volume-driver=flocker
   –v /home/demo:/var/jenkins_home –p 8080:8080 –p 50000:50000 jenkins
To confirm that the driver has been changed, first let’s use the docker ps command to see the running containers and get the container ID. So, issue the following command first −
sudo docker ps
sudo docker inspect 9bffb1bfebee > temp.txt
If you browse through the text file and go to the line which says VolumeDriver , you will see that the driver name has been changed.
Creating a Volume
A volume can be created beforehand using the docker command. Let’s learn more about this command.
Syntax
docker volume create –-name=volumename –-opt options
Options
- name − This is the name of the volume which needs to be created.
- opt − These are options you can provide while creating the volume.
Return Value
The command will output the name of the volume created.
Example
sudo docker volume create –-name = demo –opt o = size = 100mIn the above command, we are creating a volume of size 100MB and with a name of demo.
Output
The output of the above command is shown below −

Listing all the Volumes
You can also list all the docker volumes on a docker host. More details on this command is given below −
Syntax
docker volume lsDocker - Networking
https://earthly.dev/blog/docker-networking/
Docker networking is primarily used to establish communication between Docker containers and the outside world via the host machine where the Docker daemon is running.
Docker takes care of the networking aspects so that the containers can communicate with other containers and also with the Docker Host. If you do an ifconfig on the Docker Host, you will see the Docker Ethernet adapter. This adapter is created when Docker is installed on the Docker Host
list all the networks associated with Docker on the host :
docker network ls
see more details on the network associated with Docker:
docker network inspect networkname
Example
sudo docker network inspect bridgeCreating Your Own New Network
One can create a network in Docker before launching containers. This can be done with the following command −
docker network create –-driver drivername name
Example
sudo docker network create –-driver bridge new_nwYou can now attach the new network when launching the container. So let’s spin up an Ubuntu container with the following command −
sudo docker run –it –network=new_nw ubuntu:latest /bin/bashAnd now when you inspect the network via the following command, you will see the container attached to the network.
sudo docker network inspect new_nwDocker networking differs from virtual machine (VM) or physical machine networking in a few ways:
- Virtual machines are more flexible in some ways as they can support configurations like NAT and host networking. Docker typically uses a bridge network, and while it can support host networking, that option is only available on Linux.
- When using Docker containers, network isolation is achieved using a network namespace, not an entirely separate networking stack.
- You can run hundreds of containers on a single-node Docker host, so it’s required that the host can support networking at this scale. VMs usually don’t run into these network limits as they typically run fewer processes per VM.
Docker allows you to create three different types of network drivers out-of-the-box: bridge, host, and none. However, they may not fit every use case, so we’ll also explore user-defined networks such as overlay and macvlan. Let’s take a closer look at each one.
The Bridge Driver
This is the default. Whenever you start Docker, a bridge network gets created and all newly started containers will connect automatically to the default bridge network.
You can use this whenever you want your containers running in isolation to connect and communicate with each other. Since containers run in isolation, the bridge network solves the port conflict problem. Containers running in the same bridge network can communicate with each other, and Docker uses iptables on the host machine to prevent access outside of the bridge.
Let’s look at some examples of how a bridge network driver works.
- Check the available network by running the
docker network lscommand
- Start two busybox containers named
busybox1andbusybox2in detached mode by passing theditflag.
verify that the containers are attached to the bridge network.
docker network inspect bridge
Under the container’s key, you can observe that two containers (busybox1 and busybox2) are listed with information about IP addresses. Since containers are running in the background, attach to the busybox1 container and try to ping to busybox2 with its IP address.
$ docker attach busybox1
/ # whoami
root
/ # hostname -i
172.17.0.2
/ # ping 172.17.0.3
PING 172.17.0.3 (172.17.0.3): 56 data bytes
64 bytes from 172.17.0.3: seq=0 ttl=64 time=2.083 ms
64 bytes from 172.17.0.3: seq=1 ttl=64 time=0.144 ms
/ # ping busybox2
ping: bad address 'busybox2'
Observe that the ping works by passing the IP address of busybox2 but fails when the container name is passed instead.
The downside with the bridge driver is that it’s not recommended for production; the containers communicate via IP address instead of automatic service discovery to resolve an IP address to the container name. Every time you run a container, a different IP address gets assigned to it. It may work well for local development or CI/CD, but it’s definitely not a sustainable approach for applications running in production.
Another reason not to use it in production is that it will allow unrelated containers to communicate with each other, which could be a security risk. I’ll cover how you can create custom bridge networks later.
The Host Driver
As the name suggests, host drivers use the networking provided by the host machine. And it removes network isolation between the container and the host machine where Docker is running. For example, If you run a container that binds to port 80 and uses host networking, the container’s application is available on port 80 on the host’s IP address. You can use the host network if you don’t want to rely on Docker’s networking but instead rely on the host machine networking.
One limitation with the host driver is that it doesn’t work on Docker desktop: you need a Linux host to use it. This article focuses on Docker desktop, but I’ll show you the commands required to work with the Linux host.
The following command will start an Nginx image and listen to port 80 on the host machine:
docker run --rm -d --network host --name my_nginx nginx
You can access Nginx by hitting the http://localhost:80/ url.
The downside with the host network is that you can’t run multiple containers on the same host having the same port. Ports are shared by all containers on the host machine network.
The None Driver
The none network driver does not attach containers to any network. Containers do not access the external network or communicate with other containers. You can use it when you want to disable the networking on a container.
The Overlay Driver
The Overlay driver is for multi-host network communication, as with Docker Swarm or Kubernetes. It allows containers across the host to communicate with each other without worrying about the setup. Think of an overlay network as a distributed virtualized network that’s built on top of an existing computer network.
To create an overlay network for Docker Swarm services, use the following command:
docker network create -d overlay my-overlay-networkTo create an overlay network so that standalone containers can communicate with each other, use this command:
docker network create -d overlay --attachable my-attachable-overlayThe Macvlan Driver
This driver connects Docker containers directly to the physical host network. As per the Docker documentation:
“Macvlan networks allow you to assign a MAC address to a container, making it appear as a physical device on your network. The Docker daemon routes traffic to containers by their MAC addresses. Using the macvlan driver is sometimes the best choice when dealing with legacy applications that expect to be directly connected to the physical network, rather than routed through the Docker host’s network stack.”
Macvlan networks are best for legacy applications that need to be modernized by containerizing them and running them on the cloud because they need to be attached to a physical network for performance reasons. A macvlan network is also not supported on Docker desktop for macOS.
Basic Docker Networking Commands
To see which commands list, create, connect, disconnect, inspect, or remove a Docker network, use the docker network help command.
docker network connect
Run the docker network connect 0f8d7a833f42 command to connect the container named wizardly_greiderwith mynetwork. To verify that this container is connected to mynetwork, use the docker inspectcommand.
docker network create mynetwork
docker network ls
This command disconnects a Docker container from the custom mynetwork:
docker network disconnect mynetwork 0f8d7a833f42The following are the Docker commands to remove a specific or all available networks:
$ docker network rm mynetworkdocker network prune
WARNING! This will remove all custom networks not used by at least one container.
Are you sure you want to continue? [y/N]Public Networking
For example, here we’ve mapped the TCP port 80 of the container to port 8080 on the Docker host:
docker run -it --rm nginx -p 8080:80Here, we’ve mapped container TCP port 80 to port 8080 on the Docker host for connections to host IP 192.168.1.100:
docker run -p 192.168.1.100:8085:80 nginxYou can verify this by running the following curl command:
$ curl 192.168.1.100:8085Let me briefly mention DNS configuration for containers. Docker provides your containers with the ability to make basic name resolutions:
$ docker exec busybox2 ping www.google.com
PING www.google.com (216.58.216.196): 56 data bytes
64 bytes from 216.58.216.196: seq=0 ttl=37 time=9.672 ms
64 bytes from 216.58.216.196: seq=1 ttl=37 time=6.110 ms
$ ping www.google.com
PING www.google.com (216.58.216.196): 56 data bytes
64 bytes from 216.58.216.196: icmp_seq=0 ttl=118 time=4.722 ms
Docker containers inherit DNS settings from the host when using a bridge network, so the container will resolve DNS names just like the host by default. To add custom host records to your container, you’ll need to use the relevant --dns* flags outlined here.
Docker Compose Networking
Docker Compose
is a tool for running multi-container applications on Docker, which are defined using the compose YAML file. You can start your applications with a single command: docker-compose up.
By default, Docker Compose creates a single network for each container defined in the compose file. All the containers defined in the compose file connect and communicate through the default network.
$ docker compose help
Let’s understand this with an example. In the following docker-compose.yaml file, we have a WordPress and a MySQL image.
When deploying this setup, docker-compose maps the WordPress container port 80 to port 80 of the host as specified in the compose file. We haven’t defined any custom network, so it should create one for you. Run docker-compose up -d to bring up the services defined in the YAML file:
version: '3.7'
services:
  db:
    image: mysql:8.0.19
    command: '--default-authentication-plugin=mysql_native_password'
    restart: always
    volumes:
      - db_data:/var/lib/mysql
    restart: always
    environment:
      - MYSQL_ROOT_PASSWORD=somewordpress
      - MYSQL_DATABASE=wordpress
      - MYSQL_USER=wordpress
      - MYSQL_PASSWORD=wordpress
  wordpress:
    image: wordpress:latest
    ports:
      - 80:80
    restart: always
    environment:
      - WORDPRESS_DB_HOST=db
      - WORDPRESS_DB_USER=wordpress
      - WORDPRESS_DB_PASSWORD=wordpress
      - WORDPRESS_DB_NAME=wordpress
volumes:
  db_data:
As you can see in the following output, a network named downloads_default is created for you:
$ docker-compose up -d
Creating network "downloads_default" with the default driver
Creating volume "downloads_db_data" with default driver
Pulling db (mysql:8.0.19)...
Navigate to http://localhost:80 in your web browser to access WordPress.
Now let’s inspect this network with the docker network inspect command. The following is the output:
$ docker network inspect downloads_default
In the container sections, you can see that two containers (downloads_db_1 and downloads_wordpress_1) are attached to the default downloads_default network driver, which is the bridge type. Run the following commands to clean up everything:
$ docker-compose downYou can observe that the network created by Compose is deleted, too:
$ docker-compose down -v
Removing network downloads_default
WARNING: Network downloads_default not found.
Removing volume downloads_db_data
The volume created earlier is deleted, and since the network is already deleted after running the previous command, it shows a warning that the default network is not found. That’s fine.
The example we’ve looked at so far covers the default network created by Compose, but what if we want to create our custom network and connect services to it? You will define the user-defined networks using the Compose file. The following is the docker-composeYAML file:
version: '3.7'
services:
  db:
    image: mysql:8.0.19
    command: '--default-authentication-plugin=mysql_native_password'
    restart: always
    volumes:
      - db_data:/var/lib/mysql
    restart: always
    networks:
      - mynetwork
    environment:
      - MYSQL_ROOT_PASSWORD=somewordpress
      - MYSQL_DATABASE=wordpress
      - MYSQL_USER=wordpress
      - MYSQL_PASSWORD=wordpress
  wordpress:
    image: wordpress:latest
    ports:
      - 80:80
    networks:
      - mynetwork
    restart: always
    environment:
      - WORDPRESS_DB_HOST=db
      - WORDPRESS_DB_USER=wordpress
      - WORDPRESS_DB_PASSWORD=wordpress
      - WORDPRESS_DB_NAME=wordpress
volumes:
  db_data:
networks:
  mynetwork:
Let’s bring up the services again after the changing the Docker Compose YAML file:
$ docker-compose up -d
Creating network "downloads_mynetwork" with the default driver
Creating volume "downloads_db_data" with default driver
Creating downloads_wordpress_1 ... done
Creating downloads_db_1        ... done
As you can see, Docker Compose has created the new custom mynetwork, started the containers, and connected them to the custom network. You can inspect it by using the Docker inspect command:
$ docker network inspect downloads_mynetworkdocker logs
Docker has logging mechanisms in place which can be used to debug issues as and when they occur. There is logging at the daemon level and at the container level. Let’s look at the different levels of logging.
Daemon Logging
At the daemon logging level, there are four levels of logging available −
- Debug − It details all the possible information handled by the daemon process.
- Info − It details all the errors + Information handled by the daemon process.
- Errors − It details all the errors handled by the daemon process.
- Fatal − It only details all the fatal errors handled by the daemon process.
sudo service docker stop
sudo dockerd –l debug &
Container Logging
Logging is also available at the container level.
Usage🔗
$ docker logs [OPTIONS] CONTAINER
docker logs gt865rr8f4Docker - Setting Node.js
https://www.tutorialspoint.com/docker/docker_setting_nodejs.htm
Docker - Setting MongoDB
https://www.tutorialspoint.com/docker/docker_setting_mongodb.htm
Docker - Setting NGINX
https://www.tutorialspoint.com/docker/docker_setting_nginx.htm
How To Run Docker in Docker Container
https://devopscube.com/run-docker-in-docker/
Docker in Docker Use Cases
Here are a few use cases to run docker inside a docker container.
- One potential use case for docker in docker is for the CI pipeline, where you need to build and push docker images to a container registry after a successful code build.
- Building Docker images with a VM is pretty straightforward. However, when you plan to use Jenkins Docker-based dynamic agents for your CI/CD pipelines, docker in docker comes as a must-have functionality.
- Sandboxed environments.
- For experimental purposes on your local development workstation.
Run Docker in a Docker Container
There are three ways to achieve docker in docker
- Run docker by mounting
docker.sock(DooD Method)
- dind method
- Using Nestybox sysbox Docker runtime
Is running Docker in Docker secure? Running docker in docker usingdocker.sockanddindmethod is less secure as it has complete privileges over the docker daemon
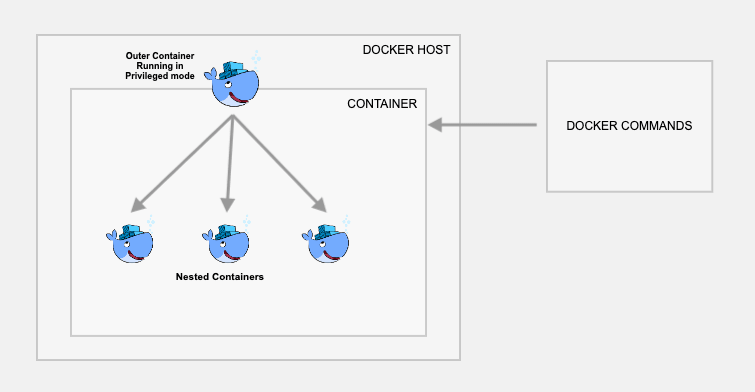
Method 1: Docker in Docker Using [/var/run/docker.sock]
docker-compose file for running jenkins. Here I have shown you this yaml file for you to see how docker is mounted. Focus on volumes. - /var/run/docker.sock:/var/run/docker.sock
# docker-compose.yaml
  version: '3.7'
  services:
    jenkins:
      image: jenkins/jenkins:lts
      privileged: true
      user: root
      ports:
        - 8080:8080
        - 50000:50000
      container_name: jenkins
      volumes:
      - /home/${myname}/jenkins_compose/jenkins_configuration:/var/jenkins_home
      - /var/run/docker.sock:/var/run/docker.sock
    agent:
      image: jenkins/ssh-agent:jdk11
      privileged: true
      user: root
      container_name: agent
      expose:
        - 22
      environment:
        - JENKINS_AGENT_SSH_PUBKEY=ssh-rsa AAAuK479zkZC0UdGzjcRPu1IBU++9Wkn0= gourav@gourav
		# here the key is shortend for presentation only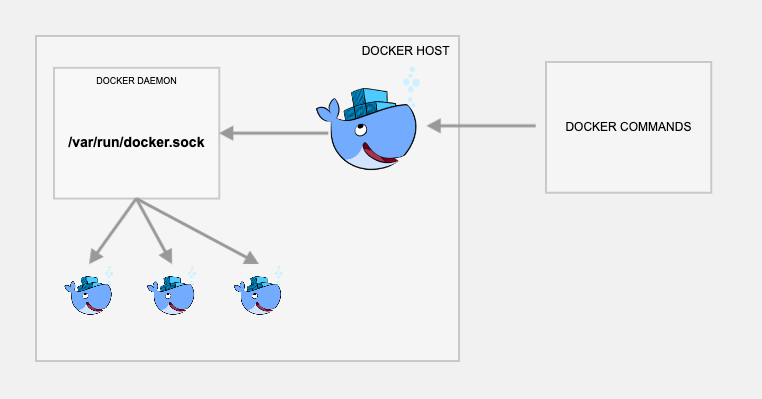
What is /var/run/docker.sock?
/var/run/docker.sock is the default Unix socket. Sockets are meant for communication between processes on the same host. Docker daemon by default listens to docker.sock. If you are on the same host where Docker daemon is running, you can use the /var/run/docker.sock to manage containers.
For example, if you run the following command, it would return the version of docker engine.
curl --unix-socket /var/run/docker.sock http://localhost/versionNow that you have a bit of understanding of what is docker.sock, let’s see how to run docker in docker using docker.sock
To run docker inside docker, all you have to do it just run docker with the default Unix socket docker.sock as a volume.
For example,
docker run -v /var/run/docker.sock:/var/run/docker.sock \
           -ti docker
Just a word of caution: If your container gets access to docker.sock, it means it has more privileges over your docker daemon. So when used in real projects, understand the security risks, and use it.
Now, from within the container, you should be able to execute docker commands for building and pushing images to the registry.
Here, the actual docker operations happen on the VM host running your base docker container rather than from within the container. Meaning, even though you are executing the docker commands from within the container, you are instructing the docker client to connect to the VM host docker-engine through docker.sock
To test his setup, use the official docker image from the docker hub. It has docker the docker binary in it.
Follow the steps given below to test the setup.
Step 1: Start Docker container in interactive mode mounting the docker.sock as volume. We will use the official docker image.
docker run -v /var/run/docker.sock:/var/run/docker.sock -ti dockerStep 2: Once you are inside the container, execute the following docker command.
docker pull ubuntu
Step 3: When you list the docker images, you should see the ubuntu image along with other docker images in your host VM.
docker imagesStep 4: Now create a Dockerfile inside test directory.
mkdir test && cd test
vi Dockerfile
Copy the following Dockerfile contents to test the image build from within the container.
FROM ubuntu:18.04

LABEL maintainer="Bibin Wilson <bibinwilsonn@gmail.com>"

RUN apt-get update && \
    apt-get -qy full-upgrade && \
    apt-get install -qy curl && \
    apt-get install -qy curl && \
    curl -sSL https://get.docker.com/ | sh
Build the Dockerfile
docker build -t test-image .Method 2: Docker in Docker Using dind
This method actually creates a child container inside a container. Use this method only if you really want to have the containers and images inside the container. Otherwise, I would suggest you use the first approach.
For this, you just need to use the official docker image with dind tag. The dind image is baked with required utilities for Docker to run inside a docker container.
Follow the steps to test the setup.
Note: This requires your container to be run in privileged mode.
Step 1: Create a container named dind-test with docker:dind image
docker run --privileged -d --name dind-test docker:dindStep 2: Log in to the container using exec.
docker exec -it dind-test /bin/shNow, perform steps 2 to 4 from the previous method and validate docker command-line instructions and image build.
Method 3: Docker in Docker Using Sysbox Runtime
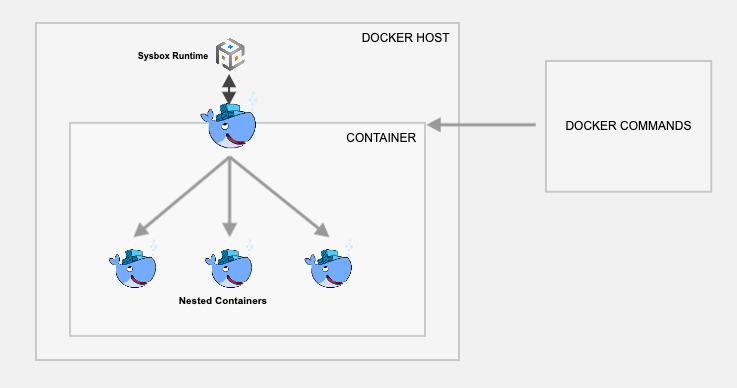
Method 1 & 2 has some disadvantages in terms of security because of running the base containers in privileged mode. Nestybox tries to solve that problem by having a sysbox Docker runtime.
If you create a container using Nestybox sysbox runtime, it can create virtual environments inside a container that is capable of running systemd, docker, kubernetes without having privileged access to the underlying host system.
Explaining sysbox demands significant comprehension so I’ve excluded from the scope of this post. Please refer this page to understand fully about sysbox
To get a glimpse, let us now try out an example
Step 1: Install sysbox runtime environment. Refer to this page to get the latest official instructions on installing sysbox runtime.
Step 2: Once you have the sysbox runtime available, all you have to do is start the docker container with a sysbox runtime flag as shown below. Here we are using the official docker dind image.
docker run --runtime=sysbox-runc --name sysbox-dind -d docker:dindStep 3: Now take an exec session to the sysbox-dind container.
docker exec -it sysbox-dind /bin/shNow, you can try building images with the Dockerfile as shown in the previous methods.
Docker Build: A Beginner’s Guide to Building Docker Images
Building your first Docker image
It’s time to get our hands dirty and see how Docker build works in a real-life app. We’ll generate a simple Node.js app with an Express app generator. Express generator is a CLI tool used for scaffolding Express applications. After that, we’ll go through the process of using Docker build to create a Docker image from the source code.
We start by installing the express generator as follows:
$ npm install express-generator -gNext, we scaffold our application using the following command:
$ express docker-appNow we install package dependencies:
$ npm installStart the application with the command below:
$ npm startIf you point your browser to http://localhost:3000, you should see the application default page, with the text “Welcome to Express.”

Dockerfile
Mind you, the application is still running on your machine, and you don’t have a Docker image yet. Of course, there are no magic wands you can wave at your app and turn it to a Docker container all of a sudden. You’ve got to write a Dockerfile and build an image out of it.
Docker’s official docs define Dockerfile as “a text document that contains all the commands a user could call on the command line to assemble an image.” Now that you know what a Dockerfile is, it’s time to write one.
At the root directory of your application, create a file with the name “Dockerfile.”
$ touch DockerfileDockerignore
There’s an important concept you need to internalize—always keep your Docker image as lean as possible. This means packaging only what your applications need to run. Please don’t do otherwise.
In reality, source code usually contain other files and directories like .git, .idea, .vscode, or travis.yml. Those are essential for our development workflow, but won’t stop our app from running. It’s a best practice not to have them in your image—that’s what .dockerignore is for. We use it to prevent such files and directories from making their way into our build.
Create a file with the name .dockerignore at the root folder with this content:
.git
.gitignore
node_modules
npm-debug.log
Dockerfile*
docker-compose*
README.md
LICENSE
.vscode
The base image
Dockerfile usually starts from a base image. As defined in the Docker documentation, a base image or parent image is where your image is based. It’s your starting point. It could be an Ubuntu OS, Redhat, MySQL, Redis, etc.
Base images don’t just fall from the sky. They’re created—and you too can create one from scratch. There are also many base images out there that you can use, so you don’t need to create one in most cases.
We add the base image to Dockerfile using the FROM command, followed by the base image name:
# Filename: Dockerfile
FROM node:10-alpine
Copying source code
Let’s instruct Docker to copy our source during Docker build:
# Filename: Dockerfile
FROM node:10-alpine
WORKDIR /usr/src/app
COPY package*.json ./
RUN npm install
COPY . .
First, we set the working directory using WORKDIR. We then copy files using the COPY command. The first argument is the source path, and the second is the destination path on the image file system. We copy package.jsonand install our project dependencies using npm install. This will create the node_modules directory that we once ignored in .dockerignore.
You might be wondering why we copied package.json before the source code. Docker images are made up of layers. They’re created based on the output generated from each command. Since the file package.json does not change often as our source code, we don’t want to keep rebuilding node_modules each time we run Docker build.
Copying over files that define our app dependencies and install them immediately enables us to take advantage of the Docker cache. The main benefit here is quicker build time. There’s a really nice blog post that explains this concept in detail.
Want to improve your code? Try Stackify’s free code profiler, Prefix, to write better code on your workstation. Prefix works with .NET, Java, PHP, Node.js, Ruby, and Python.
Exposing a port
Exposing port 3000 informs Docker which port the container is listening on at runtime. Let’s modify the Docker file and expose the port 3000.
# Filename: Dockerfile
FROM node:10-alpine
WORKDIR /usr/src/app
COPY package*.json ./
RUN npm install
COPY . .
EXPOSE 3000
Docker CMD
The CMD command tells Docker how to run the application we packaged in the image. The CMD follows the format CMD [“command”, “argument1”, “argument2”].
# Filename: Dockerfile
FROM node:10-alpine
WORKDIR /usr/src/app
COPY package*.json ./
RUN npm install
COPY . .
EXPOSE 3000
CMD ["npm", "start"]
Building Docker images
With Dockerfile written, you can build the image using the following command:
$ docker build .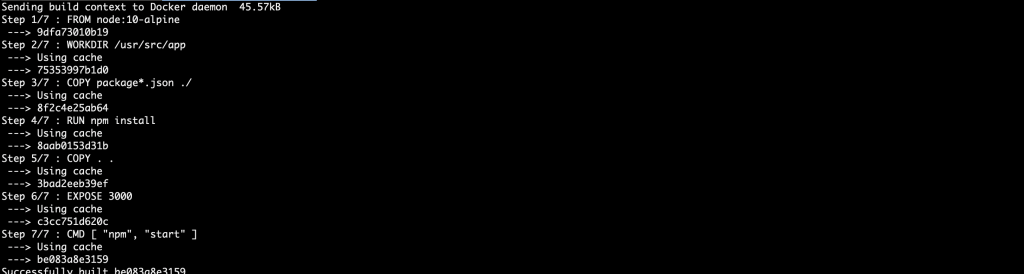
We can see the image we just built using the command docker images.
$ docker images
REPOSITORY TAG IMAGE ID CREATED SIZE
<none> <none> 7b341adb0bf1 2 minutes ago 83.2MB
Tagging a Docker image
When you have many images, it becomes difficult to know which image is what. Docker provides a way to tag your images with friendly names of your choosing. This is known as tagging.
$ docker build -t yourusername/repository-name .Let’s proceed to tag the Docker image we just built.
$ docker build -t yourusername/example-node-appIf you run the command above, you should have your image tagged already. Running docker images again will show your image with the name you’ve chosen.
$ docker images
REPOSITORY TAG IMAGE ID CREATED SIZE
abiodunjames/example-node-app latest be083a8e3159 7 minutes ago 83.2MB
Running a Docker image
You run a Docker image by using the docker run API. The command is as follows:
$ docker run -p80:3000 yourusername/example-node-appThe command is pretty simple. We supplied -p argument to specify what port on the host machine to map the port the app is listening on in the container. Now you can access your app from your browser on https://localhost.
To run the container in a detached mode, you can supply argument -d:
$ docker run -d -p80:3000 yourusername/example-node-appA big congrats to you! You just packaged an application that can run anywhere Docker is installed.
Pushing a Docker image to Docker repository
The Docker image you built still resides on your local machine. This means you can’t run it on any other machine outside your own—not even in production! To make the Docker image available for use elsewhere, you need to push it to a Docker registry.
A Docker registry is where Docker images live. One of the popular Docker registries is Docker Hub. You’ll need an account to push Docker images to Docker Hub, and you can create one here.
With your Docker Hub credentials ready, you need only to log in with your username and password.
$ docker loginRetag the image with a version number:
$ docker tag yourusername/example-node-app yourdockerhubusername/example-node-app:v1Then push with the following:
$ docker push abiodunjames/example-node-app:v1If you’re as excited as I am, you’ll probably want to poke your nose into what’s happening in this container, and even do cool stuff with Docker API.
You can list Docker containers:
$ docker psAnd you can inspect a container:
$ docker inspect <container-id>You can view Docker logs in a Docker container:
$ docker logs <container-id>And you can stop a running container:
$ docker stop <container-id>Logging and monitoring are as important as the app itself. You shouldn’t put an app in production without proper logging and monitoring in place, no matter what the reason. Retrace provides first-class support for Docker containers. This guide can help you set up a Retrace agent.
Conclusion
The whole concept of containerization is all about taking away the pain of building, shipping, and running applications. In this post, we’ve learned how to write Dockerfile as well as build, tag, and publish Docker images. Now it’s time to build on this knowledge and learn about how to automate the entire process using compose , continuous integration and delivery[jenkins section].
Building Efficient Dockerfiles - Node.js
http://bitjudo.com/blog/2014/03/13/building-efficient-dockerfiles-node-dot-js/
One key is to understand how Docker layers work. For now, visit the documentation
to see a graphic showing the various layers involved with Docker. Commands in your Dockerfile
will create new layers. When possible, docker will try to use an existing cached layer if it’s possible. You should try to take advantage of layers as much as possible by organizing your commands in a specific order. We’ll get into that order in a second for dealing with node modules in your application.
A bad Dockerfile could look like this:
FROM ubuntu

RUN echo "deb http://archive.ubuntu.com/ubuntu precise main universe" > /etc/apt/sources.list
RUN apt-get update
RUN apt-get -y install python-software-properties git build-essential
RUN add-apt-repository -y ppa:chris-lea/node.js
RUN apt-get update
RUN apt-get -y install nodejs

WORKDIR /opt/app

ADD . /opt/app
RUN npm install
EXPOSE 3001

CMD ["node", "server.js"]
This is bad because we copy the app’s working directory on line 12[ADD . /opt/app]—which has our package.json—. to our container and then build the modules. This results in our modules being built everytime we make a change to a file in .
Here’s a full example of a better implementation:
FROM ubuntu

# install our dependencies and nodejs
RUN echo "deb http://archive.ubuntu.com/ubuntu precise main universe" > /etc/apt/sources.list
RUN apt-get update
RUN apt-get -y install python-software-properties git build-essential
RUN add-apt-repository -y ppa:chris-lea/node.js
RUN apt-get update
RUN apt-get -y install nodejs

# use changes to package.json to force Docker not to use the cache
# when we change our application's nodejs dependencies:
ADD package.json /tmp/package.json
RUN cd /tmp && npm install
RUN mkdir -p /opt/app && cp -a /tmp/node_modules /opt/app/

# From here we load our application's code in, therefore the previous docker
# "layer" thats been cached will be used if possible
WORKDIR /opt/app
ADD . /opt/app

EXPOSE 3000

CMD ["node", "server.js"]
The idea here is that if the package.json file changes (line 14) then Docker will re-run the npm installsequence (line 15)… otherwise Docker will use our cache and skip that part.
Now our modules are cached so we aren’t rebuilding them every time we change our apps source code! This will speed up testing and debugging nodejs apps. Also this caching technique can work for ruby gems which we’ll talk about in another post.
COPY vs ADD command Dockerfile
When creating Dockerfiles, it’s often necessary to transfer files from the host system into the Docker image. These could be property files, native libraries, or other static content that our applications will require at runtime.
The Dockerfile specification provides two ways to copy files from the source system into an image: the COPY and ADD directives.Here we will look at the difference between them and when it makes sense to use each one.
Sometimes you see COPY or ADD being used in a Dockerfile, but 99% of the time you should be using COPY. Here’s why?
COPY and ADD are both Dockerfile instructions that serve similar purposes. They let you copy files from a specific location into a Docker image.COPY takes in a src and destination. It only lets you copy in a local or directory from your host (the machine-building the Docker image) into the Docker image itself.
COPY <src> <dest>ADD lets you do that too, but it also supports 2 other sources. First, you can use a URL instead of a local file/directory. Secondly, you can extract tar from the source directory into the destination.
ADD <src> <dest>In most cases, if you’re using a URL, you download a zip file and then use the RUN command to extract it. However, you might as well just use RUN and curl instead of ADD here, so you chain everything into 1 RUN command to make a smaller Docker image. A valid use case for ADD is when you want to extract a local tar file into a specific directory in your Docker image. This is exactly what the Alpine image does with ADD rootfs.tar.gz /.
If one is copying local files to your Docker image, always use COPY because it’s more explicit.
While functionality is similar, the ADD directive is more powerful in two ways as follows:
- It can handle remote URLs
- It can also auto-extract tar files.
Let’s look at these more closely.
First, the ADD directive can accept a remote URL for its source argument. The COPY directive, on the other hand, can only accept local files.
Note: Using ADD to fetch remote files and copying is not typically ideal.
This is because the file will increase the overall Docker Image size. Instead, we should use curl or wget to fetch remote files and remove them when no longer needed.
Second, the ADD directive will automatically expand tar files into the image file system. While this can reduce the number of Dockerfile steps required to build an image, it may not be desired in all cases.
Note: The auto-expansion only occurs when the source file is local to the host system.
When to use ADD or COPY: According to the Dockerfile best practices guide, we should always prefer COPY over ADD unless we specifically need one of the two additional features of ADD. As noted above, using ADD command automatically expands tar files and certain compressed formats, which can lead to unexpected files being written to the file system in our images.
Conclusion: Here we have seen the two primary ways to copy files into a Docker image: ADD and COPY. While functionally similar, the COPY directive is preferred for most cases. This is because the ADD directive provides additional functionality that should be used with caution and only when needed.
WORKDIR Instruction
WORKDIR instruction is used to set the working directory for all the subsequent Dockerfile instructions. Some frequently used instructions in a Dockerfile are RUN, ADD, CMD, ENTRYPOINT, and COPY. If the WORKDIR is not manually created, it gets created automatically during the processing of the instructions. Some points to be noted when using the WORKDIR instruction are as follows:
- WORKDIR does not create new intermediate Image layers.
- It adds metadata to the Image Config.
- You can have multiple WORKDIR instructions in your Dockerfile.
- If you use relative paths as Working Directory, it will be relative to the previous Working Directory.
- The default path is /
https://www.geeksforgeeks.org/docker-workdir-instruction/
FROM ubuntu:latest
WORKDIR /my-work-dir
WORKDIR relative path
FROM ubuntu:latest
WORKDIR /my-work-dir
RUN echo "work directory 1" > file1.txt
WORKDIR /my-work-dir-2
RUN echo "work directory 2" > file2.txt
WORKDIR by specifying environment variables
FROM ubuntu:latest
ENV DIRPATH /app
WORKDIR $DIRPATH
COPY instruction
FROM ubuntu:latest
RUN apt-get -y update
COPY to-be-copied .
ADD Instruction
If you want to extract a TAR file inside a Docker Container or copy files from a URL or local directory, you can specify ADD Instructions inside your Dockerfile. This is different from COPY instruction because COPY instruction only allows you to copy files and directories from the local machine.
Create a Tar File
For this example, we are simply going to create a TAR file of a folder. You can use this command to create a tar file.
tar -zcvf my-tar-folder.tar.gz ~/Desktop/my-tar-folderAfter you have your Tar file ready, you can now create a Dockerfile with ADD instruction.
FROM ubuntu:latest
RUN apt-get -y update
ADD my-tar-folder.tar.gz .
After you have the bash of the Container running, you can use the list command to list the directories and verify the instruction.
EXPOSE Instruction
The EXPOSE instruction exposes a particular port with a specified protocol inside a Docker Container. In the simplest term, the EXPOSE instruction tells Docker to get all its information required during the runtime from a specified Port. These ports can be either TCP or UDP, but it’s TCP by default. It is also important to understand that the EXPOSE instruction only acts as an information platform (like Documentation) between the creator of the Docker image and the individual running the Container. Some points to be noted are:
- It can use TCP or UDP protocol to expose the port.
- Default Protocol is TCP if no other protocol is specified.
- It does not map ports on the host machine.
- It can be overridden using the publish flag (p) while starting a Container.
The syntax to EXPOSE the ports by specifying a protocol is:
Syntax:EXPOSE <port>/<protocol>Let’s create a Dockerfile with two EXPOSE Instructions, one with TCP protocol and the other with UDP protocol.
FROM ubuntu:latest
EXPOSE 80/tcp
EXPOSE 80/udp
To verify the ports exposed, you can use the Docker inspect command.
sudo docker image inspect --format='' expose-demoTo publish all the exposed ports, you can use the -p flag.
sudo docker run -P -d expose-demoYou can just the list containers to check the published ports using the following command. But make sure that the Container is running.
sudo docker start <container-id>
sudo docker container ls
RUN command
A RUN instruction is used to run specified commands. You can use several RUN instructions to run different commands. But it is an efficient approach to combine all the RUN instructions into a single one.
Each RUN command creates a new cache layer or an intermediate image layer and hence chaining all of them into a single line, becomes efficient. However, chaining multiple RUN instructions could lead to cache bursts as well.
Some example of RUN commands are −
RUN apt−get −y install vim
RUN apt−get −y update
You can chain multiple RUN instructions in the following way −
RUN apt−get −y update \
&& apt−get −y install firefox \
&& apt−get −y install vim
CMD instruction
CMD instruction in a Dockerfile. If you list more than one CMD then only the last CMDwill take effect.If you want to run a docker container by specifying a default command that gets executed for all the containers of that image by default, you can use a CMD command. In case you specify a command during the docker run command, it overrides the default one. Specifying more than one CMD instructions, will allow only the last one to get executed.
Example of a CMD command −
CMD echo "Welcome to TutorialsPoint"If you specify the above line in the dockerfile and run the container using the following command without specifying any arguments, the output will be “Welcome to TutorialsPoint”
sudo docker run −it <image_name>Output − “Welcome to TutorialsPoint”
In case you try to specify any other arguments such as /bin/bash, etc, the default CMD command will be overridden.
ENTRYPOINT
The difference between ENTRYPOINT and CMD is that, if you try to specify default arguments in the docker run command, it will not ignore the ENTRYPOINT arguments. The exec form of an ENTRYPOINT command is −
ENTRYPOINT [“<executable-command>”, “<parameter 1>”, “<parameter 2>”, ….]
If you have used the exec form of the ENTRYPOINT instruction, you can also set additional parameters with the help of CMD command. For example −
ENTRYPOINT ["/bin/echo", "Welcome to TutorialsPoint"]
CMD ["Hello World!"]
Running docker run command without any argument would output −
Welcome to TutorialsPoint Hello World!
If you specify any other CLI arguments, “Hello World!” will get overridden.
Docker RUN vs CMD vs ENTRYPOINT
https://codewithyury.com/docker-run-vs-cmd-vs-entrypoint/
Some Docker instructions look similar and cause confusion among developers who just started using Docker or do it irregularly. In this post I will explain the difference between CMD, RUN, and ENTRYPOINT on examples.
In a nutshell
- RUN executes command(s) in a new layer and creates a new image. E.g., it is often used for installing software packages.
- CMD sets default command and/or parameters, which can be overwritten from command line when docker container runs.
- ENTRYPOINT configures a container that will run as an executable.
If it doesn’t make much sense or you after details, then read on.
Docker images and layers
When Docker runs a container, it runs an image inside it. This image is usually built by executing Docker instructions, which add layers on top of existing image or OS distribution. OS distribution is the initial image and every added layer creates a new image.
Final Docker image reminds an onion with OS distribution inside and a number of layers on top of it. For example, your image can be built by installing a number of deb packages and your application on top of Ubuntu 14.04 distribution.
Shell and Exec forms
All three instructions (RUN, CMD and ENTRYPOINT) can be specified in shell form or exec form. Let’s get familiar with these forms first, because the forms usually cause more confusion than instructions themselves.
Shell form
<instruction> <command>
Examples:
RUN apt-get install python3
CMD echo "Hello world"
ENTRYPOINT echo "Hello world"
When instruction is executed in shell form it calls /bin/sh -c <command> under the hood and normal shell processing happens. For example, the following snippet in Dockerfile
ENV name John Dow
ENTRYPOINT echo "Hello, $name"
when container runs as docker run -it <image> will produce output
Hello, John Dow
Note that variable name is replaced with its value.
Exec form
This is the preferred form for CMD and ENTRYPOINT instructions.
<instruction> ["executable", "param1", "param2", ...]
Examples:
RUN ["apt-get", "install", "python3"]
CMD ["/bin/echo", "Hello world"]
ENTRYPOINT ["/bin/echo", "Hello world"]
When instruction is executed in exec form it calls executable directly, and shell processing does not happen. For example, the following snippet in Dockerfile
ENV name John Dow
ENTRYPOINT ["/bin/echo", "Hello, $name"]
when container runs as docker run -it <image> will produce output
Hello, $name
Note that variable name is not substituted.
How to run bash?
If you need to run bash (or any other interpreter but sh), use exec form with /bin/bash as executable. In this case, normal shell processing will take place. For example, the following snippet in Dockerfile
ENV name John Dow
ENTRYPOINT ["/bin/bash", "-c", "echo Hello, $name"]
when container runs as docker run -it <image> will produce output
Hello, John Dow
RUN
RUN instruction allows you to install your application and packages requited for it. It executes any commands on top of the current image and creates a new layer by committing the results. Often you will find multiple RUN instructions in a Dockerfile.
RUN has two forms:
RUN <command>(shell form)
RUN ["executable", "param1", "param2"](exec form)
(The forms are described in detail in Shell and Exec forms section above.)
A good illustration of RUN instruction would be to install multiple version control systems packages:
RUN apt-get update && apt-get install -y \
  bzr \
  cvs \
  git \
  mercurial \
  subversion
Note that apt-get update and apt-get install are executed in a single RUN instruction. This is done to make sure that the latest packages will be installed. If apt-get install were in a separate RUN instruction, then it would reuse a layer added by apt-get update, which could had been created a long time ago.
CMD
CMD instruction allows you to set a default command, which will be executed only when you run container without specifying a command. If Docker container runs with a command, the default command will be ignored. If Dockerfile has more than one CMD instruction, all but last CMD instructions are ignored.
CMD has three forms:
CMD ["executable","param1","param2"](exec form, preferred)
CMD ["param1","param2"](sets additional default parameters for ENTRYPOINT in exec form)
CMD command param1 param2(shell form)
Again, the first and third forms were explained in Shell and Exec forms section. The second one is used together with ENTRYPOINT instruction in exec form. It sets default parameters that will be added after ENTRYPOINT parameters if container runs without command line arguments. See ENTRYPOINT for example.
Let’s have a look how CMD instruction works. The following snippet in Dockerfile
CMD echo "Hello world"
when container runs as docker run -it <image> will produce output
Hello world
but when container runs with a command, e.g., docker run -it <image> /bin/bash, CMD is ignored and bash interpreter runs instead:
root@7de4bed89922:/#
ENTRYPOINT
ENTRYPOINT instruction allows you to configure a container that will run as an executable. It looks similar to CMD, because it also allows you to specify a command with parameters. The difference is ENTRYPOINT command and parameters are not ignored when Docker container runs with command line parameters. (There is a way to ignore ENTTRYPOINT, but it is unlikely that you will do it.)
ENTRYPOINT has two forms:
ENTRYPOINT ["executable", "param1", "param2"](exec form, preferred)
ENTRYPOINT command param1 param2(shell form)
Be very careful when choosing ENTRYPOINT form, because forms behaviour differs significantly.
Exec form
Exec form of ENTRYPOINT allows you to set commands and parameters and then use either form of CMD to set additional parameters that are more likely to be changed. ENTRYPOINT arguments are always used, while CMD ones can be overwritten by command line arguments provided when Docker container runs. For example, the following snippet in Dockerfile
ENTRYPOINT ["/bin/echo", "Hello"]
CMD ["world"]
when container runs as docker run -it <image> will produce output
Hello world
but when container runs as docker run -it <image> John will result in
Hello John
Shell form
Shell form of ENTRYPOINT ignores any CMD or docker run command line arguments.
The bottom line
Use RUN instructions to build your image by adding layers on top of initial image.
Prefer ENTRYPOINT to CMD when building executable Docker image and you need a command always to be executed. Additionally use CMD if you need to provide extra default arguments that could be overwritten from command line when docker container runs.
Choose CMD if you need to provide a default command and/or arguments that can be overwritten from command line when docker container runs.
Differences Between Dockerfile Instructions in Shell and Exec Form
What is the difference between shell and exec form for
CMD:
CMD python my_script.py arg
vs.
CMD ["python", "my_script.py", "arg"]
ENTRYPOINT:
ENTRYPOINT ./bin/main
vs.
ENTRYPOINT ["./bin/main"]
and RUN:
RUN npm start
vs.
RUN ["npm", "start"]
Dockerfile instructions?
Answer :→
There are two differences between the shell form and the exec form. According to the documentation, the exec form is the preferred form. These are the two differences:
The exec form is parsed as a JSON array, which means that you must use double-quotes (“) around words not single-quotes (‘).Unlike the shell form, the exec form does not invoke a command shell. This means that normal shell processing does not happen. For example, CMD [ "echo", "$HOME" ] will not do variable substitution on $HOME. If you want shell processing then either use the shell form or execute a shell directly, for example: CMD [ "sh", "-c", "echo $HOME" ]. When using the exec form and executing a shell directly, as in the case for the shell form, it is the shell that is doing the environment variable expansion, not docker.
Some additional subtleties here are:
The exec form makes it possible to avoid shell string munging, and to RUN commands using a base image that does not contain the specified shell executable.In the shell form you can use a \ (backslash) to continue a single RUN instruction onto the next line.
There is also a third form for CMD:
CMD ["param1","param2"] (as default parameters to ENTRYPOINT)
Additionally, the exec form is required for CMD if you are using it as parameters/arguments to ENTRYPOINT that are intended to be overwritten.
Docker build context and .dockerignore
The Docker build context refers to the files and directories that will be available to the Docker engine when you run docker build. Anything not included in the build context won’t be accessible to commands in your Dockerfile.
You should audit your use of docker build to keep your build contexts small. Accidentally including unnecessary files can result in an excessively large build context, which will lead to longer builds.
What Is the Build Context?
Here’s a simple docker build command:
docker build . -t my-image:latestThis builds a Docker image using the Dockerfile found in your working directory. The resulting image will be tagged as my-image:latest, although this detail isn’t important to this tutorial.
Within your Dockerfile, you’ll likely use COPY to add files and folders into your image:
FROM httpd:latest

COPY index.html /usr/local/apache2/htdocs/index.html
COPY css/ /usr/local/apache2/htdocs/css/
This example copies the index.html file and css directory into your container. At first glance, it looks like the COPY statement simply references a path that’s resolved relative to your working directory.
This isn’t quite the case. COPY can only access resources available in the build context. In this example, the build context is the working directory, so the files and folders within it are available. By default, Docker uses the contents of the directory passed to docker build as the build context.
Why Is the Build Context Used?
The build context is important because the Docker CLI and Docker Engine might not be running on the same machine. When you run docker build, the CLI sends the files and folders to build to the Docker engine. This set of files and folders becomes the build context.
Furthermore, not every build context is as straightforward as reusing your working directory. Docker also supports Git repository URLs as the path given to docker build. In this case, the build context becomes the content of the specified repository.
The build context’s default “include all” behavior is fine for many small repositories. Problems become apparent once you add files to your working directory that aren’t used by your Dockerfile. Resources such as prebuilt binaries, documentation files, and dependency libraries will be included in the build context even though they’re redundant.
Including too many assets in the build context can become a performance drain. You’re needlessly copying files that will never be used. The slowdown will be particularly evident if you’re connected to a remote Docker daemon or if you’re using a slow mechanical hard drive. You’ll see “sending build context to Docker daemon” in your shell while the copy is completed.
Docker does try to minimize redundant copying on its own. The BuildKit build backend—used since Docker 18.09—added support for incremental transfers. This means that Docker will usually only need to copy files added or changed since your last build. It’ll still copy the whole lot on the first build.
Excluding Resources from the Build Context
To resolve wasteful copying for good, you must tell Docker what it can omit from the build context. Let’s start by creating a Dockerfile:
FROM node:latest
WORKDIR /my-app
COPY package.json package.json
COPY package-lock.json package-lock.json
COPY src/ .
RUN npm install
This simple Dockerfile could be used by an application written in Node.js. Node.js programs use npm as their package manager. Packages are installed to a node_modules folder. When you run npm install locally, during development, the packages will be downloaded to the node_modules folder in your working directory.
The Dockerfile runs npm install itself to acquire the dependencies. This ensures that the image is fully self-contained. There’s no need to copy in the local node_modules folder, as it’s not used by the Dockerfile.
Despite this, Docker will still include the node_modules folder in the default build context. To exclude it, create a .dockerignore file in your working directory. This file has a similar syntax to .gitignore.
node_modules/Any paths listed in .dockerignore will be excluded from the build context. You should make sure that .dockerignore is kept updated with changes to your project’s filesystem structure. You can substantially reduce Docker build context copying time by checking that only relevant paths (those actually used by your Dockerfile) are present in the build context.
In the case of our example, the node_modules folder could include thousands of files if we have a lot of dependencies in our project. Copying them to the Docker daemon as part of the build context could take several seconds and would be a wasteful operation. The Dockerfile completely ignores them, fetching its own dependencies via npm install instead.
Other Build Context Issues
Not using .dockerignore can introduce other issues, too. A Dockerfile with this line is particularly problematic:
COPY . /my-appThis will copy everything in your working directory. This might seem like a good idea until you realize that your .git history and any secret files will also end up within your container.
Copying an unfiltered build context also prevents Docker layer caching from working effectively. As something in your working directory will probably change between builds, Docker would need to run the COPY instruction every time. This would create a new layer—and new layers for any subsequent instructions—even if the assets you’re interested in haven’t changed.
Compressing the Build Context
You can compress the build context to further improve build performance. Pass the --compress flag to docker build to apply gzip compression. The compression occurs before the context is sent to the Docker daemon.
docker build . -t my-image:latest --compressThis can improve performance in some scenarios. The compression adds its own overheads, though—your system now needs to compress the context, and the receiving Docker daemon has to uncompress it. Using compression could actually be slower than copying the original files, in some circumstances. Experiment with each of your images to assess whether you see an improvement.
Conclusion
The Docker build context defines the files that will be available for copying in your Dockerfile. The build context is copied over to the Docker daemon before the build begins.
Build contexts default to including the contents of the directory or Git repository you passed to docker build. You can omit items from the build context by creating a .dockerignore file. This increases efficiency by reducing the amount of redundant data passed to the Docker daemon.
Docker – USER Instruction
By default, a Docker Container runs as a Root user. This poses a great security threat if you deploy your applications on a large scale inside Docker Containers. You can change or switch to a different user inside a Docker Container using the USER Instruction. For this, you first need to create a user and a group inside the Container.
In this article, we are going to use the USER instruction to switch the user inside the Container from Root to the one which we will create. To do so follow the below steps:
You can specify the instructions to create a new user and group and to switch the user both in the Dockerfile. For this example, we will simply create an Ubuntu Image and use the bash with a different user other than the Root user.
FROM ubuntu:latest
RUN apt-get -y update
RUN groupadd -r user && useradd -r -g user user
USER user
In the above dockerfile, we have pulled the base Image Ubuntu and updated it. We have created a new group called user and a new user inside the group with the same name. Using the USER option, we have then switched the user.
You can now check that the default user and the group have now changed to the one we created in the Dockerfile using the id command.
idDocker – LABEL Instruction
Labels are used in Dockerfile to help organize your Docker Images. Labels are key-value pairs and simply adds custom metadata to your Docker Images. Some key points associated with the LABEL instructions are as follows:
- To include spaces inside a label, you can use quotes.
- For multi line labels, you can use backslashes.
- You can use more than one labels in a Docker Image.
- Docker allows you to specify multiple labels in a single line.
- Labels from parent Images are inherited to your Image.
- If labels with same names exist even though they have different values, the last one overrides.
General syntax of LABEL instruction is as follows:
Syntax: LABEL <key-string>=<value-string> <key-string>=<value-string> ...
In this article, we will look at different ways to use Label instruction through a simple example. To do so follow the below steps:
Create the Dockerfile with LABEL instruction
Look at the template for the Dockerfile below:
FROM ubuntu:latest
LABEL "website.name"="geeksforgeeks website"
LABEL "website.tutorial-name"="docker"
LABEL website="geeksforgeeks"
LABEL desc="This is docker tutorial with \
geeksforgeeks website"
LABEL tutorial1="Docker" tutorial2="LABEL INSTRUCTION"
In the above Dockerfile, we have shown different ways to use LABEL instruction.
To check the labels of a particular Image, you can use the Docker Inspect command.
Start the Docker Container.
sudo docker start <container-id>Execute the Inspect Command.
sudo docker inspect <container-id>Docker – ARG Instruction
You can use the ARG command inside a Dockerfile to define the name of a parameter and its default value. This default value can also be overridden using a simple option with the Docker build command. The difference between ENV and ARG is that after you set an environment variable using ARG, you will not be able to access that later on when you try to run the Docker Container.
In this article, we will discuss how to use the ARG instruction inside a Dockerfile to set parameters. Follow the below steps to implement ARG instruction in a Dockerfile:
You can create a Dockerfile with ARG instruction using the following template.
FROM ubuntu:latest
ARG GREET=GeeksForGeeks
RUN echo "Hey there! Welcome to $GREET" > greeting.txt
CMD cat greeting.txt
You can override the default value of ARG by using the –build-arg option along with the build command.
sudo docker build -t arg-demo --build-arg GREET=World .
Docker ARG vs ENV
ARG and env can be confusing at first. Both are Dockerfile instructions which help you define variables, and from within the Dockerfile they feel pretty similar.
Let’s make sure that you understand the difference, and can use both of them comfortably to build better Docker images without repeating yourself.
ENV is mainly meant to provide default values for your future environment variables. Running dockerized applications can access environment variables. It’s a great way to pass configuration values to your project.
ARG values are not available after the image is built. A running container won’t have access to an ARG variable value. You can imagine the ARG and ENV as two overlapping rectangles:
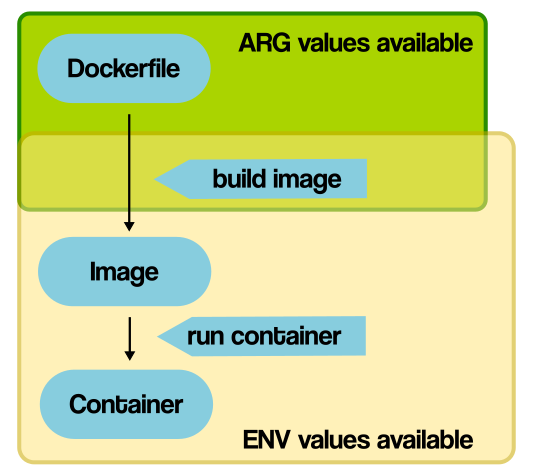
An overview of ARG and ENV availability.
Notice how both ARG and ENV overlap during the image build? This causes confusion sometimes: from within your Dockerfile, both ARG and ENV seem very similar. Both can be accessed from within your Dockerfile commands in the same manner.
ARG VAR_A 5
ENV VAR_B 6
RUN echo $VAR_A
RUN echo $VAR_B
Just looking at the RUN commands, you couldn’t tell which one is an ARG and which one is an ENV variable.
You can’t change ENV directly during the build!
Build arguments can be set to a default value inside of a Dockerfile:
ARG VAR_NAME 5
but also changed by providing a --build-arg VAR_NAME=6 argument when you build your image. In a similar way, you can specify default values for ENV variables:
ENV VAR_NAME_2 6
But unlike ARG, you can’t override ENV values directly from the commandline when building your image. However, you can use ARG values to dynamically set default values of ENV variables during the build like this:
# You can set VAR_A while building the image
# or leave it at the default
ARG VAR_A 5
# VAR_B gets the (overridden) value of VAR_A
ENV VAR_B $VAR_A
You can read about it in more detail here.
HEALTHCHECK Instruction
A HEATHCHECK instruction determines the state of a Docker Container. It determines whether the Container is running in a normal state or not. It performs health checks at regular intervals. The initial state is starting and after a successful checkup, the state becomes healthy. If the test remains unsuccessful, it turns into an unhealthy state.
Some options provided by the HEALTHCHECK instruction are –
- –interval=: It determines the interval between 2 health check-ups. The default interval is the 30s.
- –timeout=: If the HEALTHCHECK command exceeds the specified duration, it is categorized as a failure. The default duration is the 30s.
- –retries=: If it reaches the specified number of retries, the state is considered to be unhealthy. The default number of retries is 3.
In this article, we will see practical examples of how to use the HEALTHCHECK command in your Dockerfile. We will create an Nginx Container and determine it states. Follow the below steps to Check the health of your dockerfile:
You can use the following template to create the Dockerfile.
FROM nginx:latest
HEALTHCHECK --interval=35s --timeout=4s CMD curl -f https://localhost/ || exit 1
EXPOSE 80
sudo docker build -t healthcheck-demo .
Here, we will check whether the nginx.conf file exists or not. We will set the Command while running the Docker Container.
sudo docker run --name=healthcheck-demo -d --health-cmd='stat /etc/nginx/nginx.conf || exit 1' healthcheck-demoYou can use the inspect command to determine the state of the Container.
sudo docker inspect --format='' healthcheck-demoONBUILD
The ONBUILD instruction adds to the image a trigger instruction to be executed at a later time, when the image is used as the base for another build. The trigger will be executed in the context of the downstream build, as if it had been inserted immediately after the FROM instruction in the downstream Dockerfile.