
Docker compose
Docker Compose is used to run multiple containers as a single service. For example, suppose you had an application which required NGNIX and MySQL, you could create one file which would start both the containers as a service without the need to start each one separately.
Compose has commands for managing the whole lifecycle of your application:
- Start, stop, and rebuild services
- View the status of running services
- Stream the log output of running services
- Run a one-off command on a service
Common use cases🔗
Compose can be used in many different ways. Some common use cases are outlined below.
- Development environments
- Automated testing environments
- Single host deployments
Docker Compose ─ Installation
The following steps need to be followed to get Docker Compose up and running.
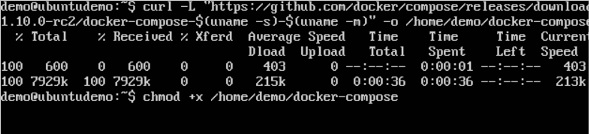
Step 1 − Download the necessary files from github using the following command −
curl -L "https://github.com/docker/compose/releases/download/1.10.0-rc2/dockercompose
-$(uname -s) -$(uname -m)" -o /home/demo/docker-compose
The above command will download the latest version of Docker Compose which at the time of writing this article is 1.10.0-rc2. It will then store it in the directory /home/demo/.

Step 2 − Next, we need to provide execute privileges to the downloaded Docker Compose file, using the following command −
chmod +x /home/demo/docker-compose
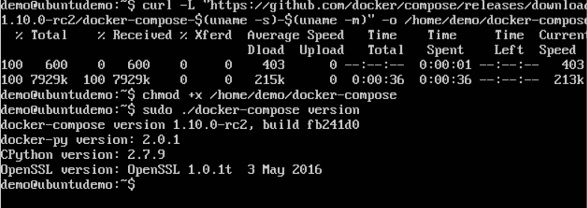
We can then use the following command to see the compose version.
Syntax
docker-compose version
Parameters
- version − This is used to specify that we want the details of the version of Docker Compose.
Output
The version details of Docker Compose will be displayed.
Example
The following example shows how to get the docker-compose version.
sudo ./docker-compose -version
Output
You will then get the following output −
Creating Your First Docker-Compose File
All Docker Compose files are YAML files. You can create one using the vim editor. So execute the following command to create the compose file −
sudo vim docker-compose.ymlversion: '3.7'
services:
db:
image: mysql:8.0.19
command: '--default-authentication-plugin=mysql_native_password'
restart: always
volumes:
- db_data:/var/lib/mysql
restart: always
networks:
- mynetwork
environment:
- MYSQL_ROOT_PASSWORD=somewordpress
- MYSQL_DATABASE=wordpress
- MYSQL_USER=wordpress
- MYSQL_PASSWORD=wordpress
wordpress:
image: wordpress:latest
ports:
- 80:80
networks:
- mynetwork
restart: always
environment:
- WORDPRESS_DB_HOST=db
- WORDPRESS_DB_USER=wordpress
- WORDPRESS_DB_PASSWORD=wordpress
- WORDPRESS_DB_NAME=wordpress
volumes:
db_data:
networks:
mynetwork:Let’s take a close look at the various details of this file −
- The db and wordpress keyword are used to define two separate services. One will be running our mysql database and the other will be our nginx web server.
- The image keyword is used to specify the image from dockerhub for our mysql and wordpress containers
- For the database, we are using the ports keyword to mention the ports that need to be exposed for mysql.
- And then, we also specify the environment variables for mysql which are required to run mysql.
Now let’s run our Docker Compose file using the following command −
sudo ./docker-compose upOnce executed, all the images will start downloading and the containers will start automatically. And when you do a docker ps, you can see that the containers are indeed up and running.
other compose examples:
#This is a sample Image
FROM ubuntu
MAINTAINER gourav.thakur39@gmail.com

RUN apt-get update
RUN apt-get install -y nginx
CMD ["echo", "Image created"]
#apace
# this code might not work
FROM ubuntu
RUN apt-get update
RUN apt-get install apache2 -y
RUN apt-get install apache2-utils -y
RUN apt-get clean
EXPOSE 80
CMD [“apache2”, “-D”, “FOREGROUND”]Some Docker commands
docker run ...creates and runs a container
docker stop ...stops a running container
docker start ...starts a stopped container
docker rm ...removes a stopped container
Some Docker Compose commands
docker-compose upcreates and runs a collection of containers
docker-compose stopstops the containers
docker-compose startstarts the containers
docker-compose downstops and removes the containers
Be careful...
As it discussed in the comments section, by using docker-compose down other things can also take place regarding volumes, networks. Keep in mind that you might lose data (if your container is a database for example) and make sure you have saved them or you are somehow able to create them again.
Environment variables in Compose
There are multiple parts of Compose that deal with environment variables in one sense or another.
It’s possible to use environment variables in your shell to populate values inside a Compose file:
web:
  image: "webapp:${TAG}"
If you have multiple environment variables, you can substitute them by adding them to a default environment variable file named .envor by providing a path to your environment variables file using the --env-file
command line option.
Your configuration options can contain environment variables. Compose uses the variable values from the shell environment in which docker-compose is run. For example, suppose the shell contains POSTGRES_VERSION=9.3 and you supply this configuration:
db:
  image: "postgres:${POSTGRES_VERSION}"
You can use a $$ (double-dollar sign) when your configuration needs a literal dollar sign. This also prevents Compose from interpolating a value, so a $$ allows you to refer to environment variables that you don’t want processed by Compose.
web:
  build: .
  command: "$$VAR_NOT_INTERPOLATED_BY_COMPOSE"
The “.env” file
You can set default values for any environment variables referenced in the Compose file, or used to configure Compose, in an environment file named .env. The .envfile path is as follows:
$ cat .env
TAG=v1.5

$ cat docker-compose.yml
version: '3'
services:
  web:
    image: "webapp:${TAG}"
Using the “--env-file” option🔗
By passing the file as an argument, you can store it anywhere and name it appropriately, for example, .env.ci, .env.dev, .env.prod. Passing the file path is done using the --env-file option:
$ docker-compose --env-file ./config/.env.dev up
Set environment variables in containers
You can set environment variables in a service’s containers with the ‘environment’ key, just like with docker run -e VARIABLE=VALUE ...:
web:
  environment:
    - DEBUG=1
Docker compose networking
https://docs.docker.com/compose/networking/
By default Compose sets up a single network for your app. Each container for a service joins the default network and is both reachable by other containers on that network, and discoverable by them at a hostname identical to the container name.
For example, suppose your app is in a directory called myapp, and your docker-compose.yml looks like this:
version: "3.9"
services:
  web:
    build: .
    ports:
      - "8000:8000"
  db:
    image: postgres
    ports:
      - "8001:5432"
When you run docker-compose up, the following happens:
- A network called
myapp_defaultis created.
- A container is created using
web’s configuration. It joins the networkmyapp_defaultunder the nameweb.
- A container is created using
db’s configuration. It joins the networkmyapp_defaultunder the namedb.
Each container can now look up the hostname web or db and get back the appropriate container’s IP address. For example, web’s application code could connect to the URL postgres://db:5432 and start using the Postgres database.
It is important to note the distinction between HOST_PORT and CONTAINER_PORT. In the above example, for db, the HOST_PORT is 8001 and the container port is 5432 (postgres default). Networked service-to-service communication uses the CONTAINER_PORT. When HOST_PORT is defined, the service is accessible outside the swarm as well.
Within the web container, your connection string to db would look like postgres://db:5432, and from the host machine, the connection string would look like postgres://{DOCKER_IP}:8001.
Links
Links allow you to define extra aliases by which a service is reachable from another service. They are not required to enable services to communicate - by default, any service can reach any other service at that service’s name. In the following example, db is reachable from web at the hostnames db and database:
version: "3.9"
services:

  web:
    build: .
    links:
      - "db:database"
  db:
    image: postgres
Multi-host networking
When deploying a Compose application on a Docker Engine with Swarm mode enabled, you can make use of the built-in overlay driver to enable multi-host communication.
Specify custom networks
Instead of just using the default app network, you can specify your own networks with the top-level networks key. This lets you create more complex topologies and specify custom network drivers and options. You can also use it to connect services to externally-created networks which aren’t managed by Compose.
Each service can specify what networks to connect to with the service-level networks key, which is a list of names referencing entries under the top-level networks key.
Here’s an example Compose file defining two custom networks. The proxy service is isolated from the db service, because they do not share a network in common - only app can talk to both.
version: "3.7"

services:
  proxy:
    build: ./proxy
    networks:
      - frontend
  app:
    build: ./app
    networks:
      - frontend
      - backend
  db:
    image: postgres
    networks:
      - backend

networks:
  frontend:
    # Use a custom driver
    driver: custom-driver-1
  backend:
    # Use a custom driver which takes special options
    driver: custom-driver-2
    driver_opts:
      foo: "1"
      bar: "2"
Networks can be configured with static IP addresses by setting the ipv4_address and/or ipv6_address for each attached network.
Networks can also be given a custom name (since version 3.5):
version: "3.9"
services:
  # ...
networks:
  frontend:
    name: custom_frontend
    driver: custom-driver-1
Configure the default network
Instead of (or as well as) specifying your own networks, you can also change the settings of the app-wide default network by defining an entry under networks named default:
version: "3.9"
services:
  web:
    build: .
    ports:
      - "8000:8000"
  db:
    image: postgres

networks:
  default:
    # Use a custom driver
    driver: custom-driver
Use a pre-existing network🔗
If you want your containers to join a pre-existing network, use the external option:
services:
  # ...
networks:
  default:
    name: my-pre-existing-network
    external: true
Instead of attempting to create a network called [projectname]_default, Compose looks for a network called my-pre-existing-networkand connect your app’s containers to it.
Use Compose in production
When you define your app with Compose in development, you can use this definition to run your application in different environments such as CI, staging, and production.
The easiest way to deploy an application is to run it on a single server, similar to how you would run your development environment. If you want to scale up your application, you can run Compose apps on a Swarm cluster.
Modify your Compose file for production
You probably need to make changes to your app configuration to make it ready for production. These changes may include:
- Removing any volume bindings for application code, so that code stays inside the container and can’t be changed from outside
- Binding to different ports on the host
- Setting environment variables differently, such as reducing the verbosity of logging, or to specify settings for external services such as an email server
- Specifying a restart policy like
restart: alwaysto avoid downtime
- Adding extra services such as a log aggregator
For this reason, consider defining an additional Compose file, say production.yml, which specifies production-appropriate configuration. This configuration file only needs to include the changes you’d like to make from the original Compose file. The additional Compose file can be applied over the original docker-compose.yml to create a new configuration.
Once you’ve got a second configuration file, tell Compose to use it with the -f option:
$ docker-compose -f docker-compose.yml -f production.yml up -d
See Using multiple compose files for a more complete example.
Deploying changes
When you make changes to your app code, remember to rebuild your image and recreate your app’s containers. To redeploy a service called web, use:
$ docker-compose build web
$ docker-compose up --no-deps -d web
This first rebuilds the image for web and then stop, destroy, and recreate just the web service. The --no-deps flag prevents Compose from also recreating any services which web depends on.
Running Compose on a single server
You can use Compose to deploy an app to a remote Docker host by setting the DOCKER_HOST, DOCKER_TLS_VERIFY, and DOCKER_CERT_PATH environment variables appropriately.
Once you’ve set up your environment variables, all the normal docker-compose commands work with no further configuration.
How to Install and Run Jenkins With Docker Compose
https://www.cloudbees.com/blog/how-to-install-and-run-jenkins-with-docker-compose
Jenkins is an automation server. While you can use it to automate just about any task, it’s most often associated with building source code and deploying the results. For many, Jenkins is synonymous with continuous integration and continuous delivery (CI/CD).
One of Jenkins’s most powerful features is its ability to distribute jobs across multiple nodes. A Jenkins controller sends jobs to the appropriate agent based on the job requirements and the resources available at the time.
While it’s possible to run jobs on the controller, it’s considered a best practice to always create at least one agent and run your jobs there. So, we’ll use Docker Compose to do just that.
If you want to try out the sample configurations, you’ll need a system with Docker and Docker Compose installed. You’ll also need access to Docker Hub to download the latest Jenkins images.
To keep the tutorial simple and easy to follow, it will run the containers as root. In a production environment, you would add a Jenkins user with a user ID of 1000 to the systems running Jenkins controllers and agents.
Running Jenkins With Docker Compose
You can run a Jenkins controller with a single Docker command:
$ docker run -it -p 8080:8080 jenkins/jenkins:lts
That will give you a running Jenkins controller. You can set it up, log in, and start running jobs. But if you restart it, you will lose all your data. You need to set up a volume to start the Jenkins instance data.
Let’s use Docker Compose to do that.
Create a directory named jenkins_compose and create a file named docker-compose.yaml with these contents.
  # docker-compose.yaml
  version: '3.7'
  services:
    jenkins:
      image: jenkins/jenkins:lts
      privileged: true
      user: root
      ports:
       - 8080:8080
       - 50000:50000
      container_name: jenkins
      volumes:
       - /home/${myname}/jenkins_compose/jenkins_configuration:/var/jenkins_home
       - /var/run/docker.sock:/var/run/docker.sock
Line #3 starts defining services. For now, we just have one.
The rest of the file defines the Jenkins container.
It will run the latest Jenkins image with root privileges. We’re running the container with host networking, so lines #9 and #10 tell Docker to redirect ports 8080 and 50000 to the host’s network.
The container’s name is jenkins.
Finally, /home/${myname}/jenkins_compose/jenkins_configuration is mapped to /var/jenkins_home in the container. Change /home/${myname} to your user’s home directory or the path you created the new directory in.
Run Jenkins Controller
Now it’s time to run your Jenkins controller.
Run docker-compose in the directory where you placed docker-compose.yaml.
$ docker-compose up -d
Creating jenkins … done
Now point a web browser at port 8080 on your host system. You’ll see the unlock page.
The page tells you to find the initial password in a log file, but Jenkins prints the initial password to standard output too. So, you can retrieve it from the Docker log.
Go back to your shell and view the logs with docker logs.
$ docker logs jenkins | less
Look for a block enclosed with six lines of asterisks like this:
*************************************************************
*************************************************************
*************************************************************

Jenkins initial setup is required. An admin user has been created and a password generated.
Please use the following password to proceed to installation:

c061b679107a4893b5383617729b5c6a

This may also be found at: /var/jenkins_home/secrets/initialAdminPassword

*************************************************************
*************************************************************
*************************************************************
Enter the password and click Continue.
Select Install Suggested Plugins on the next page. When Jenkins finishes, it will prompt you for a new admin user and password. Enter a user name and password and click Save and Continue.
The next page gives you a chance to change the host name of your controller. For this tutorial, you can accept the default and click Save and Finish
Building on the built-in node can be a security issue. You should set up distributed builds. See the documentation
You’re ready to set up an agent!
Adding a Jenkins Agent With Docker Compose
- READ THIS FOR MORE INFO: https://cloudacademy.com/course/jenkins-cicd-advanced/build-agent-scaling-out-build-infrastructure/
Now it’s time to add an agent. Before you add anything to the Docker Compose configuration, you need to generate an SSH key. This key will allow the controller to access the agent via SSH.
First, use ssh-keygen to create a key.
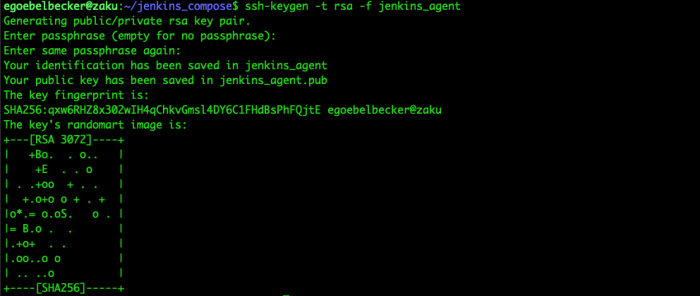
This command creates two files: jenkins_agent, which holds the private key, and jenkins-agent.pub, the public key.
Here are the contents of jenkins_agent (provided as an example for the purposes of this tutorial).
cat jenkins_agent
We’ll use this first to give the controller access to the agent.
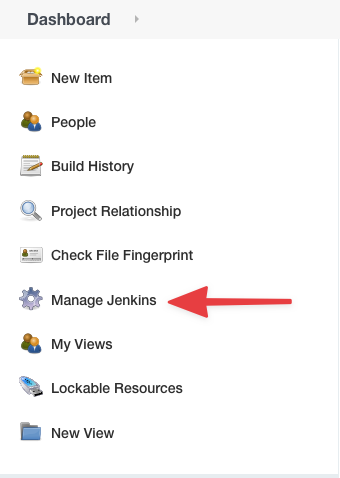
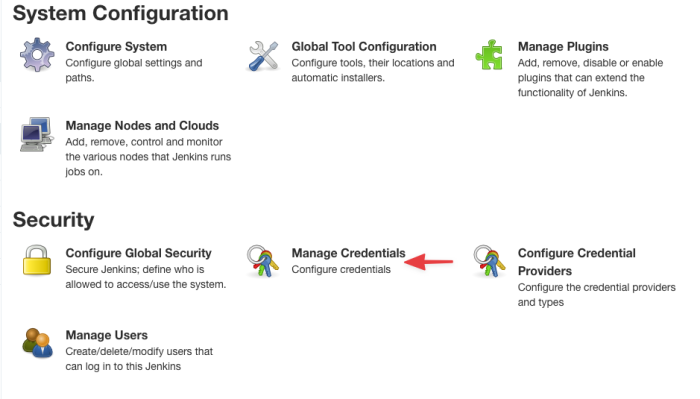
Start with the Manage Jenkins menu.
Then go to Manage Credentials.
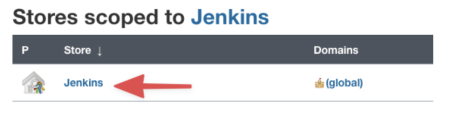
Click Jenkins under Stores scoped to Jenkins.
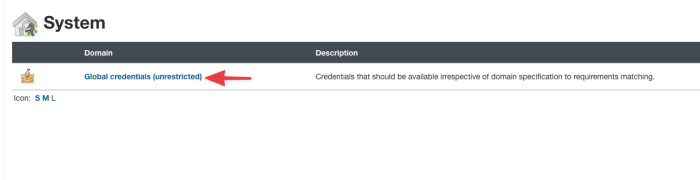
Then click Global credentials.
Finally, click Add Credentials in the menu on the left.

Set these options on this screen.
- Select SSH Username with private key.
- Limit the scope to System. This means the key can’t be used for jobs.
- Give the credential an ID.
- Provide a description.
- Enter jenkins for a username. Don’t use the username used to create the key.
- Under Private Key, check Enter directly.
Now, paste the contents of jenkins_agent in the text box.
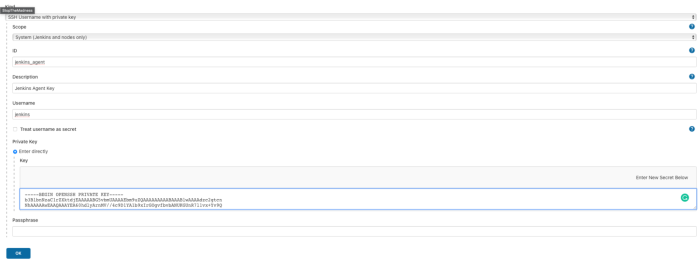
Click OK to save the credential.
Now it’s time to set up the agent.
Here are the contents of jenkins_agent.pub.

We’ll use this in docker-compose.yaml.
Add a new service.
# docker-compose.yaml
  version: '3.7'
  services:
    jenkins:
      image: jenkins/jenkins:lts
      privileged: true
      user: root
      ports:
        - 8080:8080
        - 50000:50000
      container_name: jenkins
      volumes:
      - /home/${myname}/jenkins_compose/jenkins_configuration:/var/jenkins_home
      - /var/run/docker.sock:/var/run/docker.sock
    agent:
      image: jenkins/ssh-agent:jdk11
      privileged: true
      user: root
      container_name: agent
      expose:
        - 22
      environment:
        - JENKINS_AGENT_SSH_PUBKEY=ssh-rsa AAAAB3NzaC1yclLqpKc96nhHTjcRPu1IBU++9Wkn0= gourav@gourav
	# here ths key is shortend for presentation purpose
Lines #15 through #22 define a new container with jenkins/ssh-agent:jdk11 image and options similar to the controller, except you’re exposing the SSH port, 22.
Lines #22 and #23 add an environment variable with the public key. Add the exact contents of the text file, including the ssh-rsa prefix at the beginning. Don’t enclose it in quotes.
Ready to Go
Now it’s time to start everything up.
If you haven’t already, stop Docker Compose.
$ docker-compose down
Then start everything back up again.
$ docker-compose up -d
Creating network "jenkins_compose_default" with the default driver
Creating jenkins ... done
Creating agent ... done
Head back to Jenkins, click Manage Jenkins, and select Manage Nodes and Clouds instead of credentials.
Click New Node.

Now define your Jenkins agent.
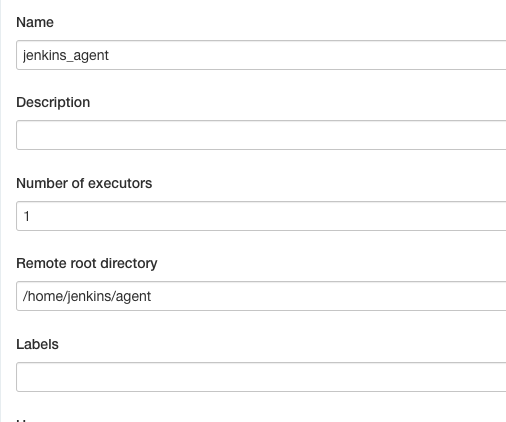
At the top of the form, give your agent a name and set the Remote root directory to /home/jenkins/agent. or /home/jenkins → (preferred)
Then, in the next part of the form, select Use this node as much as possible under Usage.
Under Launch method, select Launch agents via SSH.
For Host, enter agent. Each container can reach the others by using their container names as hostnames.
Next, click the dropdown under Credentials and select the one you just defined.
Now, under Host Key Verification Strategy, select Non verifying Verification Strategy.

Click Advanced on the right.

This opens the advanced configuration page. You need to change one setting here. Set the JavaPath to /usr/local/openjdk-11/bin/java. it can also be left blank and jenkins will find it automatically.
to find path to java:
find /usr/ -name java change /usr/ to wherever you want to search

Click Save at the bottom, and now it’s time to watch the agent start.
Jenkins will take you back to the node list. Click on your new node name.
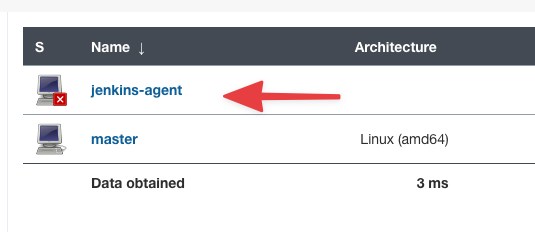
Then click on Log in the menu on the left.
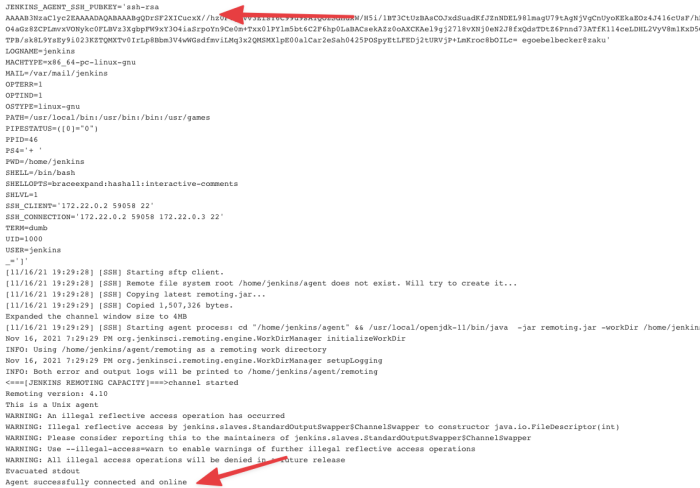
The most important entry you’ll see is Agent successfully connected and online.
sudo docker-compose up to elevate privilege.But if you look at the other entries, you’ll see plenty of information about your agent, including the SSH key.
You configured a Jenkins controller with Docker Compose. You set it up with a volume so it saved its instance data between restarts. Then you added a Jenkins agent to the Docker Compose configuration and set it up to talk to the controller.
This is just the beginning of Docker Compose’s capabilities and how the tool can help you administer your CI/CD infrastructure.
How to install wordpress and mysql with docker compose
version: "3.7"

services:
  db:
    image: mysql:5.7
    volumes:
      - db_data:/var/lib/mysql
    restart: always
    environment:
      MYSQL_ROOT_PASSWORD: somewordpress
      MYSQL_DATABASE: wordpress
      MYSQL_USER: wordpress
      MYSQL_PASSWORD: wordpress

  wordpress:
    depends_on:
      - db
    image: wordpress:latest
    volumes:
      - wordpress_data:/var/www/html
    ports:
      - "8000:80"
    restart: always
    environment:
      WORDPRESS_DB_HOST: db
      WORDPRESS_DB_USER: wordpress
      WORDPRESS_DB_PASSWORD: wordpress
      WORDPRESS_DB_NAME: wordpress
volumes:
  db_data: {}
  wordpress_data: {}
https://github.com/docker/awesome-compose
This repository contains pre-made compose templates.
ASP.NET / MS-SQL- Sample ASP.NET core application with MS SQL server database.
Elasticsearch / Logstash / Kibana- Sample Elasticsearch, Logstash, and Kibana stack.
Go / NGINX / MySQL- Sample Go application with an Nginx proxy and a MySQL database.
Go / NGINX / PostgreSQL- Sample Go application with an Nginx proxy and a PostgreSQL database.
Java Spark / MySQL- Sample Java application and a MySQL database.
NGINX / ASP.NET / MySQL- Sample Nginx reverse proxy with an C# backend using ASP.NET
NGINX / Flask / MongoDB- Sample Python/Flask application with Nginx proxy and a Mongo database.
NGINX / Flask / MySQL- Sample Python/Flask application with an Nginx proxy and a MySQL database.
NGINX / Node.js / Redis- Sample Node.js application with Nginx proxy and a Redis database
NGINX / Go- Sample Nginx proxy with a Go backend.
NGINX / WSGI / Flask- Sample Nginx reverse proxy with a Flask backend using WSGI.
PostgreSQL / pgAdmin- Sample setup for postgreSQL database with pgAdmin web interface
Python / Flask / Redis- Sample Python/Flask and a Redis database
React / Spring / MySQL- Sample React application with a Spring backend and a MySQL database.
React / Express / MySQL- Sample React application with a Node.js backend and a MySQL database.
React / Express / MongoDB- Sample React application with a Node.js backend and a Mongo database.
React / Rust / PostgreSQL- Sample React application with a Rust backend and a Postgres database.
React / Nginx- Sample React application with Nginx.
Spring / PostgreSQL- Sample Java application with Spring framework and a Postgres database.
and other single services like angular, vue, flask etc.
Practice
[Practice] clone this repo and Try to run these one by one with compose from this repo →
see how compose.yml is working
see how Dockerfile is written
react-nginx ✅
react-express-mongodb ❌ solve error
EACCES: permission denied, mkdir '/usr/src/app/node_modules/.cache’
react-express-mysql ✅
react-java-mysql ✅
angular ✅
wordpress-mysql ✅
prometheus-grafana ✅
nginx-nodejs-redis ✅
nginx-flask-mongo ✅
nginx-flask-mysql ✅
flask-redis ✅
apache-php ✅
django ✅
aspnet-mssql ✅
elasticsearch-logstash-kibana ✅
fastapi ✅
nginx-golang ✅
spring-postgres ✅
vuejs ✅
Docker Compose Syntax: Volume or Bind Mount?
https://maximorlov.com/docker-compose-syntax-volume-or-bind-mount/
Docker Compose allows you to configure volumes and bind mounts using a short syntax. A few examples:
./public:/usr/share/nginx/html
/var/lib/postgresql/data
/some/content:/usr/share/nginx/html
~/configs:/etc/configs
postgresql:/var/lib/postgresql/data
Which of these are volumes and which are a bind mounts?
Whenever I had to read a docker-compose.yml file, I had to look up the official documentation or run a quick local experiment to figure out how Docker Compose would mount the directories into the container.
I wrote this article so that next time you read a Docker Compose file, you won't have to guess anymore. You'll simply know by looking at the syntax whether a volume or a bind mount is used behind the scenes.
The different variations are essentially three unique forms. I list and explain them in this article below.
Two volumes keys in docker-compose.yml
Before we talk about the different ways to specify volumes, let's first clarify which volumes key we're referring to. In docker-compose.yml, the volumes key can appear in two different places.
version: "3.7"

services:
  database:
    # ...
    volumes: # Nested key. Configures volumes for a particular service.

volumes: # Top-level key. Declares volumes which can be referenced from multiple services.
  # ...
In this article, we'll talk about the nested volumes key. That's where you configure volumes for a specific service/container such as a database or web server. This configuration has a short (and a long) syntax format.
Short syntax format and its variations
The volume configuration has a short syntax format that is defined as:
[SOURCE:]TARGET[:MODE]
SOURCE can be a named volume or a (relative or absolute) path on the host system. TARGET is an absolute path in the container. MODE is a mount option which can be read-only or read-write. Brackets mean the argument is optional.
This optionality leads to three unique variations you can use to configure a container's volumes. Docker Compose is smart about recognising which variety is used and whether to use a volume or bind mount.
- No SOURCE -
eg.
/var/lib/postgresql/data
When only a target is specified, without a source, Docker Compose will create an anonymous directory and mount it as a volume to the target path inside the container.
The directory's path on the host system is by default /var/lib/docker/volumes/<uuid>/_data, where <uuid> is a random ID assigned to the volume as its name.
- A non-path SOURCE -
eg.
postgresql-data:/var/lib/postgresql/data
If a source is present and it's not a path, then Docker Compose assumes you're referring to a named volume. This volume needs to be declared in the same file in the top-level volumes key declaration.
Top-level volumes key always declares volumes, never bind mounts. Bind mounts don't have a name and they can't be named.
- A path SOURCE - eg.
/some/content:/usr/share/nginx/htmlor./public:/usr/share/nginx/html
If source is a path, absolute or relative, Docker Compose will bind mount the folder into the container. Relative paths starting with . or .. are relative to the location of docker-compose.yml.
Docker Compose allows you to configure volumes by using a short syntax string. Whether you end up with a volume or a bind mount, depends on which short syntax variation you use.
When you don't specify a source, Docker Compose will create an anonymous volume. If source is not a path, Docker Compose will assume source is a named volume. Sources that are relative or absolute paths are bind-mounted into the container.
How to link multiple docker-compose services via network
https://tjtelan.com/blog/how-to-link-multiple-docker-compose-via-network/
This scenario came from a question I was asked docker-compose and network connectivity between services defined in different docker-compose.yml files.
The desired result was to be able to define a docker-compose.yml in one file, and in a second docker-compose.yml have the ability to reach the first service via service or container name for development purposes.
Default scenario: Two separate docker-compose.yml and two separate default networks
Let’s take a simple docker compose file.
version: '3'
services:
  service1:
    image: busybox
    command: sleep infinity
When it starts up, a default network is created. Its name is based on the service name and the directory name of the docker-compose.yml file.
$ pwd
/tmp/docker-example/compose1

$ docker-compose up -d
Creating network "compose1_default" with the default driver
Creating compose1_service1_1 ... done
Second docker compose file
version: '3'
services:
  service2:
    image: busybox
    command: sleep infinity
Starting services in a second docker compose file, we see the same behavior. A new default network is created and used.
$ pwd
/tmp/docker-example/compose2

$ docker-compose up -d
Creating network "compose2_default" with the default driver
Creating compose2_service2_1 ... done
A side-effect of these isolated networks are that the containers are unable to ping one another by service name or container name.
Test: From Service 1 ping Service 2
# By service name
$ docker exec -it compose1_service1_1 ping service2
ping: bad address 'service2'

# By container name
$ docker exec -it compose1_service1_1 ping compose2_service2_1
ping: bad address 'compose2_service2_1'
Test: Service 2 ping Service 1
# By service name
$ docker exec -it compose2_service2_1 ping service1
ping: bad address 'service1'

# By container name
$ docker exec -it compose2_service2_1 ping compose1_service1_1
ping: bad address 'compose1_service1_1'
New scenario: Sharing a network between services
If you want define services in multiple docker-compose.yml files, and also have network connectivity between the services, you need to configure your services to use the same network.
To create an external network, you can run docker network create <name>. -- where <name> can be a single string without spaces.
Creating the network
$ docker network create external-example
2af4d92c2054e9deb86edaea8bb55ecb74f84a62aec7614c9f09fee386f248a6
Modified first docker-compose file with network configured
version: '3'
services:
  service1:
    image: busybox
    command: sleep infinity

networks:
  default:
    external:
      name: external-example
Restarting the services
$ pwd
/tmp/docker-example/compose1

$ docker-compose up -d
Creating compose1_service1_1 ... done
Modified second docker-compose file with network configured
version: '3'
services:
  service2:
    image: busybox
    command: sleep infinity

networks:
  default:
    external:
      name: external-example
Restarting the services
$ pwd
/tmp/docker-example/compose2

$ docker-compose up -d
Creating compose2_service2_1 ... done
After running docker-compose up -d on both docker-compose.yml files, we see that no new networks were created.
$ docker network ls
NETWORK ID          NAME                DRIVER              SCOPE
25e0c599d5e5        bridge              bridge              local
2af4d92c2054        external-example    bridge              local
7df4631e9cff        host                host                local
194d4156d7ab        none                null                local
With the containers using the external-example network, they are able to ping one another.
Test: Service 1 ping Service 2
# By service name
$ docker exec -it compose1_service1_1 ping service2
PING service2 (172.24.0.3): 56 data bytes
64 bytes from 172.24.0.3: seq=0 ttl=64 time=0.054 ms
^C
--- service2 ping statistics ---
1 packets transmitted, 1 packets received, 0% packet loss
round-trip min/avg/max = 0.054/0.054/0.054 ms

# By container name
$ docker exec -it compose1_service1_1 ping compose2_service2_1
PING compose2_service2_1 (172.24.0.2): 56 data bytes
64 bytes from 172.24.0.2: seq=0 ttl=64 time=0.042 ms
^C
--- compose2_service2_1 ping statistics ---
1 packets transmitted, 1 packets received, 0% packet loss
round-trip min/avg/max = 0.042/0.042/0.042 ms
Test: Service 2 ping Service 1
# By service name
$ docker exec -it compose2_service2_1 ping service1
PING service1 (172.24.0.2): 56 data bytes
64 bytes from 172.24.0.2: seq=0 ttl=64 time=0.041 ms
^C
--- service1 ping statistics ---
1 packets transmitted, 1 packets received, 0% packet loss
round-trip min/avg/max = 0.041/0.041/0.041 ms

# By container name
$ docker exec -it compose2_service2_1 ping compose1_service1_1
PING compose1_service1_1 (172.24.0.3): 56 data bytes
64 bytes from 172.24.0.3: seq=0 ttl=64 time=0.042 ms
^C
--- compose1_service1_1 ping statistics ---
1 packets transmitted, 1 packets received, 0% packet loss
round-trip min/avg/max = 0.042/0.042/0.042 ms
As a note, you can configure your services to use a custom container name by declaring the container_name key under each service (i.e., at the same level as image).
Takeaway
You can connect services defined across multiple docker-compose.yml files.
In order to do this you’ll need to:
- Create an external network with
docker network create <network name>
- In each of your docker-compose.yml configure the default network to use your externally created network with the
networkstop-level key.
- You can use either the service name or container name to connect between containers.
Using environment variables and files with Docker and Compose
Environment variables keep your app secure and flexible. This article will demonstrate that it’s easy to pass both individual variables and files that contain multiple Docker containers. If your app needs to connect to a database this would be the ideal place to store the database connection details. Advantages:
- Keeping all confidential information in one file; we can .gitignore all of it
- an env file can be “injected” in multiple containers; all configurations in one place
- Keep your Docker images safe; don’t build your image with confidential information baked into it
- We can just restart our running container with new environment variables instead of rebuilding our entire container with new variables.
This way you can simply restart your container when your database password changes. Obviously, we are going to use Docker and Docker-Compose for this.
First, we’ll create a container to pass the environment variables to. Then we’ll check out all the ways we can pass them. Let’s code!
Setting up
We’ll create a simple Python script called environprinter.py that prints our all keys and values in our environment:
import os
for k,v in os.environ.items():
 print(k,v)
We’ll bake this file in a simple docker image with the Dockerfile below.
FROM python:3.9-bullseye
WORKDIR /usr/src/app
COPY environprinter.py ./
CMD [ "python3", "./environprinter.py" ]
First, call this image environ_image. We build it with docker build . -t environ_image. Remember that this image simply contains a Python script that does nothing more than print all environment variables in our system.
When we spin up this container by executing docker run environ_image it prints all environment variables. You’ll see that there are always some environment variables that concern your path, hostname etc.
Passing environment variables
Let’s start up easy; first we’ll pass some variables. Later we’ll look into how to make this more dynamic.
1. Passing some environment variables with Docker run
The simplest way to pass an environment variable with Docker run is with the -e flag. We’ll pass the value myvalue to the environment. We need to specify a key for this as well: MYKEY:
docker run -e MYKEY=myvalue environ_imageNotice that MYKEY and myvalue now show up in the output! You can access these environment variables from anywhere in the container.
2. Passing an environment variable with Docker Compose
We can take the docker run the configuration that we’ve defined above and put in a docker-compose file.
version: '3.8'

  services:

    our_container:
      container_name: our_container
      hostname: our_container
      image: "environ_image"
      environment:
        - MYKEY=some_value
        - otherkey=3
Executing the compose file below does nothing more than the command above; spinning up the environ_imageand passing two environment variables. You can execute this file with docker-compose up
Using environment files
In this part, we’ll keep all of our environment variables in a single file. The file is called .env (no name; just an extension). In this file, we’ll keep a simple list of keys and values. Our file looks like this:
THE_LABEL="label 1"
USERNAME="mike huls"
Next, we’ll use this file in our docker-compose configuration.
1. Passing a env file to container using compose
Our goal is to pass the entire content of the .env file to our image. We do this with the docker-compose file below:
version: '3.8'

  services:

    our_container:
      container_name: our_container
      hostname: our_container
      image: "environ_image"
      env_file:
        - .env     # path to your .env file
Now we can just docker-compose up. Notice that all keys and values from our env file now are accessible in our Python file. Easy!
2. Passing an env file to docker-compose
We can also specify variables in the docker-compose file that get filled in with values from the .env file. Check out this example: we want our container to have a label that’s specified in the .env file.
In order to do this, we define a variable in the compose file in the following format: ${ENV_KEY}. When we spin up our container Docker will replace the variable by the value of the env variable as specified by the key:
version: '3.8'

 services:

    our_container:
      container_name: our_container
      hostname: our_container
      image: "environ_image"
      labels:
        some_label: ${THE_LABEL}
The code above looks for a key called ‘THE_LABEL’ in the .env file we’ve created earlier and replaces it with the value if it can find one. You can check out the output of this process with
docker-compose --env-file .env configThis way we can dynamically pass values to the docker compose file. Spin up your container with docker-compose --env-file .env up.
Using multiple env files
Notice that passing an env file to the image and passing an env file to the docker-compose configuration are two different things. In the example below we do both with two different .env files. One is called label.env, the other is called python.env. The content of these files is irrelevant for now:
version: '3.8'

  services:

    our_container:
      container_name: our_container
      hostname: our_container
      image: "environ_image"
      labels:
        some_label: ${VERSION}
      env_file:
        - python.env
We spin up this container with: docker-compose --env-file label.env up.
As you see we specify the python.env to be passed to the container while we use the label.env file for configuring the compose file