
Kubernetes
What is kubernetes?
need of kubernetes? what problem is solves? features?
what are the tasks of an orchestration tool?
k8s components
- node or worker node
- pod
- abstration over a container
- easier to replace container runtime used underneath
- you only interact with the kubernetes layer
- each pod gets it’s own IP address[not the containers]
- service
- service has 2 functionalities : permanent IP and also act as a load balancer[service will actually catch the request and forward it to whichever pod is least busy. the replica is connected to the same service]
- pods communicate with each other using a service
- permanent IP addr attached to each pod
- lifecycle of service and pod not connected
- types:
- internal service
- external service
- ingress
- forwards to service
- configMap
- external configuration of your application
- plain text
- Don’t put credentials into ConfigMap[ but here we will store cred in configMap 😛]
- secret
- used to store secret data
- base64 encoded
- the built-in security mechanism is not enabled by default
- volumes
- deployment
- statefulSet
volumes
- storage on local machine or remote, outside of the K8s cluster
- K8s doesn’t manage data persistance!
- the user is responsible for backingup data, replicating, managing etc
deployment
- blueprint for my-apps pods
- you create deployments
- abstration of pods
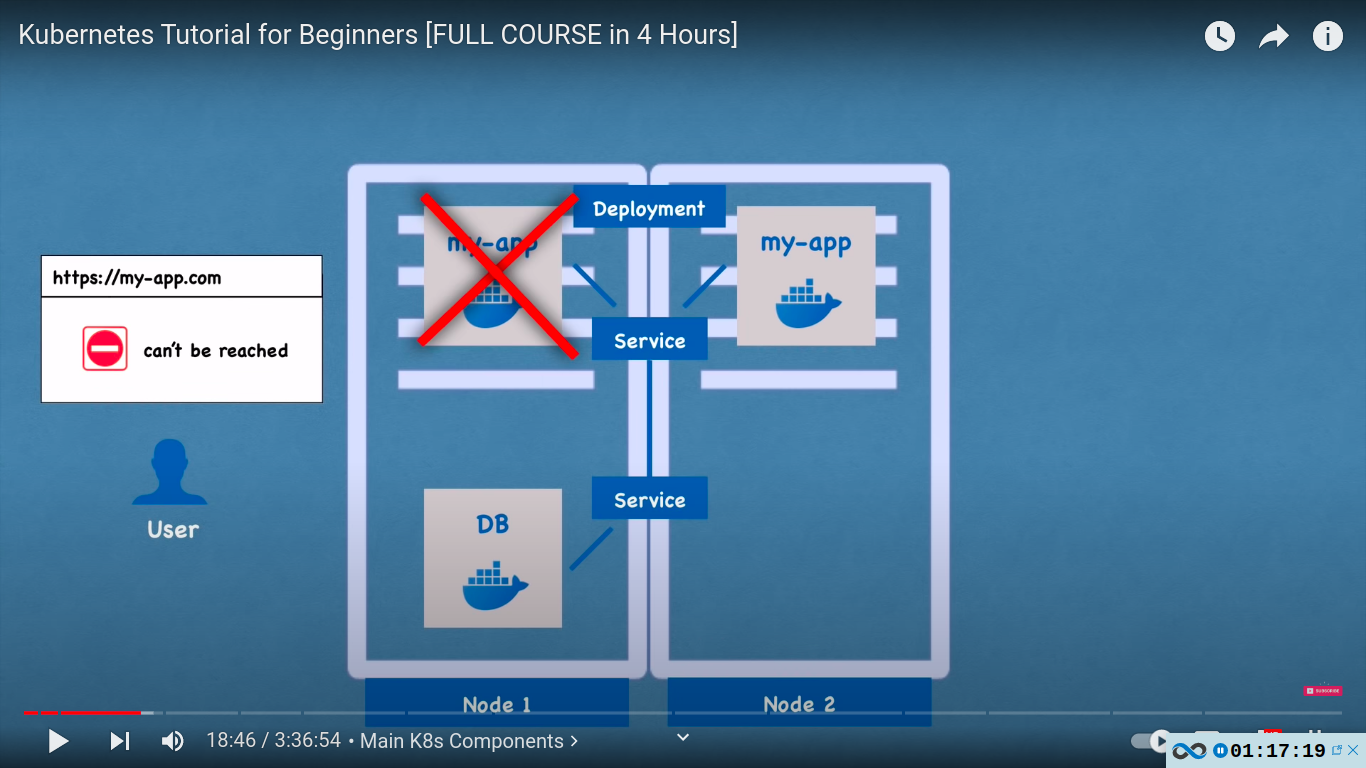
- if one pod dies.. the service will automatically forwards request to another
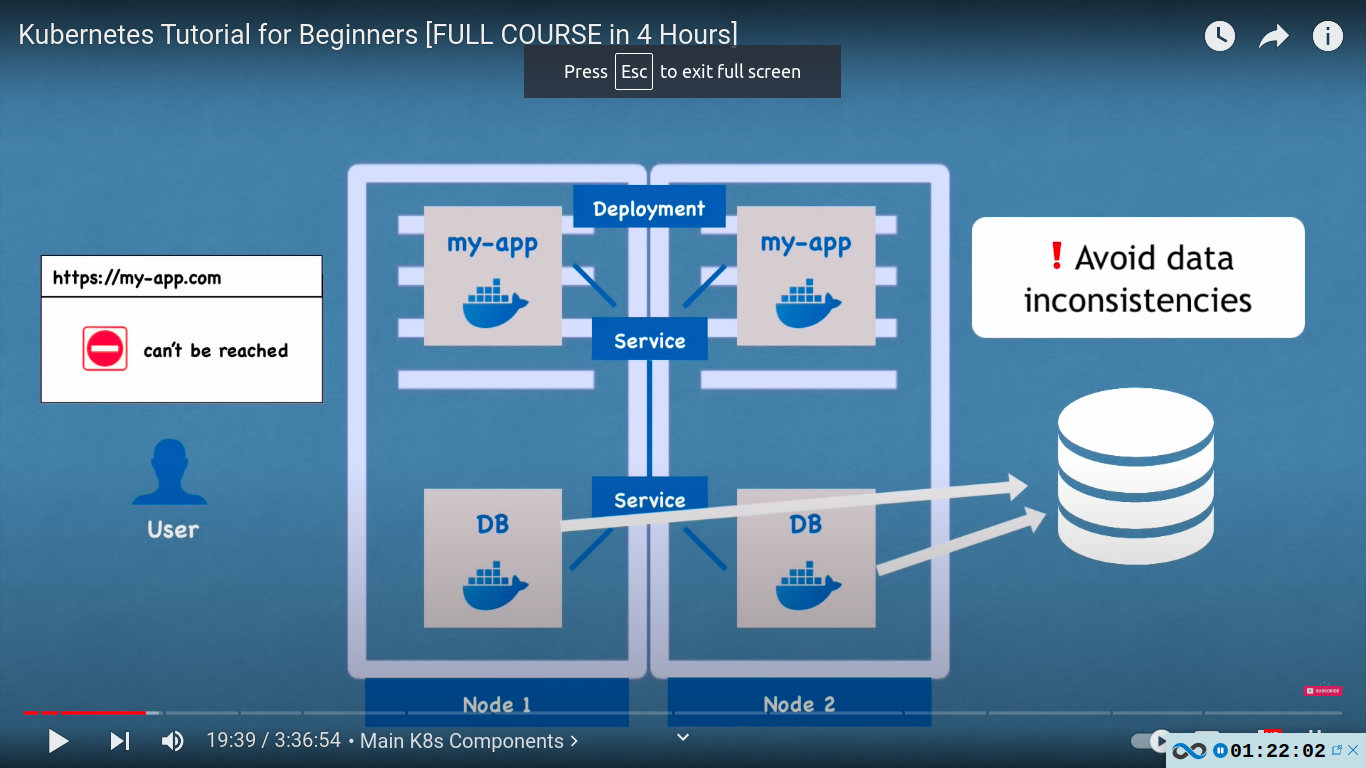
- Database can’t be replicated via deployment! as they are stateful e.g if we have clones or replicas of the database they would all need to access the same shared storage and there you would need some kind of mechanism that manages which pods are currently writing to that storage or which pods are reading from that storage in order to avoid data inconsistencies. we use statefulsets for that.
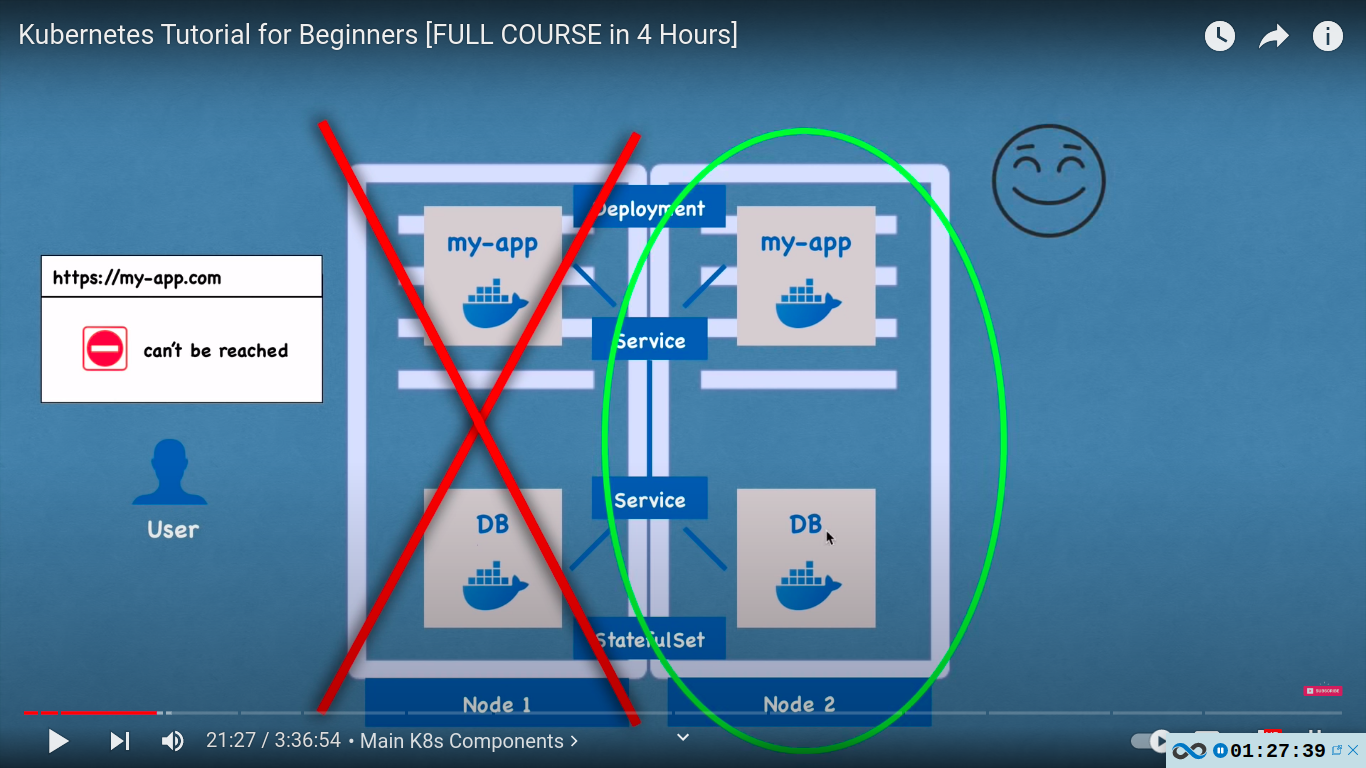
StatefulSet
- for stateful apps like databases eg. mongo, mysql, elasticsearch should be created using stateFul set and not deployments
- Deploying statefulSet is not easy, that’s why its a common practice to host DBs outside of the K8s cluster
- if node1 is no longer working.. node 2 will still work
Kubernetes architecture
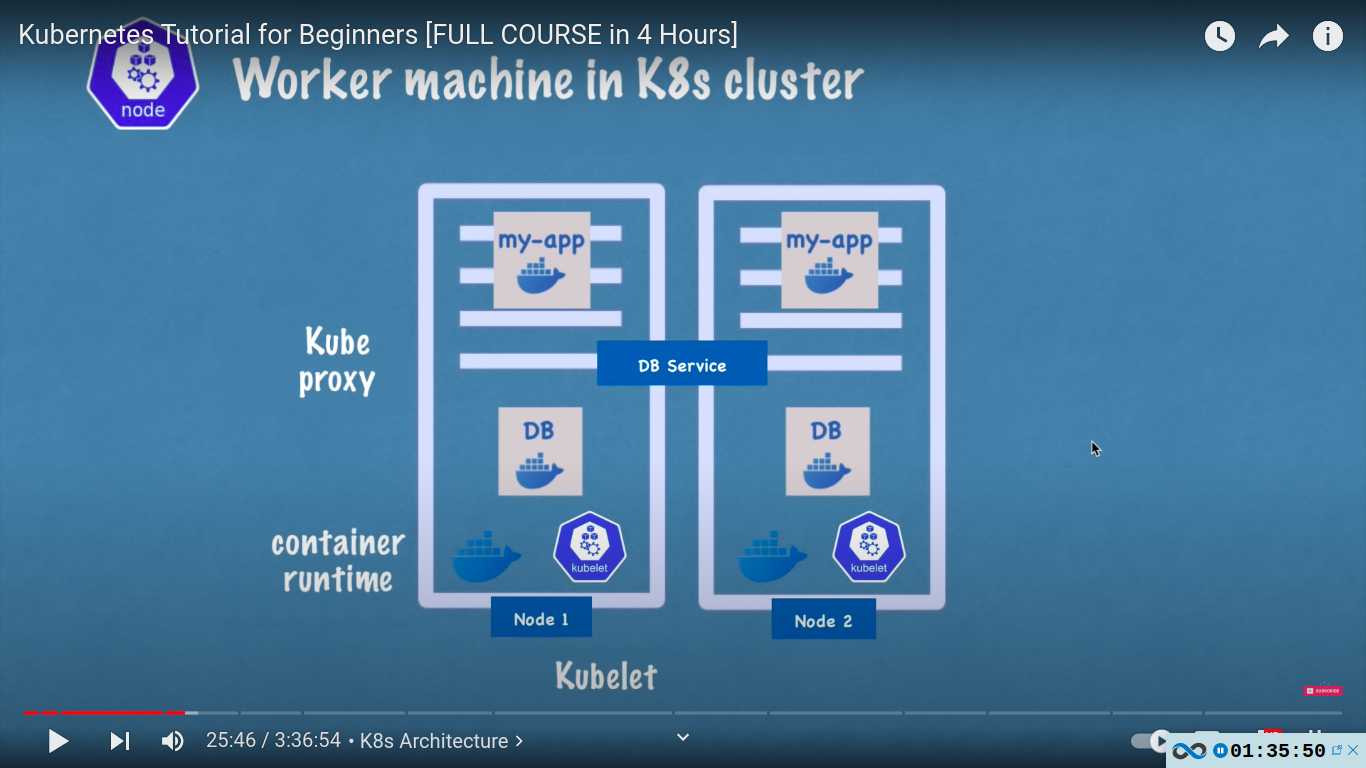
- worker machine in K8s cluster
- communication via services
- each node has multiple pods in it
- 3 processes must be installed in every worker node
- container runtime eg docker
- kubelet - interacts with the container and node itself. kubelet starts the pod with a container inside
- kube proxy - forwards the requests. intelligent forwarding for performance.
- worker nodes do the actual work
Q. So, how do you interact with this cluster
how to:
- schedule pod?
- monitor?
- re-schedule/restart pod?
- join a new node?
Answer : All the managing processes are done by master nodes
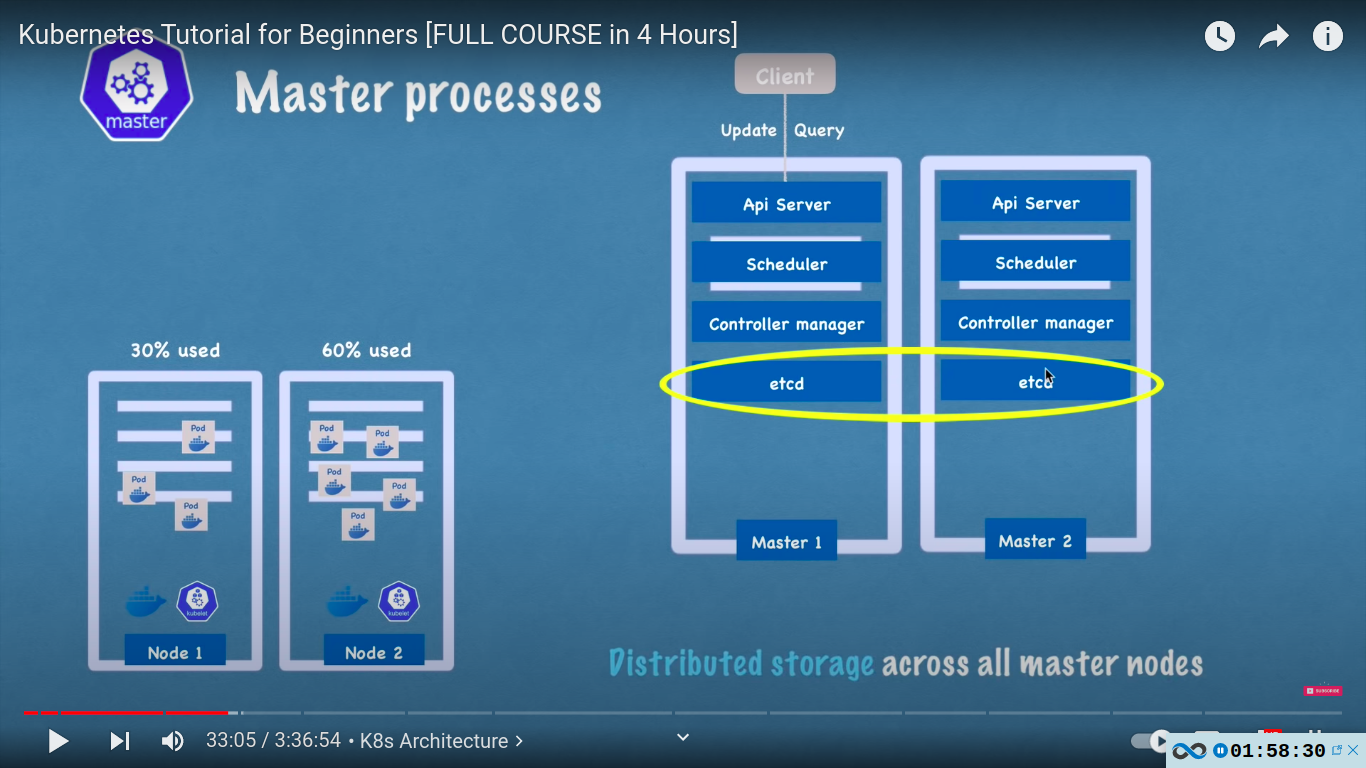
master node / master processes
4 processes run on every master node! - api server, scheduler, controller manager, etcd
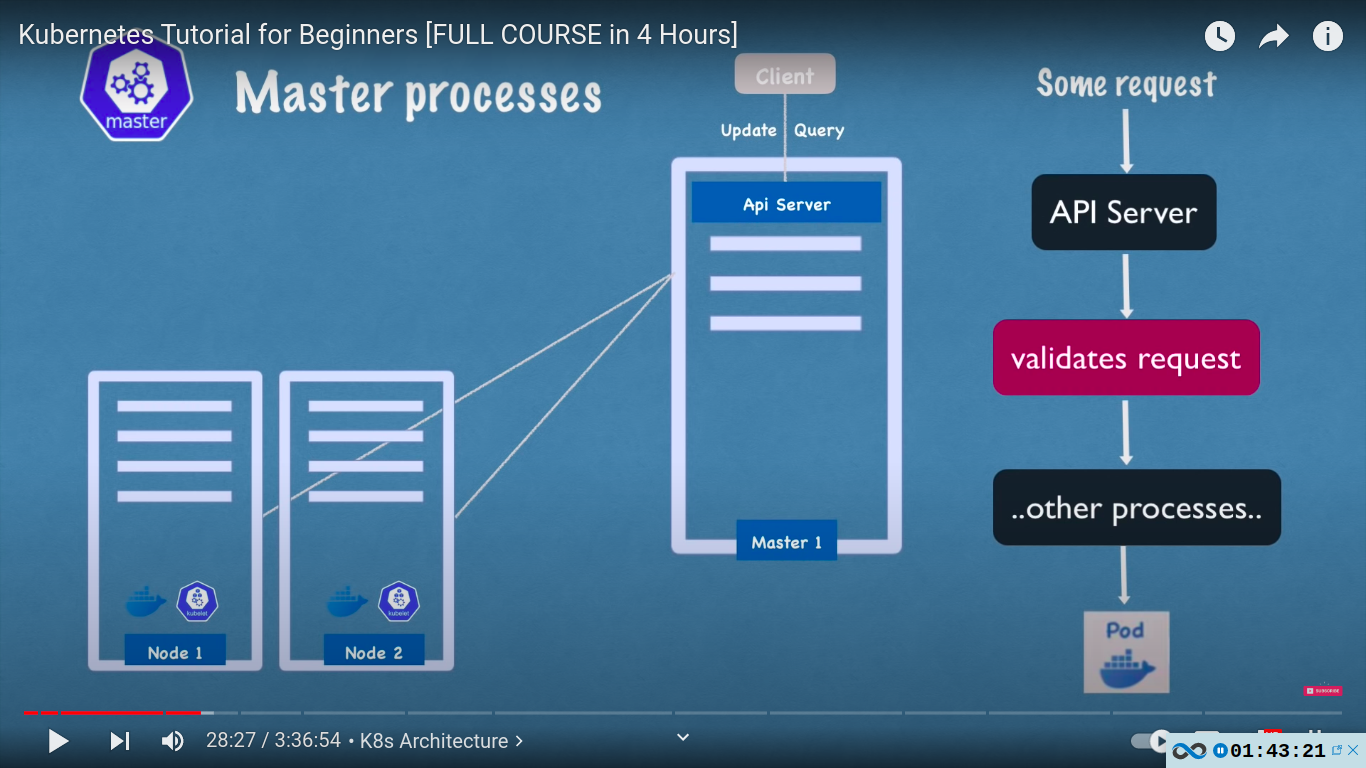
- api server - client[ kubectl etc] communicates with api server first. gateway to the cluster, also acts as a gatekeeper for authentication
- only one entrypoint into the cluster
- some request → API server → Validates request → other processes
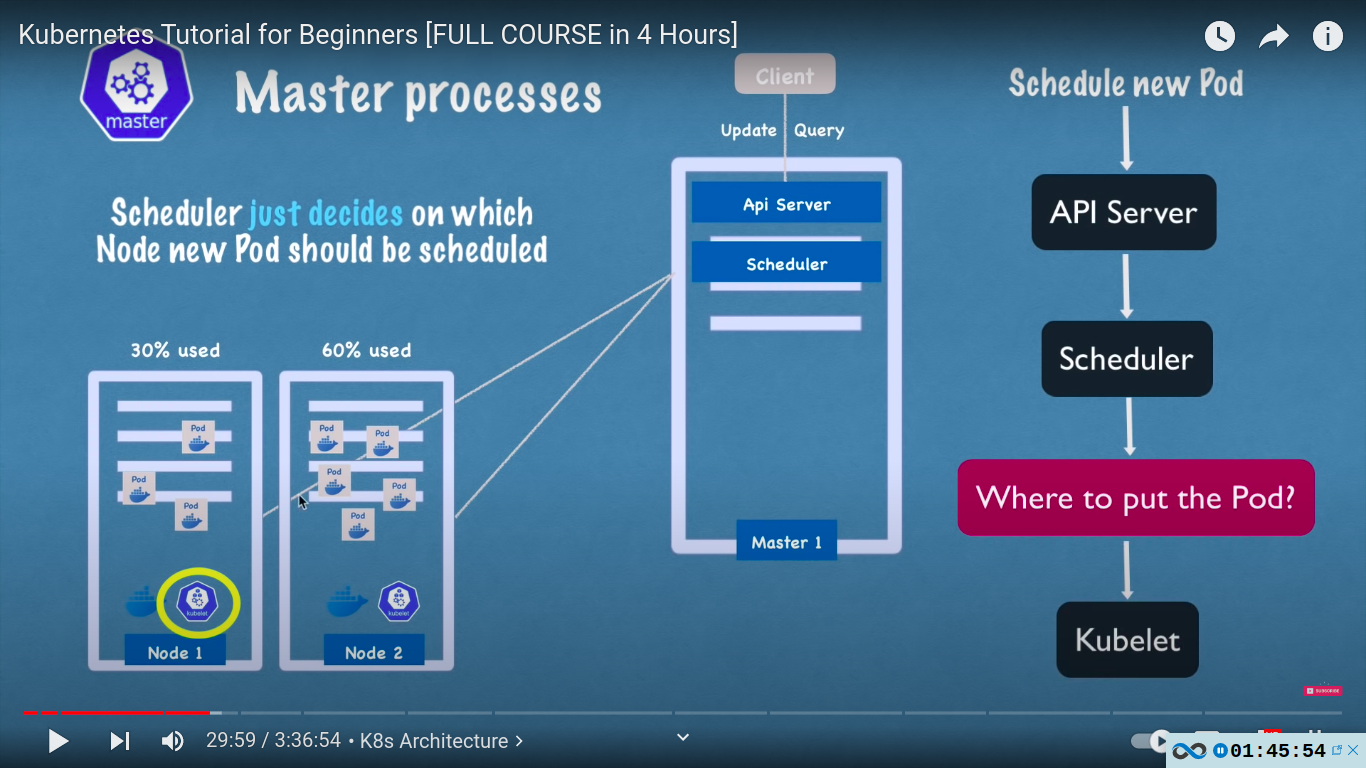
- scheduler
- scheduler just decides on which node new pod should be scheduled
- intelligent scheduling - if a node has 30% resource used and other 60%, then it will schedule the pod with more available resource( i. e 30% )
- actual pod is started by kubelet
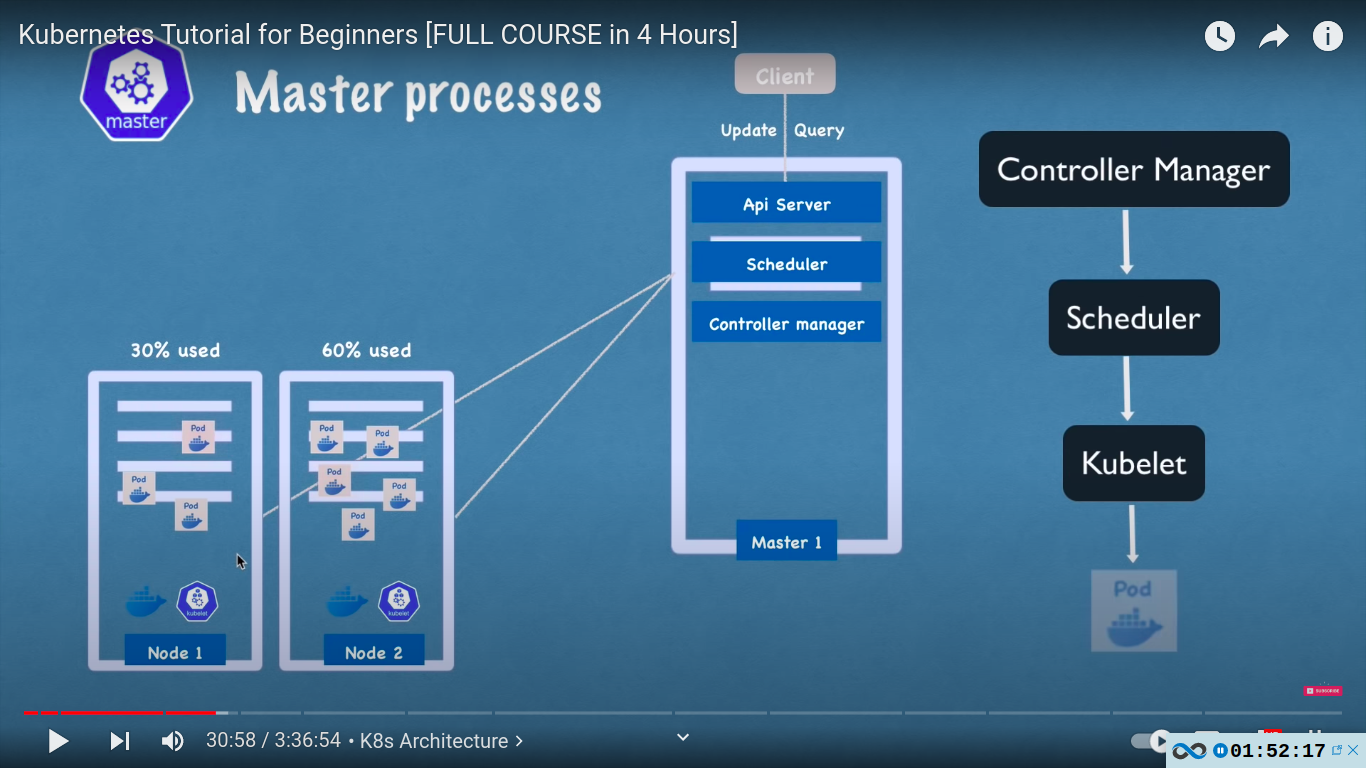
- controller manager
- what happens when pods die on a node? there must be a way to know about this and reschedule those pods as soon as possible.
- controller manager detects cluster state changes e.g crashing of pods
- controller manager → scheduler → kubelet
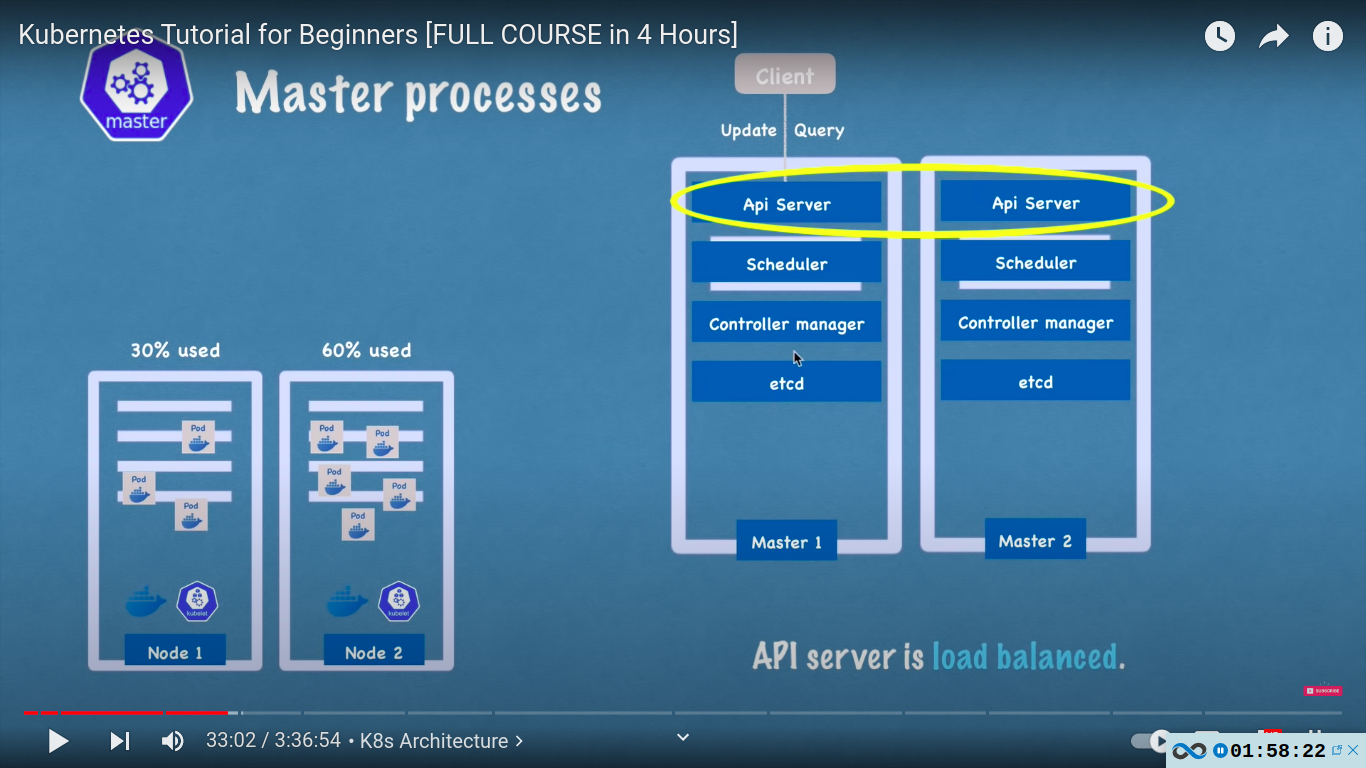
- etcd
- key-value store of a cluster state
- cluster changes get stored in the key value store
- cluster brain because all of the mechinsm with scheduler, controller manager etc works because of its data. for eg how does scheduler know what resources are available on each worker node or how does controller manager know that the cluster state change eg pods dies, or kubelet restarted or is the cluster healthy?
- actual applicaion data is not stored in etcd!
- in practice kubernetes clusters are usually made up of multiple masters where each master nodes runs its master processes where ofcourse the API server is load balanced and etcd store forms a distributed storage across all the master nodes.
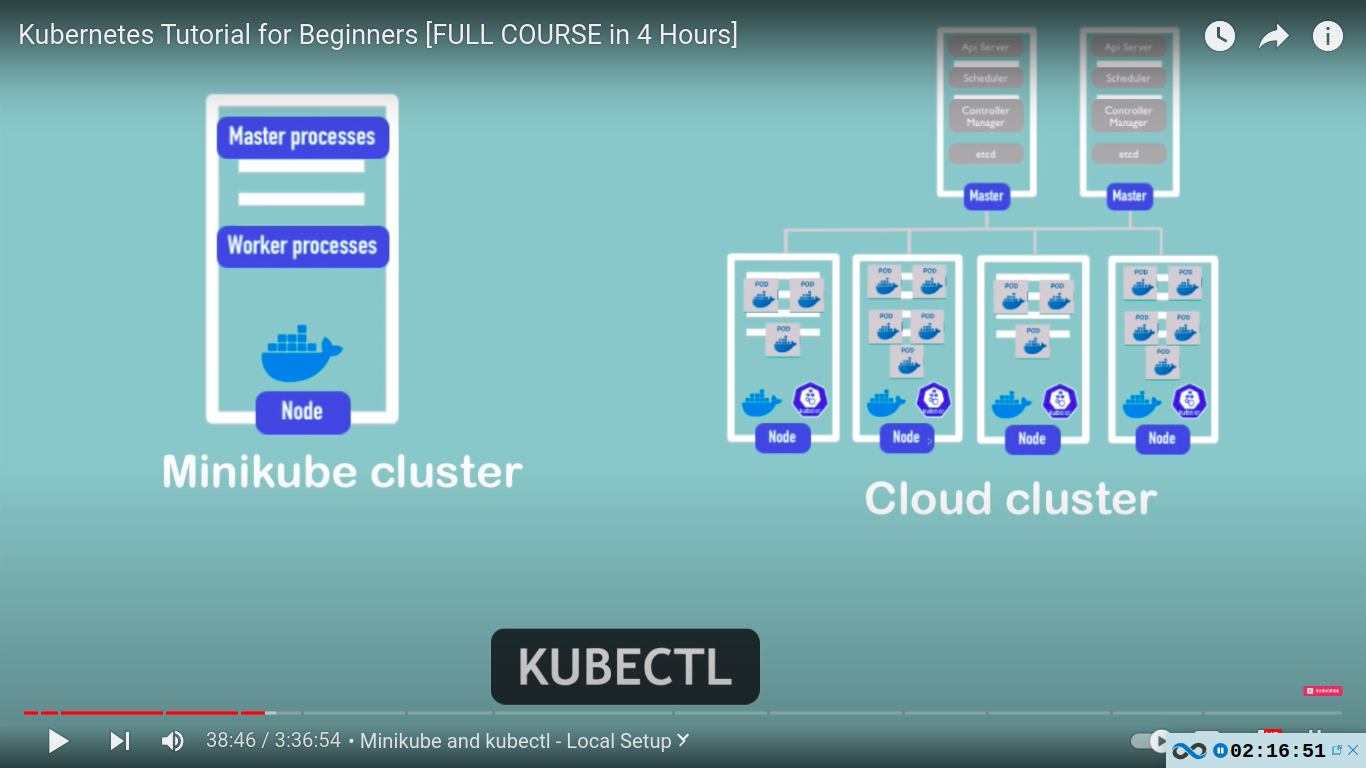
example cluster setup
a basic cluster with 2 master and 3 worker
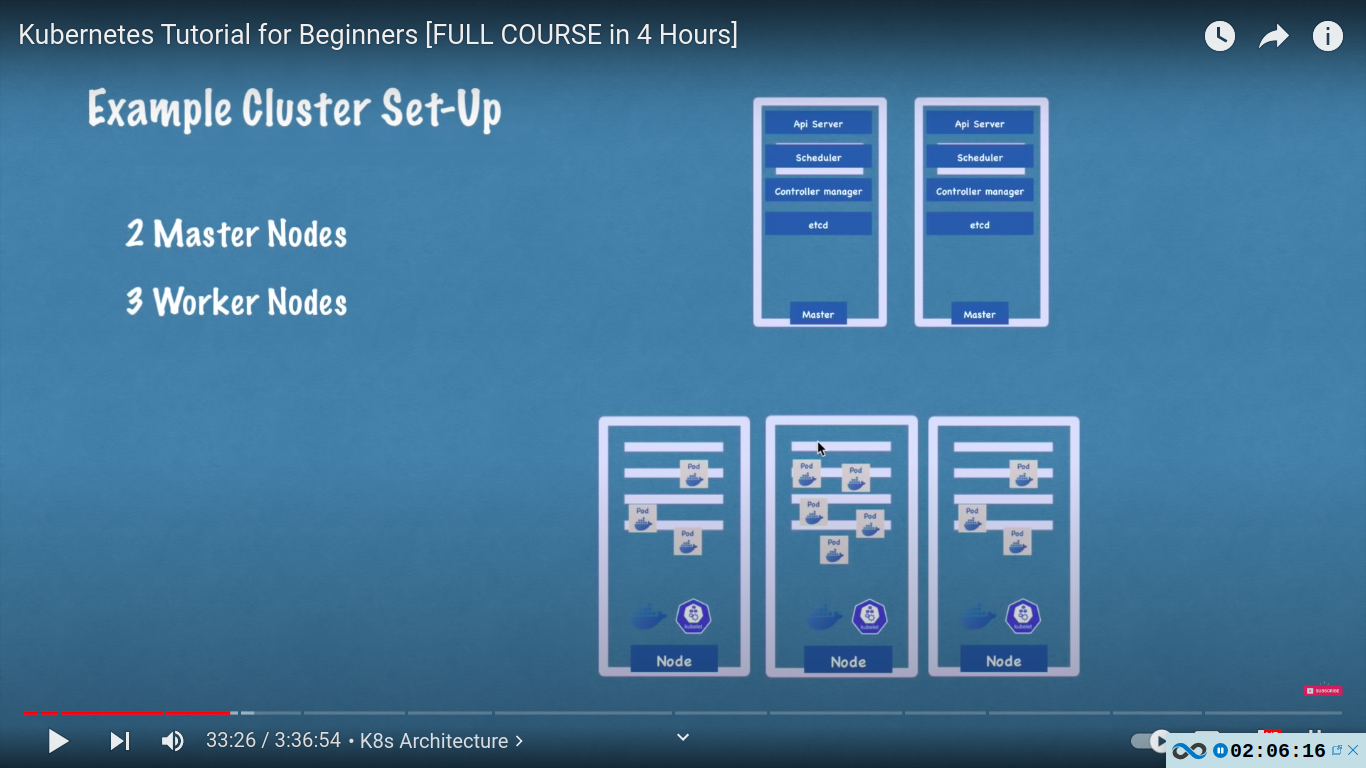
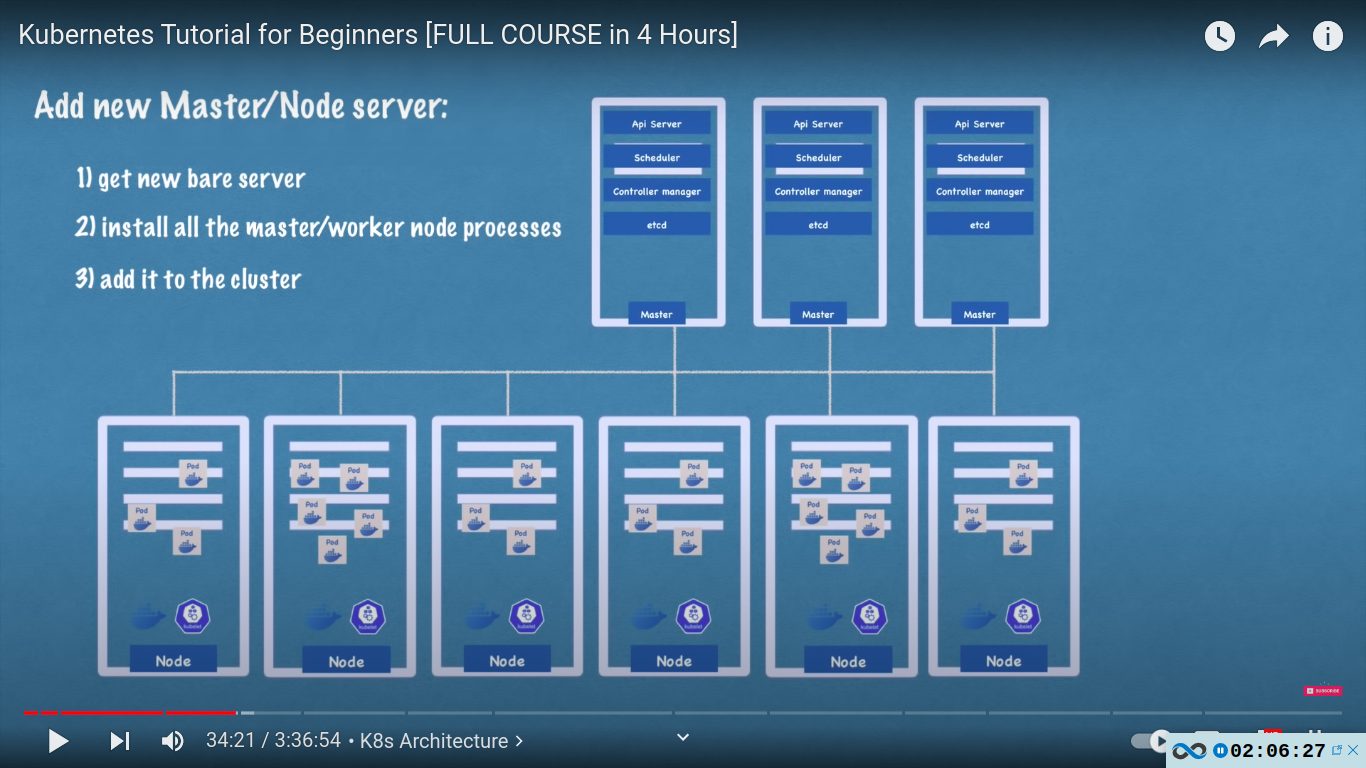
as complexity grows we can add new master and workers
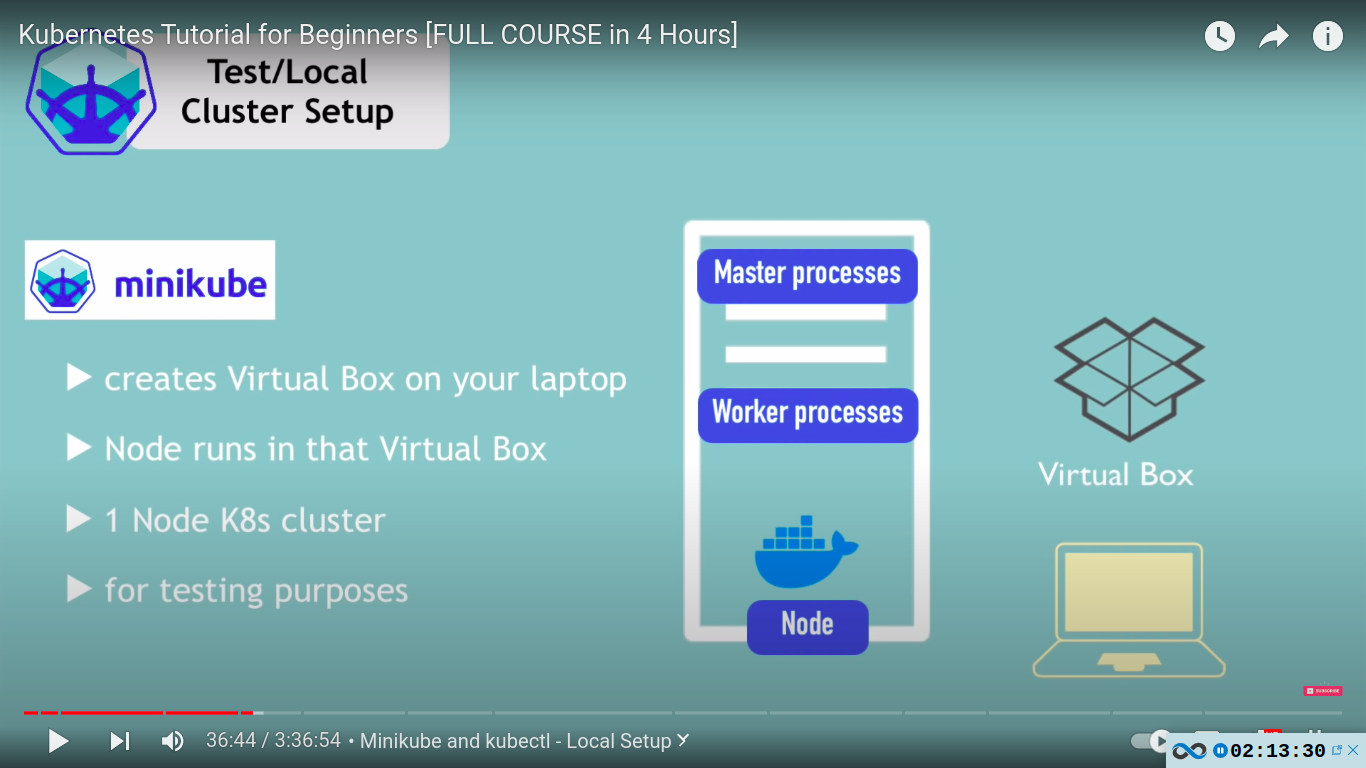
Minikube and kubectl local setup
setup mini-kube cluster
but how to test locally?
use minikube - one node cluster where the master and node processes run on ONE machine[docker pre installed]
what is kubectl?
- helps with interacting with the cluster
- command line tool for k8s cluster
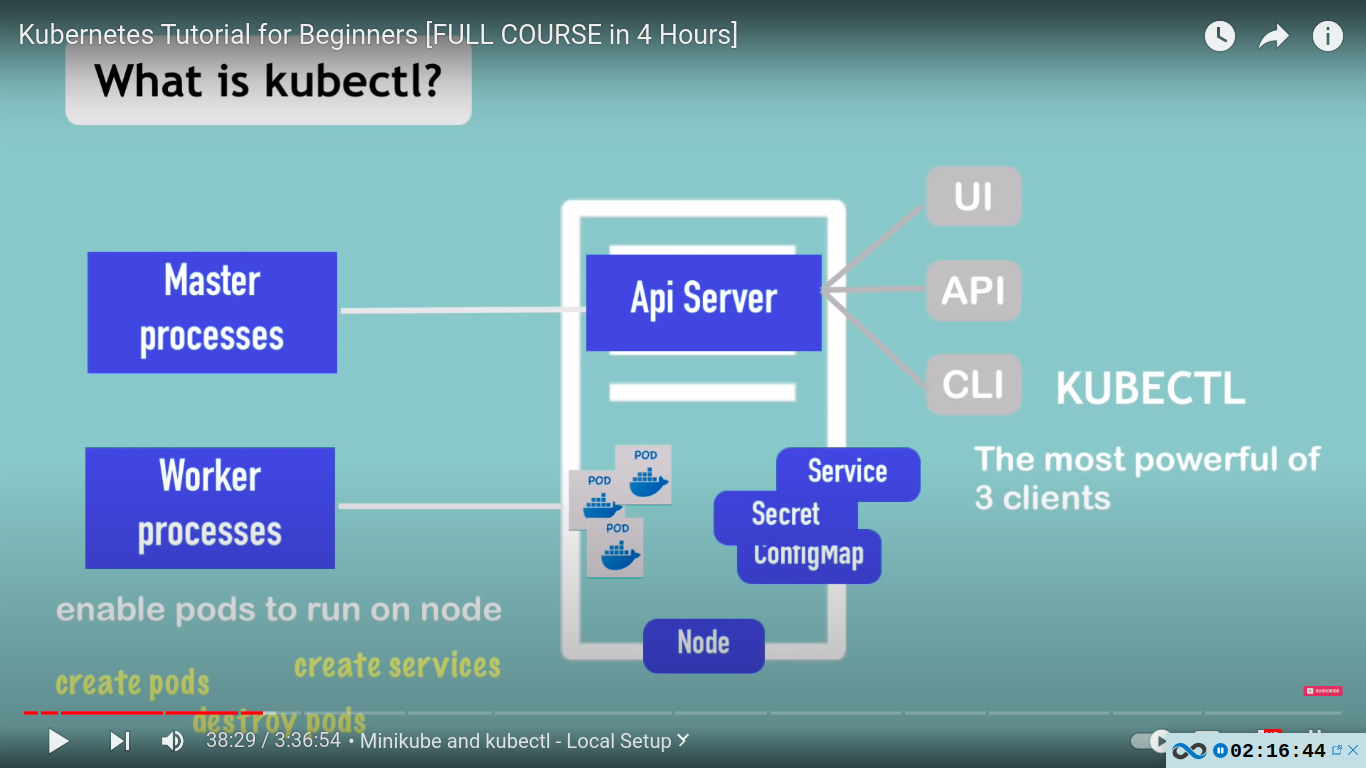
kubectl is not just for minikube.. it is also used for any type of k8 cluster setup eg cloud clusters etc
installing minikube [kubectl is a dependency]
follow any blog on internet. it’s easy
some commands
→ create minikube cluster
minikube start
minikube start --vm-driver=hyperkit
kubectl get nodes
minikube status
kubectl version
you might need to use minikube before kubectl for some commands to work or simply set alias
basic kubectl commands
kubectl get nodes
kubectl get pod
kubectl get pod —all-namespaces
kubectl get services
kubectl get all
kubectl get configmap
kubectl get secrets
kubectl get secrets --all-namespaces
kubectl create deployment NAME --image=image
eg
kubectl create deployment nginx-deploy --image=nginx
kubectl delete deployment nginx-deploy
kubectl get deployment
kubectl get deployment --all-namespaces
kubectl get replicaset
kubectl get events
kubectl cluster-info
for getting running pods
kubectl get pods --field-selector=status.phase=Running
create a new namespace with unique name
kubectl create ns hello-there
layers of abstration:
everything below deployment is handled by kubernetes
deployment manages a … → replicaset
replicaset manages a … → pod
pod is an abstraction of … → container
kubectl edit deployment [NAME]
eg.
kubectl edit deployment nginx-deploy
sample deployment configuration
A sample auto generated configuration file with default values of a deployment created with
kubectl create deployment nginx-deploy --image=nginx command.
Go through all the properties/options/whatever to understand.
apiVersion: apps/v1
kind: Deployment
metadata:
  annotations:
    deployment.kubernetes.io/revision: "1"
  creationTimestamp: "2022-08-16T08:22:45Z"
  generation: 1
  labels:
    app: nginx-deploy
  name: nginx-deploy
  namespace: default
  resourceVersion: "12513"
  uid: de257b93-7c4d-4ee2-a099-cf873c89be7c
spec:
  progressDeadlineSeconds: 600
  replicas: 1
  revisionHistoryLimit: 10
  selector:
    matchLabels:
      app: nginx-deploy
  strategy:
    rollingUpdate:
      maxSurge: 25%
      maxUnavailable: 25%
    type: RollingUpdate
  template:
    metadata:
      creationTimestamp: null
      labels:
        app: nginx-deploy
    spec:
      containers:
      - image: nginx
				imagePullPolicy: Always
        name: nginx
        resources: {}
        terminationMessagePath: /dev/termination-log
        terminationMessagePolicy: File
      dnsPolicy: ClusterFirst
      restartPolicy: Always
      schedulerName: default-scheduler
      securityContext: {}
      terminationGracePeriodSeconds: 30
status:
  availableReplicas: 1
  conditions:
  - lastTransitionTime: "2022-08-16T08:23:07Z"
    lastUpdateTime: "2022-08-16T08:23:07Z"
    message: Deployment has minimum availability.
    reason: MinimumReplicasAvailable
    status: "True"
    type: Available
  - lastTransitionTime: "2022-08-16T08:22:45Z"
    lastUpdateTime: "2022-08-16T08:23:07Z"
    message: ReplicaSet "nginx-deploy-99976564d" has successfully progressed.
    reason: NewReplicaSetAvailable
    status: "True"
    type: Progressing
  observedGeneration: 1
  readyReplicas: 1
  replicas: 1
  updatedReplicas: 1
debugging pods
- logs
kubectl logs [podName]
e.g
kubectl logs nginx-deploy-6b8ccdcfd4-dc6hvthis might not give any result in our case as nginx in our test didn’t log anything
let’s create a mongo deployment to see logs
kubectl create deployment mongo-depl --image=mongoand now we can hopefully see some logs
kubectl logs mongo-depl-85dcbc595b-2fbls
- describe pods
additional information about a pod
kubectl describe pod [podName]
kubectl describe pod mongo-depl-85dcbc595b-2fbls
- describe node
additional information about a node
kubectl describe node [nodeName]
eg
kubectl describe node minikube
- get pods on a specific node
kubectl get pods --all-namespaces -o wide --field-selector spec.nodeName=[nodeName]
eg
kubectl get pods --all-namespaces -o wide --field-selector spec.nodeName=minikube
- enter inside a container
kubectl exec -it [podName] [command]
e.g
kubectl exec -it nginx-deploy-6b8ccdcfd4-dc6hv bin/bash
kubectl delete deployment [deploymentName]kubectl delete replicaset nginx-deploy-99976564dkubectl apply
- apply manages applications through files defining Kubernetes resources. It creates and updates resources in a cluster through running kubectl apply . This is the recommended way of managing Kubernetes applications on production.
kubectl apply -f [fileName]e.g
kubectl apply -f config-file.yamlwe can also delete using yaml like this[pods , replicasets will also be deleted]
kubectl delete -f config-file.yamlan example manifest for nginx deployment. Let’s take this as an example of a manifest for Nginx deployment into the K8 cluster
apiVersion: apps/v1
kind: Deployment
metadata:
  name: my-nginx
  labels:
    app: nginx
spec:
  replicas: 1
  selector:
    matchLabels:
      app: nginx
  template:
    metadata:
      labels:
        app: nginx
    spec:
      containers:
      - name: nginx
        image: nginx:1.16
        ports:
        - containerPort: 80
As we could see it has 4 main objects such as
apiVersion, kind, metadata & spec,but how do we find these objects and where we could get the values corresponding to each object? This is where the role ofkubectl api-versions, kubectl api-resources & kubectl explaincommand comes into play (eg kubectl explain --api-version=apps/v1 Deployment)k8s YAML configuration file
YAML - strict indentation syntax!
- the three parts of the configuration file
- connecting deployments to service to pods
- each configuration file has 3 parts
- metadata
- specification - attributes of the “spec” are specific to the kind
- status - inserted by kubernetes itself. kubernetes compares desired state and actual state. and if the desire state is not equal to the actual state then kubernetes know that something is not correct and it tries to fix it. this is the basis of self-healing feature that kubernetes provide.
where does k8s get this status data? etcd ofcourse!
- store the config file with your code
- template has it’s own “metadata” and “spec” section - configuration within a configuration. this template configuration applies to a pod.
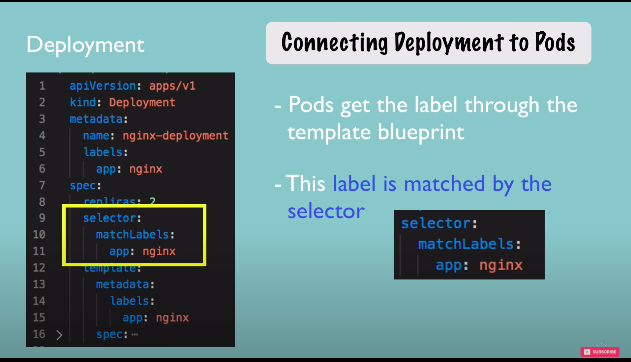
connecting components(labels & selectors & ports)
metadata part contains labels and the spec part contains selectors
- e.g connecting deployment to pods
- -any key-value pair for component as label
- and it is matched with selector
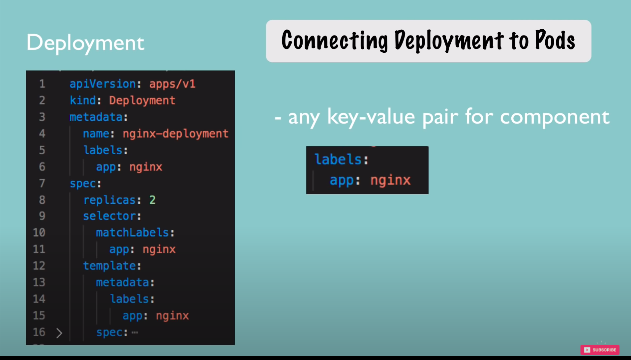
- pods get the label through the template blueprint
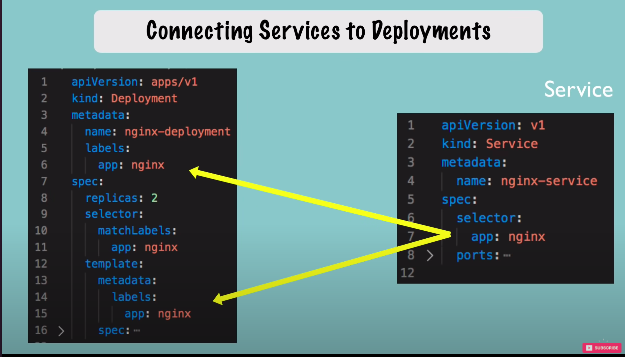
- e.g connecting services to deployments
- in the spec of service we define a selector which basically makes a connection b/w the service and the deployment or its pods because service must know which pods are kind of registered with it so which pods belong to that service. this connection is made through the selector of the label.
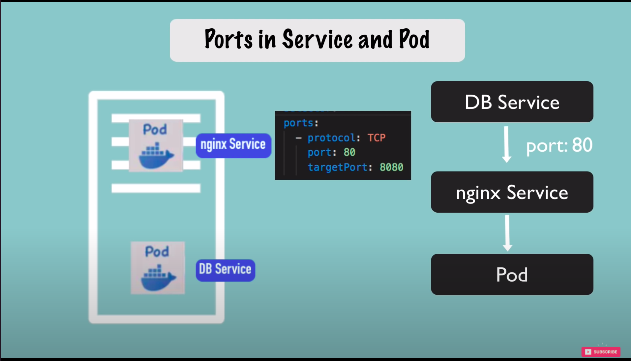
ports
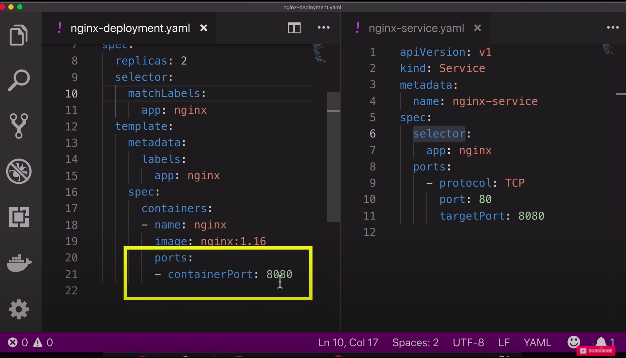
service has a port where the service itself is accessible at so if other service sends a request to nginx service here it needs to send it on port 80 but this service needs to know to which pod it should forward the request but also at which port is that pod listening and that is the target port.
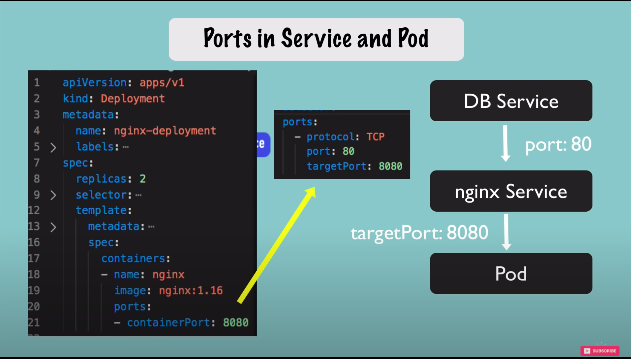
nginx-deployment.yaml
apiVersion: apps/v1
kind: Deployment
metadata:
    name: nginx-deployment
    labels:
        app: nginx
spec:
    replicas: 2
    selector:
        matchLabels:
            app: nginx
    template:
        metadata:
            labels:
                app: nginx
        spec:
            containers:
            - name: nginx
              image: nginx:1.16
              ports:
              - containerPort: 8080
nginx-service.yaml
apiVersion: v1
kind: Service
metadata:
    name: nginx-service
spec:
    selector:
        app: nginx
    ports:
        - protocol: TCP
          port: 80
          targetPort: 8080
kubectl apply -f nginx-deployment.yamlkubectl apply -f nginx-service.yamlkubectl get podcheck port of service
kubectl get servicecheck endpoints with this command
kubectl describe service nginx-serviceverify endpoint / IP
kubectl get pod -o wideget deployment in a YAML format (resides in etcd!)
kubectl get deployment [deploymentName] -o yamle.g
kubectl get deployment nginx-deployment -o yamlsimilarly,
get service in a YAML format( resides in etcd!)
kubectl get service nginx-service -o yaml
Complete application setup with kubernetes component - mongo and mongo-express with secret and configmap
Timestamp - start: https://youtu.be/X48VuDVv0do?t=4593
Timestamp - end: https://youtu.be/X48VuDVv0do?t=6374
git repo for code : https://gitlab.com/nanuchi/youtube-tutorial-series/-/tree/master/demo-kubernetes-components
basic flow of our setup:
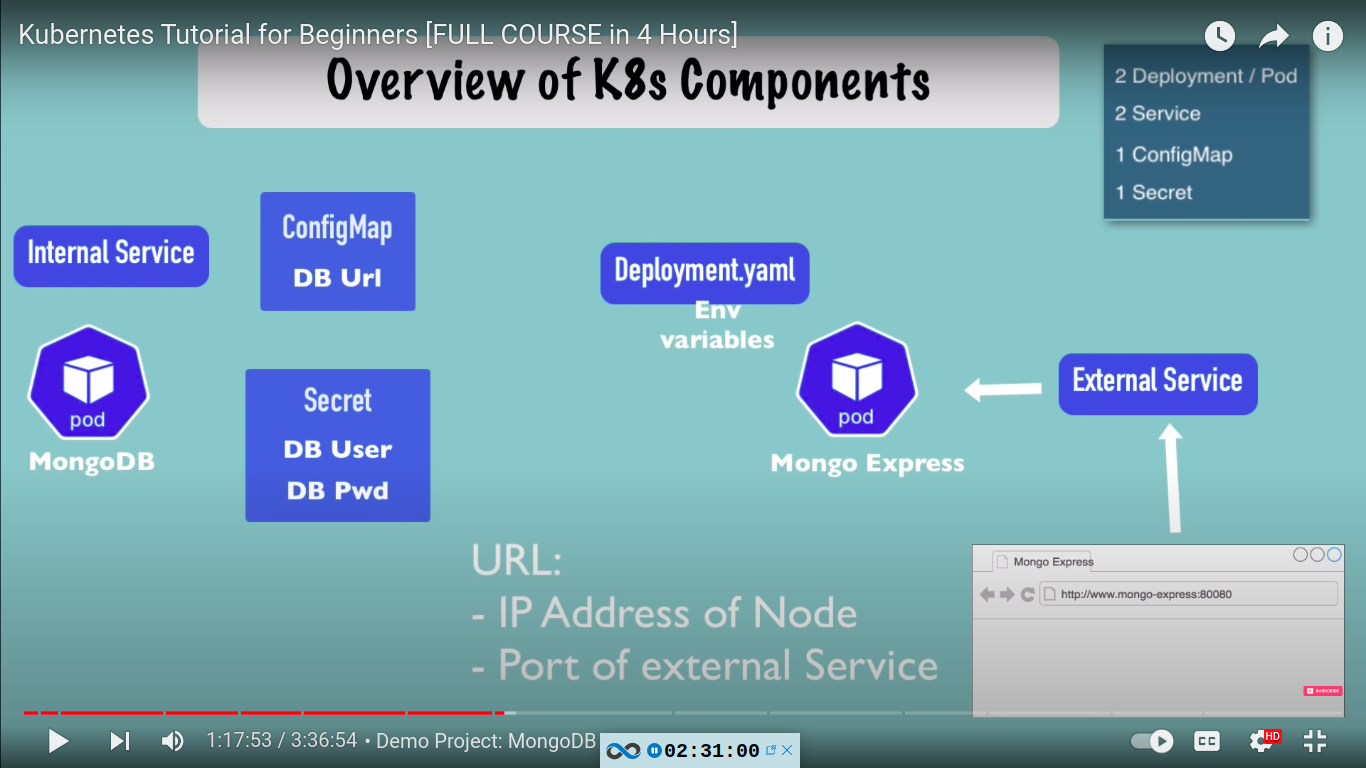
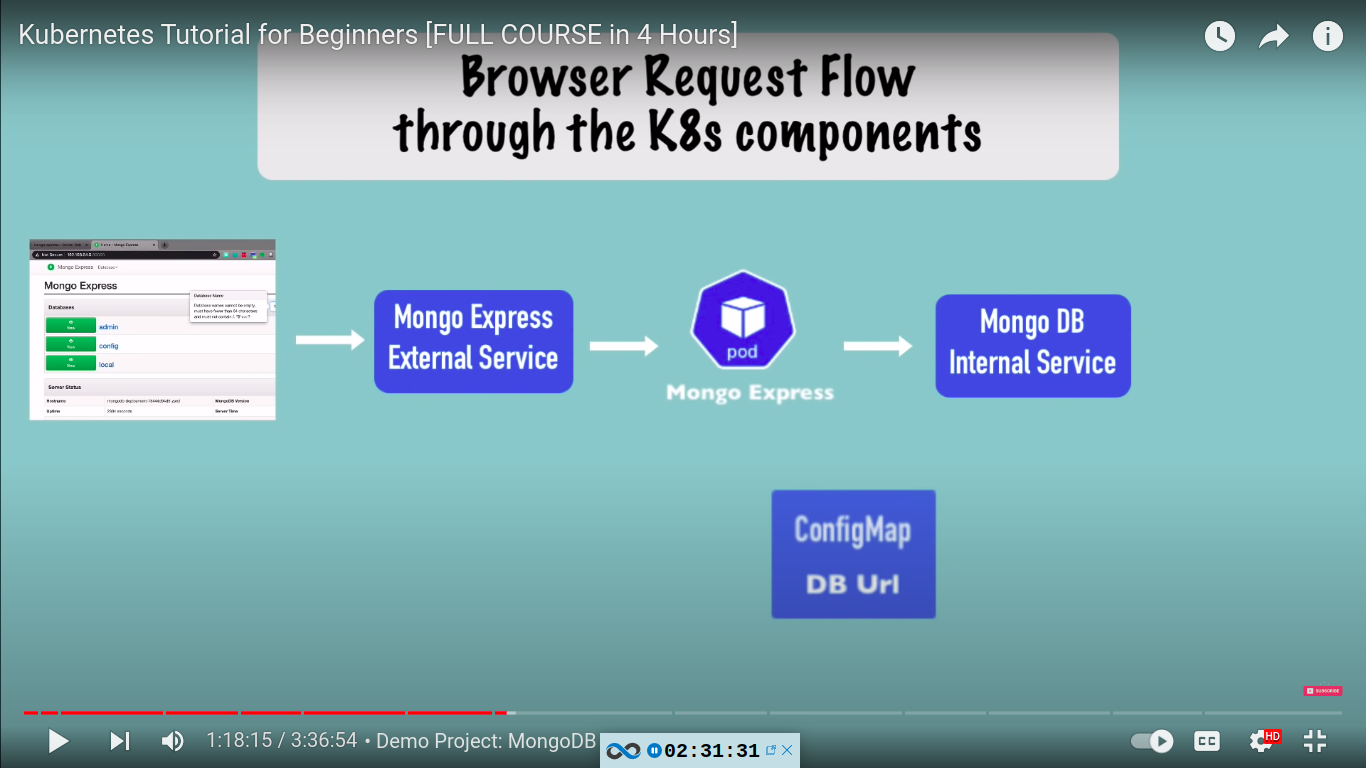
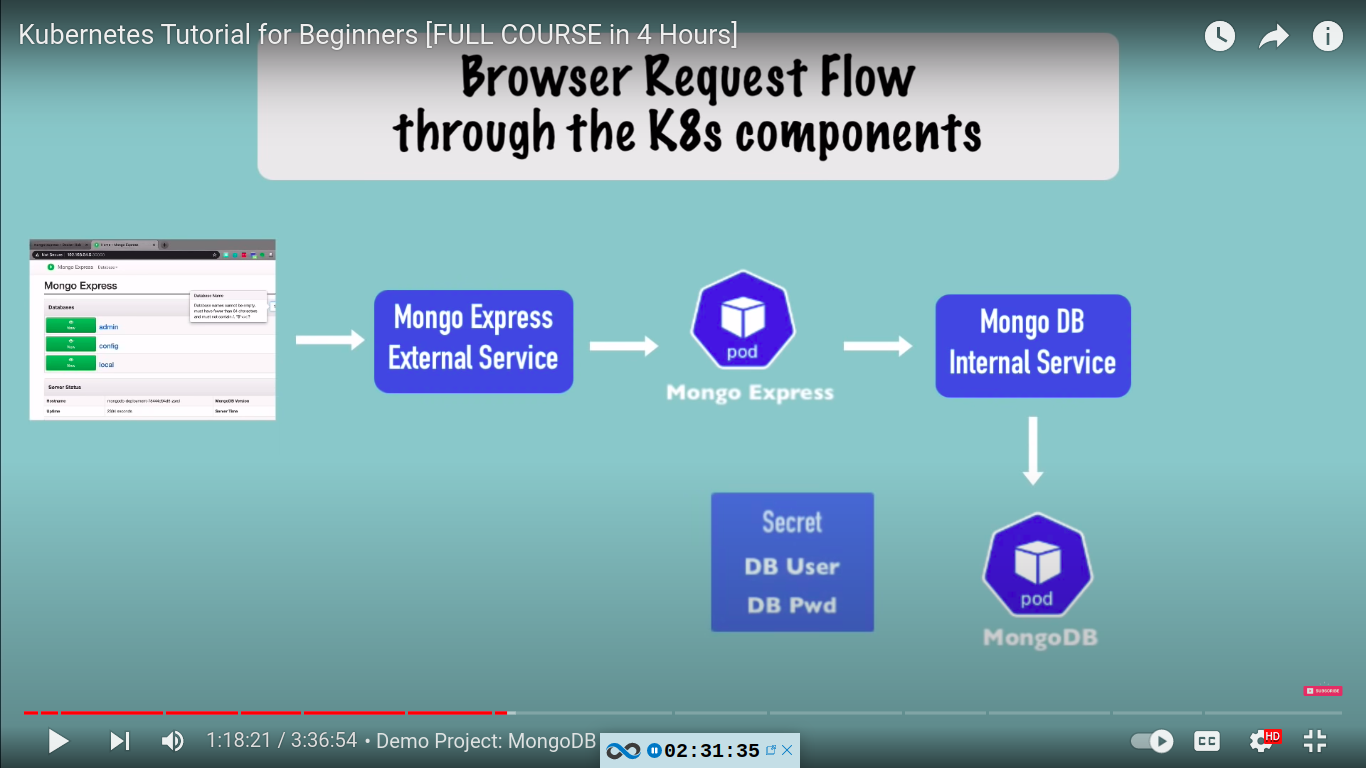
mongo.yaml - contains deployment and service for mongo db
apiVersion: apps/v1
kind: Deployment
metadata:
  name: mongodb-deployment
  labels:
    app: mongodb
spec:
  replicas: 1
  selector:
    matchLabels:
      app: mongodb
  template:
    metadata:
      labels:
        app: mongodb
    spec:
      containers:
      - name: mongodb
        image: mongo
        ports:
        - containerPort: 27017
        env:
        - name: MONGO_INITDB_ROOT_USERNAME
          valueFrom:
            secretKeyRef:
              name: mongodb-secret
              key: mongo-root-username
        - name: MONGO_INITDB_ROOT_PASSWORD
          valueFrom:
            secretKeyRef:
              name: mongodb-secret
              key: mongo-root-password
---
apiVersion: v1
kind: Service
metadata:
  name: mongodb-service
spec:
  selector:
    app: mongodb
  ports:
    - protocol: TCP
      port: 27017
      targetPort: 27017
mongo-secret.yaml
username and password are in base64
apiVersion: v1
kind: Secret
metadata:
    name: mongodb-secret
type: Opaque
data:
    mongo-root-username: dXNlcm5hbWU=
    mongo-root-password: cGFzc3dvcmQ=
mongo-express.yaml
deployment and service for mongo-express
apiVersion: apps/v1
kind: Deployment
metadata:
  name: mongo-express
  labels:
    app: mongo-express
spec:
  replicas: 1
  selector:
    matchLabels:
      app: mongo-express
  template:
    metadata:
      labels:
        app: mongo-express
    spec:
      containers:
      - name: mongo-express
        image: mongo-express
        ports:
        - containerPort: 8081
        env:
        - name: ME_CONFIG_MONGODB_ADMINUSERNAME
          valueFrom:
            secretKeyRef:
              name: mongodb-secret
              key: mongo-root-username
        - name: ME_CONFIG_MONGODB_ADMINPASSWORD
          valueFrom:
            secretKeyRef:
              name: mongodb-secret
              key: mongo-root-password
        - name: ME_CONFIG_MONGODB_SERVER
          valueFrom:
            configMapKeyRef:
              name: mongodb-configmap
              key: database_url
---
apiVersion: v1
kind: Service
metadata:
  name: mongo-express-service
spec:
  selector:
    app: mongo-express
  type: LoadBalancer
  ports:
    - protocol: TCP
      port: 8081
      targetPort: 8081
nodePort: 30000mongo-configmap.yaml
apiVersion: v1
kind: ConfigMap
metadata:
  name: mongodb-configmap
data:
  database_url: mongodb-service
working:
kubectl apply commands in order
order is important as secret and configmap should be applied/present before it can be referenced in deployments/services etc.
kubectl apply -f mongo-secret.yaml
kubectl apply -f mongo.yaml
kubectl apply -f mongo-configmap.yaml
kubectl apply -f mongo-express.yaml
kubectl get commands
kubectl get pod
kubectl get pod --watch
kubectl get pod -o wide
kubectl get service
kubectl get secret
kubectl get all | grep mongodb
kubectl debugging commands
kubectl describe pod mongodb-deployment-xxxxxx
kubectl describe service mongodb-service
kubectl logs mongo-express-xxxxxx
because we are working with minikube, the external IP/service will be shown as <pending>. we can give url to external service in minikube using this command
give a URL to external service in minikube
minikube service mongo-express-servicewe can also run kubectl describe pod [mongo-express-pod-name] e.g kubectl describe pod mongo-express-98c6ff4b4-9v88d in my case and check node there
result/output to check:
Node: minikube/192.168.49.2if you now go to 192.168.49.2:[nodeport] → nodeport is 30000 in our case
then we will see our mongo-express web app
Organizing your components with K8s Namespaces
In Kubernetes, namespaces provides a mechanism for isolating groups of resources within a single cluster. Names of resources need to be unique within a namespace, but not across namespaces. Namespace-based scoping is applicable only for namespaced objects (e.g. Deployments, Services, etc) and not for cluster-wide objects (e.g. StorageClass, Nodes, PersistentVolumes, etc).
Note: Avoid creating namespaces with the prefix kube-, since it is reserved for Kubernetes system namespaces.You can list the current namespaces in a cluster using:
kubectl get namespace
output:
NAME              STATUS   AGE
default           Active   1d
kube-node-lease   Active   1d
kube-public       Active   1d
kube-system       Active   1d
Kubernetes starts with four initial namespaces:
kubernetes-dashboard namespace is shipped only with minikube, not with standard cluster.
defaultThe default namespace for objects with no other namespace
kube-systemThe namespace for objects created by the Kubernetes system. DO NOT create or modify in kube-system.- system processes, master and kubectl processes etc.
kube-publicThis namespace is created automatically and is readable by all users (including those not authenticated). This namespace is mostly reserved for cluster usage, in case that some resources should be visible and readable publicly throughout the whole cluster. The public aspect of this namespace is only a convention, not a requirement.- it has a configmap, which contains cluster information - can check with :
kubectl cluster-infocommand
- it has a configmap, which contains cluster information - can check with :
kube-node-leaseThis namespace holds Lease objects associated with each node. Node leases allow the kubelet to send heartbeats so that the control plane can detect node failure.
Setting the namespace for a request
To set the namespace for a current request, use the --namespace flag.
For example:
kubectl run nginx --image=nginx --namespace=<insert-namespace-name-here>
kubectl get pods --namespace=<insert-namespace-name-here>
create namespace with cli
kubectl create namespace my-namespace
kubectl get namespace
create namespace with a configuration file
e.g
apiVersion: v1
kind: ConfigMap
metadata:
	name: mysql-configmap
  namespace: my-namespace
data:
	db_url: mysql-service.database
kubectl apply -f mysql-configmap.yaml
kubectl get configmap - will check in default namespace but need to check in my-namespace
kubectl get configmap -n my-namespace
use cases of namespaces:
- structure/group your components
- avoid conflict between teams/ many teams, same application
- resource sharing: blue green deployment
- share services between different environments(e.g staging and development)
- for example let’s say you have one cluster and you want to host both staging and development environment in the same cluster and the reason for that is for eg if you are using something like nginx-ingress controller or elastic stack used for logging.. you can deploy it in one cluster and use it for both environment.
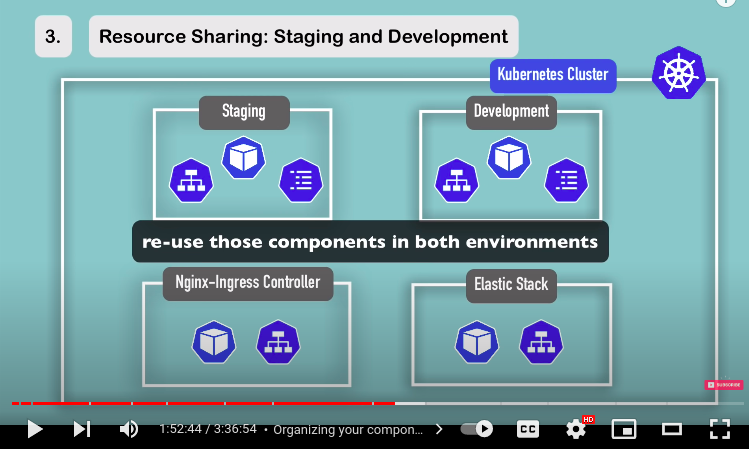
so now the staging can use both nginx-ingress controller and elastic stack as well as development also.
- access limit and resource limits (resource quota)on namespaces level
characteristics of namespaces
- you can’t access most resources from another namespace
- for eg if you have configmap in project a you can’t just use it from project b also to connect to DB service. you need to create new configmap in project b.
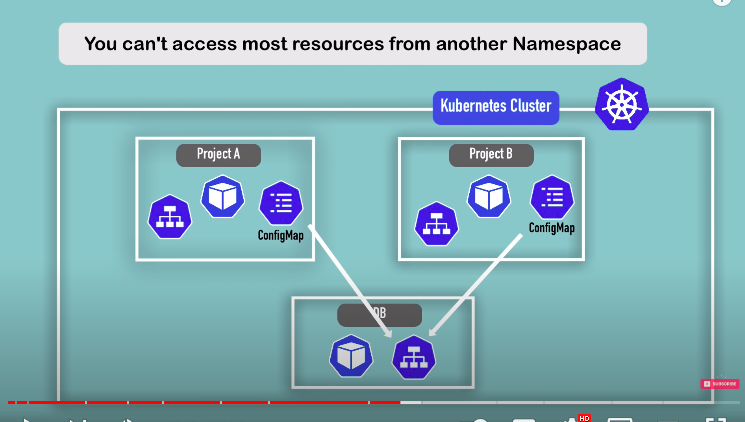
each namespace must define own configmap
same applies for secret
- access service in another namespace
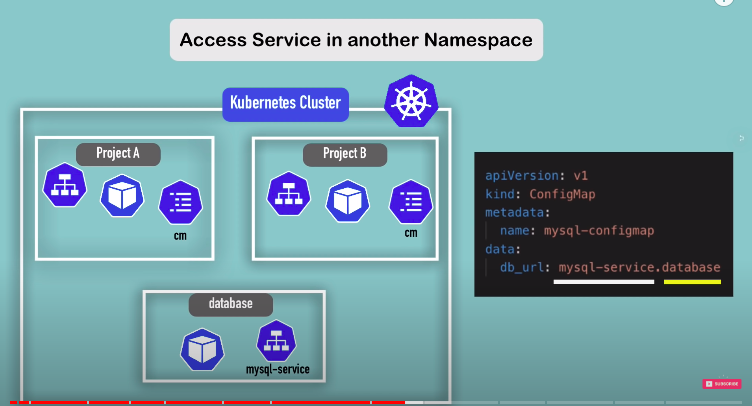
to access database in another namespace we provide namespace name (here it is database after service name)
so in db_url: mysql-service.database
mysql-service is service name and database is the namespace in which the db is present
- components, which can’t be created with a namespace e.g volume, node etc
- live globally in a cluster
- you can’t isolate them
kubectl api-resources —namespaced=falsewith this command you can find out which components can’t be namespaced.
we can change active namespace with kubens that need to be installed separately
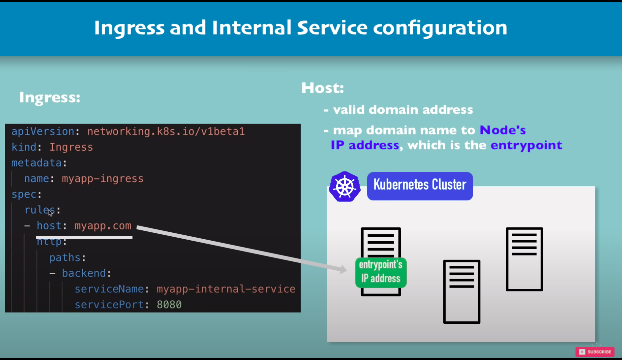
K8s ingress explained
https://youtu.be/X48VuDVv0do?t=7312
external service vs ingress?
in external service my-app service is external and port is opened to outside.
in ingress my-app service is internal and no need to open port.
when user visit my-app.com. it hits my-app ingress which then forwards request to my-app internal service and that forwards request to my-app pod.

example YAML file: External service
apiVersion: v1
kind: Service
metadata:
	name: myapp-external-service
spec:
	selector:
		app: myapp
	type: LoadBalancer
	ports:
		- protocol: TCP
			port: 8080
			targetPort: 8080
			nodePort: 35010
someone will have to visit http://ip:35010 to browser it. that’s not very user friendly. it’s okay for testing purpose
example YAML file: ingress
apiVersion: networking.k8s.io/v1beta1
kind: Ingress
metadata:
	name: myapp-ingress
spec:
	rules:
	- host: myapp.com
		http:
			paths:
			- backend:
					serviceName: myapp-internal-service
					servicePort: 8080
internal service to which ingress forwards request
example internal service:
apiVersion: v1
kind: Service
metadata:
	name: myapp-internal-service
spec:
	selector:
		app: myapp
	ports:
		- protocol: TCP
			port: 8080
targetPort: 8080- here rules or routing rules basically defines that the main request or all the request to that host (here: myapp.com) should be forwarded to the internal service (here myapp-internal-service)
- paths: here the path means url path i.e everything after the domain name ie.e myapp.com/…
- here http attribute doesn’t corresponds to http://my-app.com. this http is meant for incoming request that gets forwarded to internal service[2nd step] and not to be confused with [1st step - http://my-app.com] ie.Request from browser to ingress
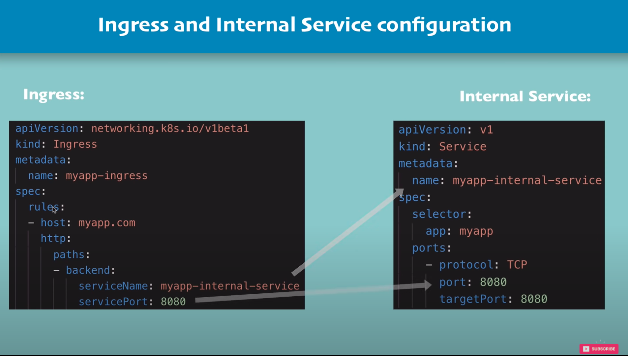
note the difference b/w external and ingress: no nodePort is in internal service. also instead of Loadbalancer, the type is default type i.e clusterIP
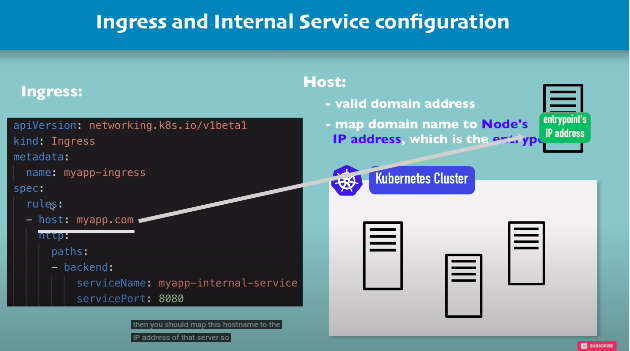
- the host/ domain name should be valid and should be mapped to Node’s IP address which is the entrypoint
or if you configure a server outside of a kubernetes cluster that is acting as entrypoint to your kubernetes cluster then you should map this hostname to the IP address of that server
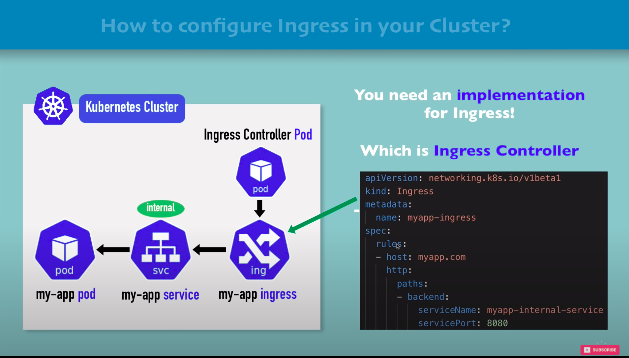
How to configure ingress in your K8s cluster?
you need an implementation for ingress! which is ingress controller. so step one will be to install an ingress controller which is basically another pod or another set of pods that run on your node in your kubernetes cluster and does evaluation, manages redirections, entrypoint to the cluster and processes of ingress rules.
ingress controller is installed. many third-party implementaions like k8s nginx ingress controller etc.
my-app ingress is the yaml file part
configure ingress controller in minikube
the actual ingress controller setup on eks etc will be different
step 1. install ingress controller in minikube
minikube addons enable ingressthis automatically starts the k8s nginx implementation of ingress controller
verify with
kubectl get pod -n kube-systemif you can’t see that mean in newer version ingress controller is namespaced to ingress-nginx or something else
check namespaces with
kubectl get namespaces
kubectl get pod -n ingress-nginx
step 2. now create ingress rule
for our ease we will use kubernetes-dashboard cluster as it exists out of the box but not accessible externally! it also has internal service and pod already.
kubectl get all -n kubernetes-dashboard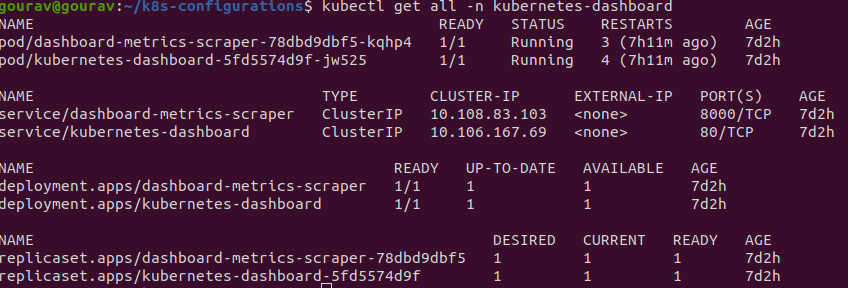
note the service - kubernetes-dashboard and pod kubernetes-dashboard-5fd5574d9f-jw525
now let’s create ingress rule for dashboard
dashboard-ingress.yaml
namespace will be same as service and pod!
apiVersion: networking.k8s.io/v1
kind: Ingress
metadata:
  name: dashboard-ingress
  namespace: kubernetes-dashboard
spec:
  rules:
  - host: dashboard.com
    http:
      paths:
      - path: /
        pathType: Prefix
        backend:
          service:
            name: kubernetes-dashboard
            port:
              number: 80
kubectl apply -f dashboard-ingress.yaml
kubectl get ingress -n kubernetes-dashboard
copy the ip address of dashboard-ingress and add it to /etc/hosts
sudo vim /etc/hosts
192.168.49.2 dashboard.comnow you can visit dashboard.com from your browser
ingress default backend
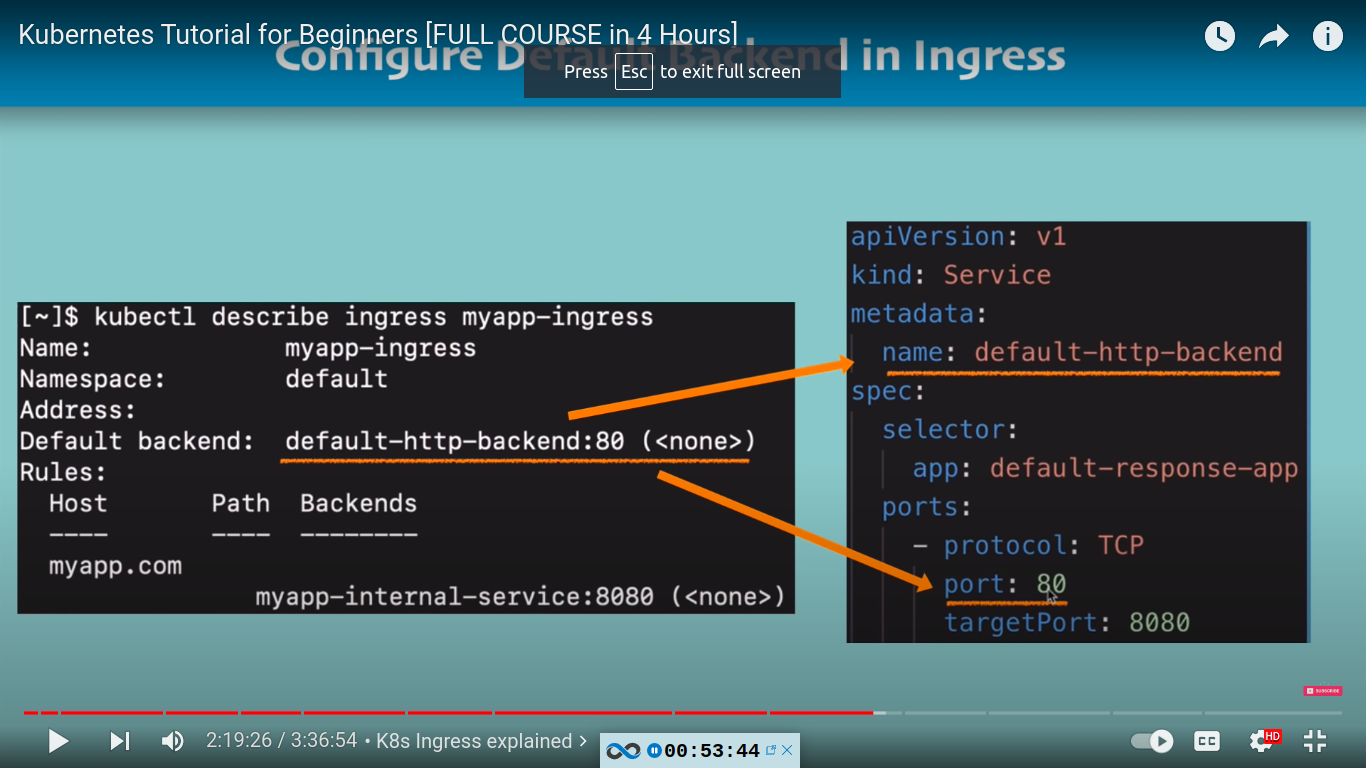
kubectl describe ingress dashboard-ingress -n kubernetes-dashboard
continue from here:
note Default backend: <default>
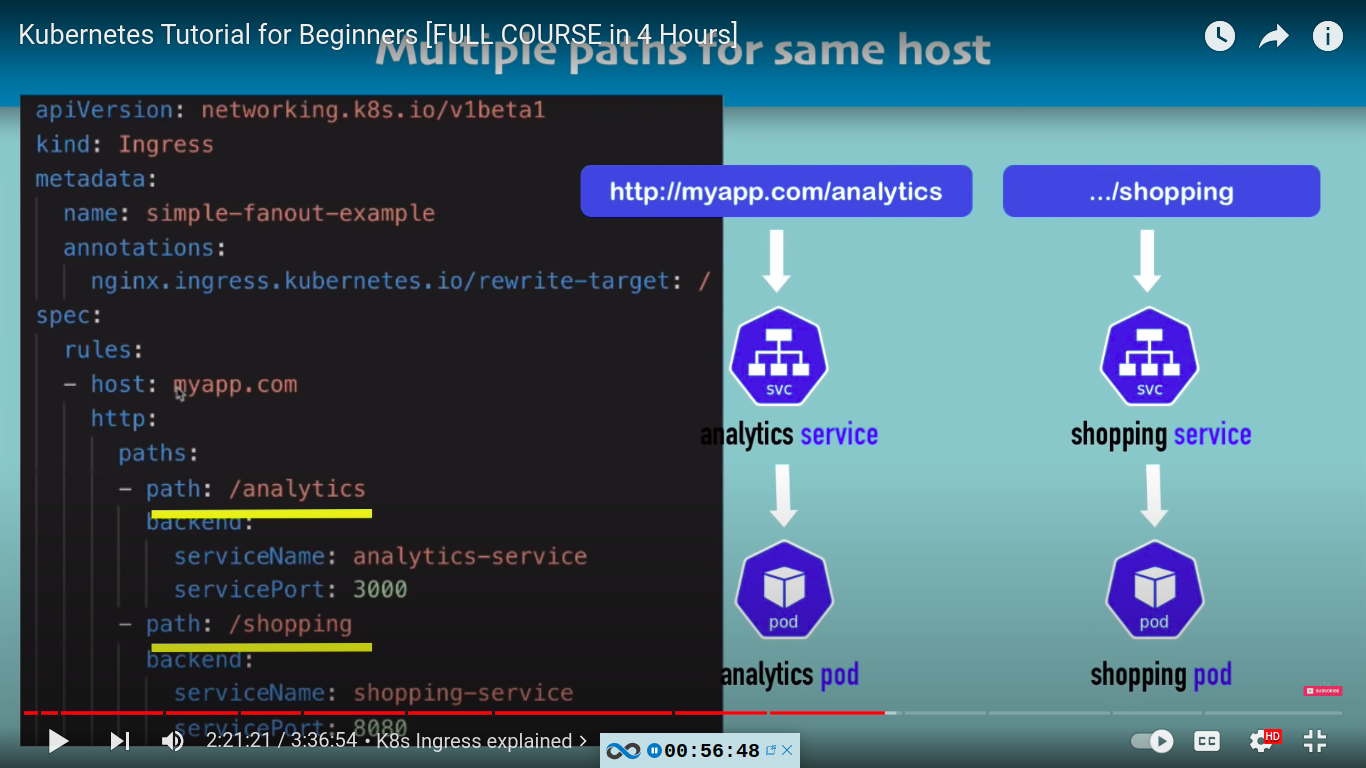
multiple path for same host with ingress
example google
when user visit myapp.com/analytics it will be forwarded to analytics service and then to analytics pod
when user visit myapp.com/shopping it will be forwarded to shopping service and then to shopping pod
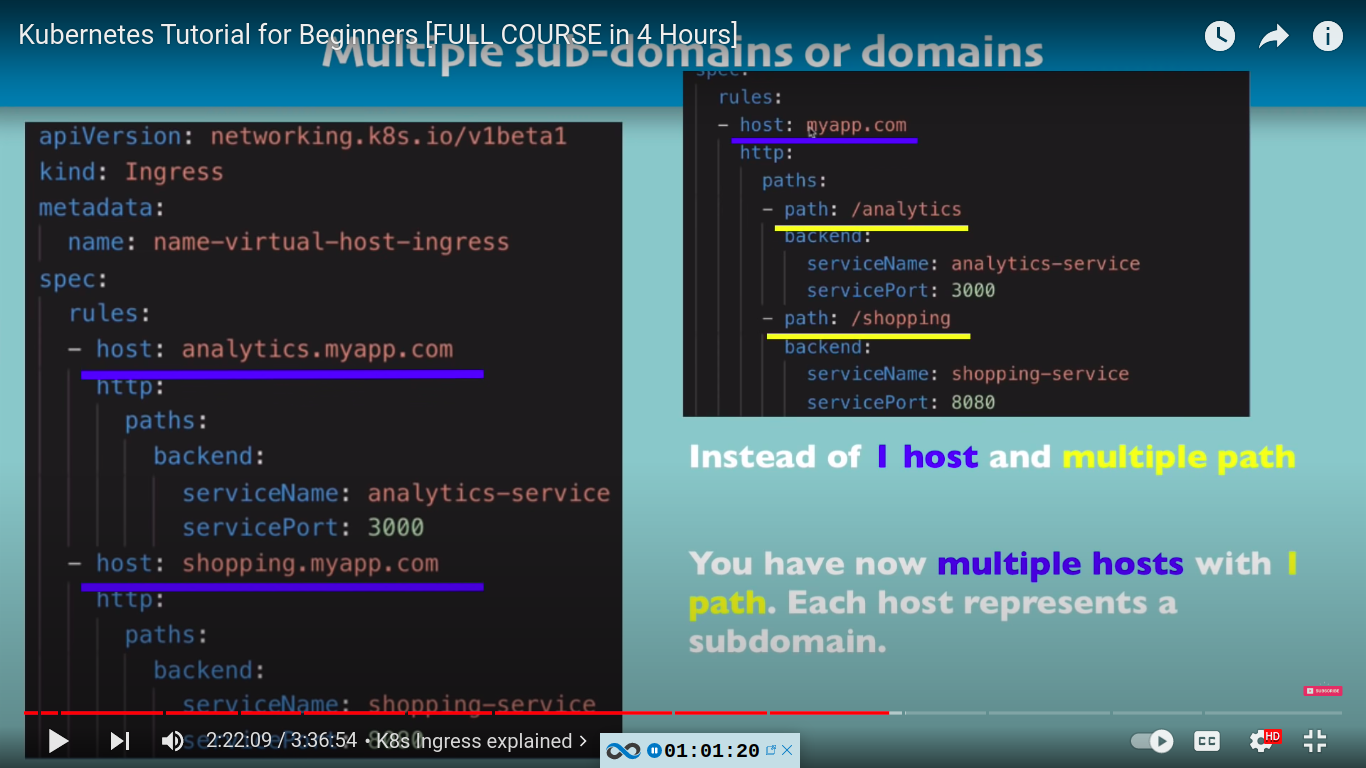
multiple sub-domains or domains with ingress
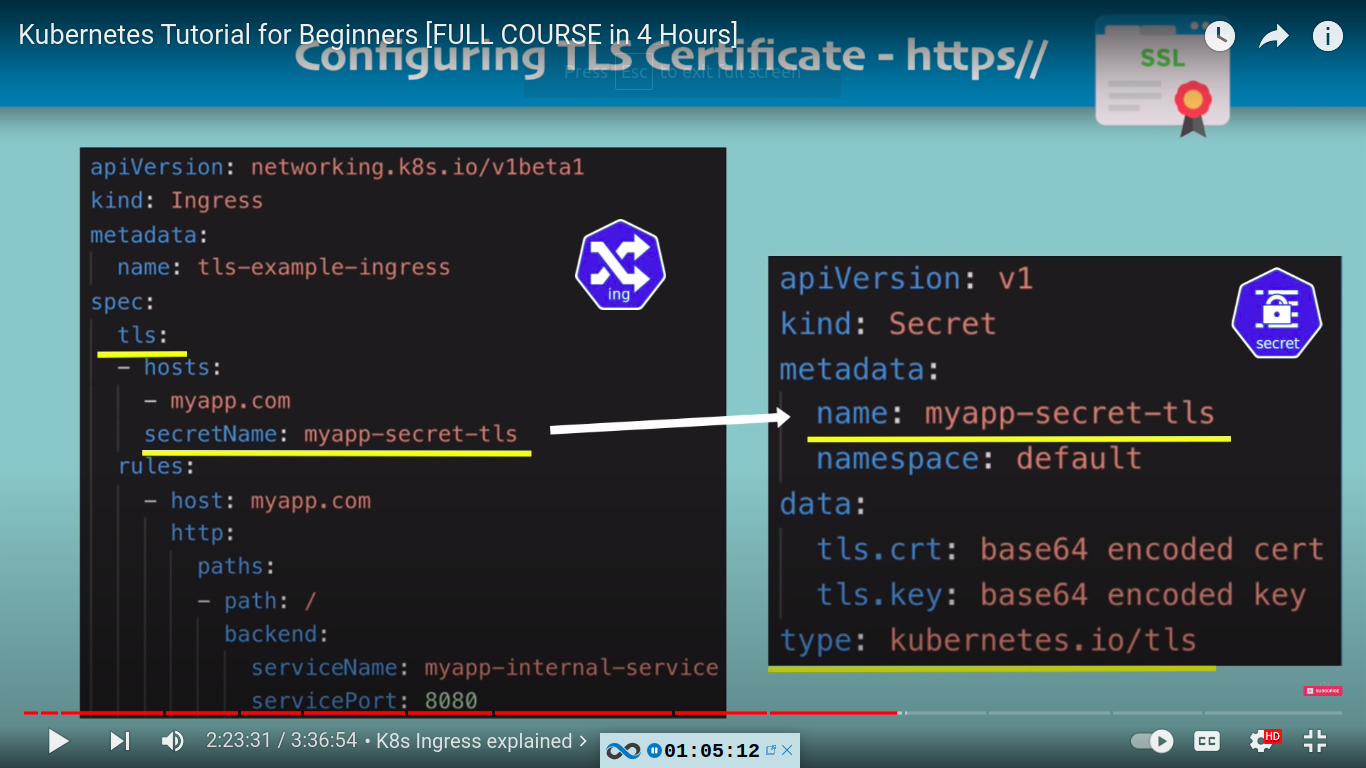
configuring TLS certificate - https//

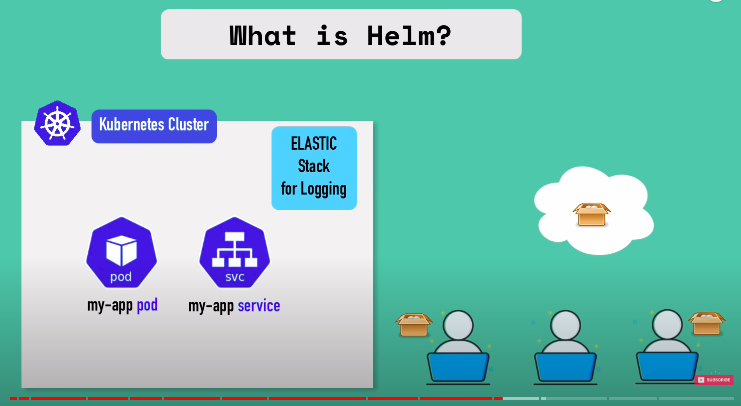
Helm package manager
- main concepts of helm
- package manager for kubernetes same as apt, yum, homebrew etc
- helm changes a lot from version to version so understand the basic common principles and use cases.
- what is helm?
- to package YAML files and distribute them in public and private repositories
- it also acts as a templating engine.
e.g let’s say you want elastic stack for logging in your cluster which is preety common. you will need to have lot of compononents to setup like statefulSet , configMap, secret etc. which is repeating and tedious.
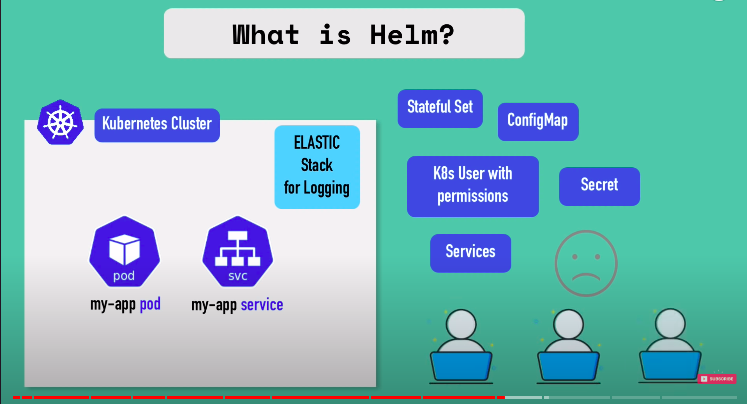
so someone packaged all this YAML files, so others can use it and this bundle of YAML file is called helm charts.
- what are helm charts?
- bundle of YAML files eg. for database apps, monitoring apps, prometheus, elasticsearch etc
- create your own Helm charts with helm
- push them to helm repository : public or private
- download and use existing ones
- how to use them?
- when to use them?
- what is tiller(server)?
- helm chart structure
- helm hub: https://artifacthub.io/
- installing helm - https://helm.sh/docs/intro/install/
- helm as a Templating engine
- it's a templating engine so what does that actually mean imagine you have an application that is made up of multiple micro services and you're deploying all of them in your kubernetes cluster and deployment and service of each of those microservices are pretty much the same with the only difference that the application name and version are different or the docker image name and version tags are different so without Helm you would write separate yaml files configuration files for each of those microservices.
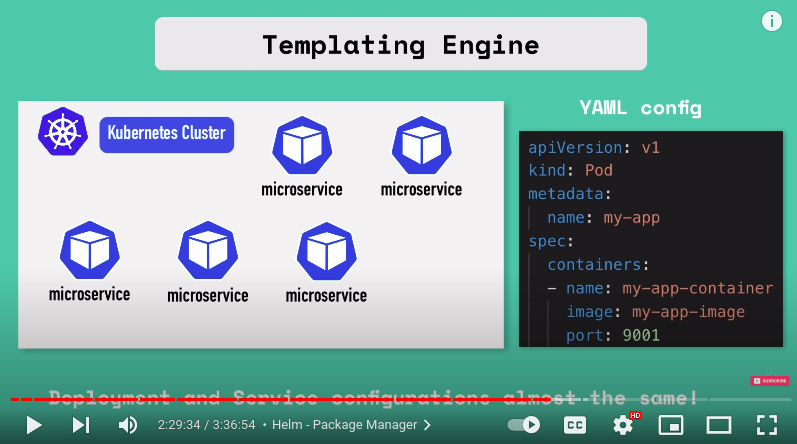
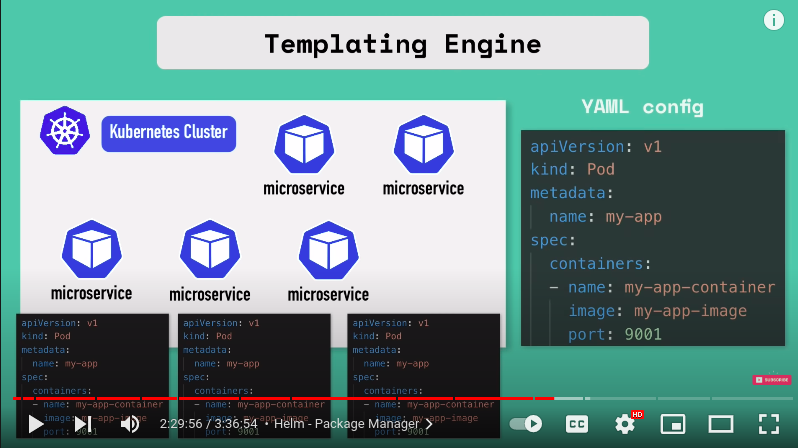
using help we can define a common blueprint and dynamic values are replaced by placeholders and that would be a template YAML config file.
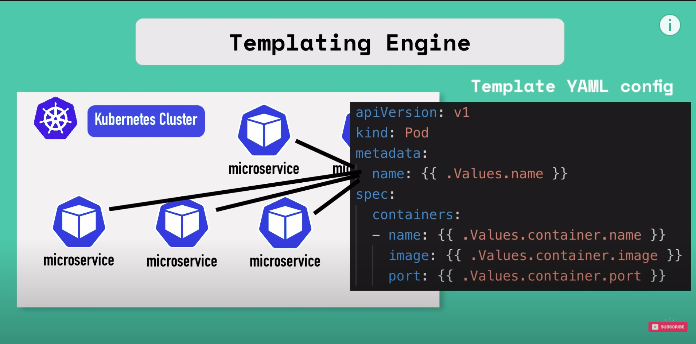
we are taking values from external configuration that comes from that comes from an additional YAML file values.yaml
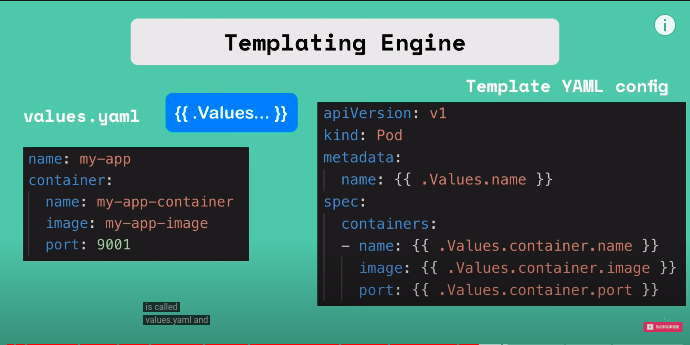
and in this values.yaml we are going to define all those values that we are going to use in that template file.
.values in template config yaml is object which that is being created based on values defined either through yaml file or with — set flag.\
so instead of many YAML files we will have now just 1 YAML file
- this templating is especially practical for CI/CD as in our build we can replace the values on the fly.
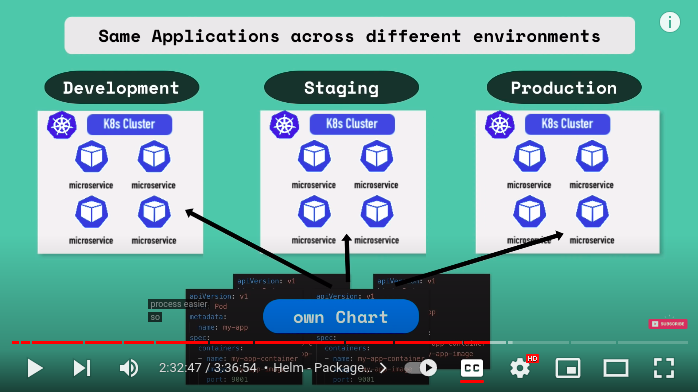
- another use case for helm features when same applications across different environments is deployed
helm chart structure
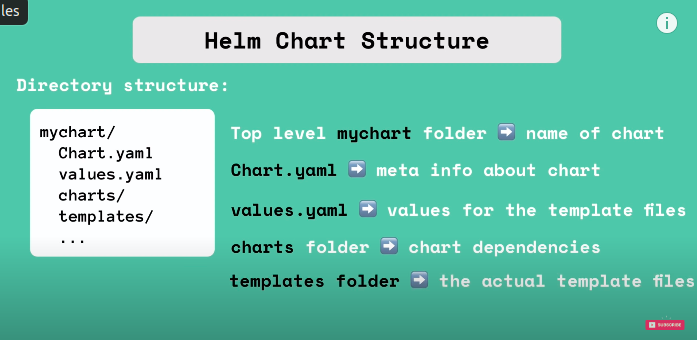
chart.yaml - metadata about chart like name, version, dependencies etc
values.yaml - values for the template files. default values you can override
charts/ - folder - chart dependencies
templates/ - folder - the actual template files are stored
when we use
helm install <chartname>the template files from templates/ will be filled with the values from values.yamlvalues injection into template files
using value.yaml
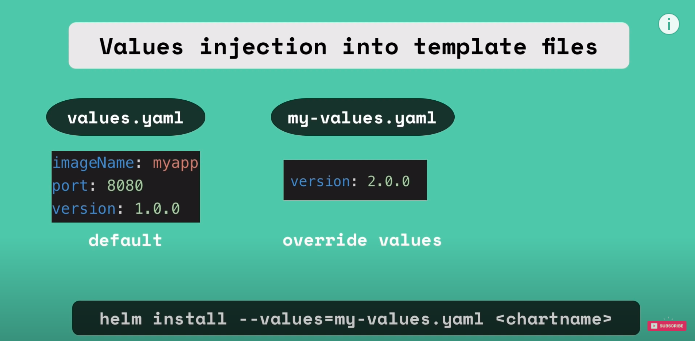
helm install —values=my-values.yaml <chartname>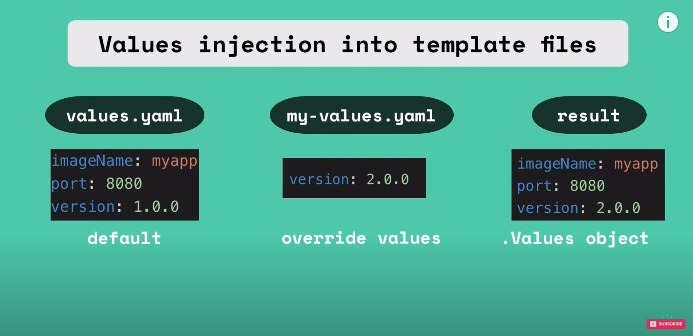
alternatively, we can also provide additional individual values using set flag where you can define the values directly on the command line
helm install —set version=2.0.0another feature of helm is
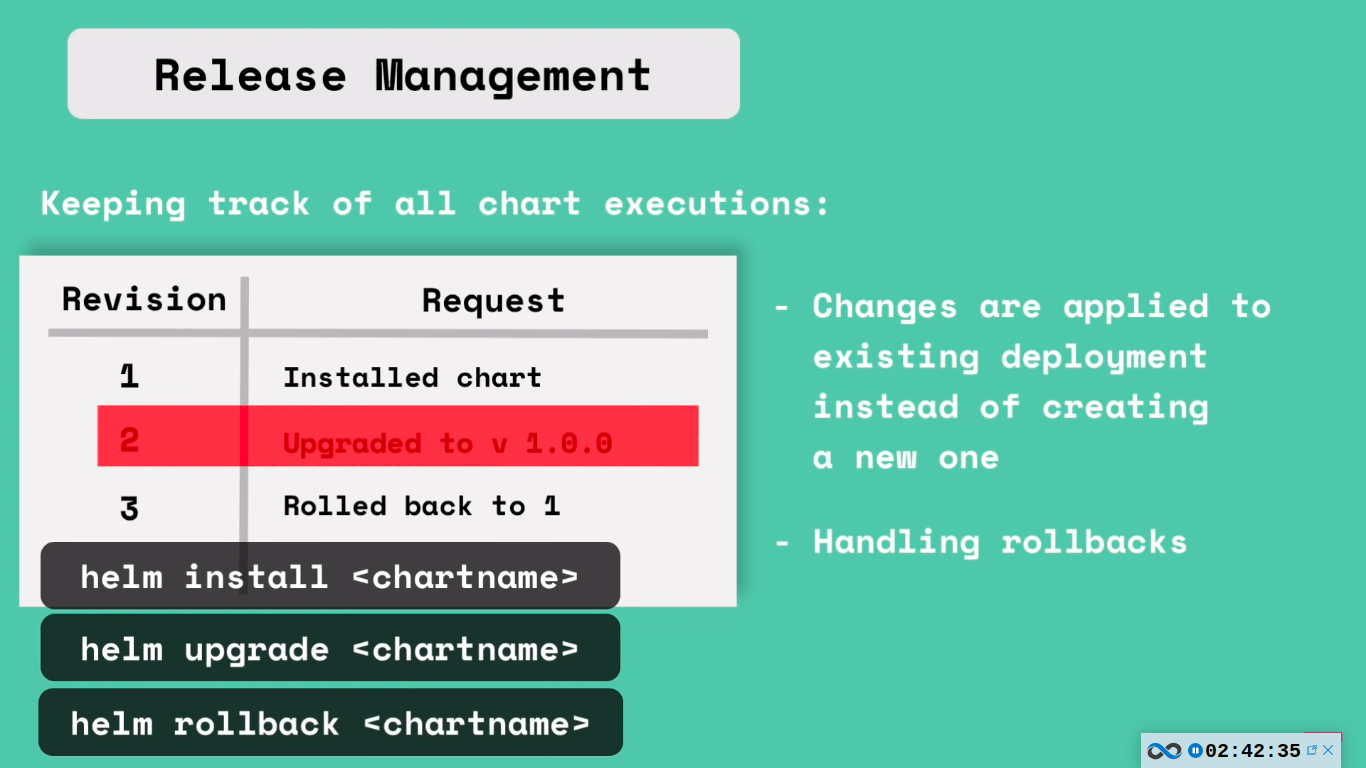
release management with helm
difference b/whelm v2 and 3
in v2 of helm the helm comes in two parts: helm client(CLI) and server(Tiller)
so whenever you deploy Helm chart using
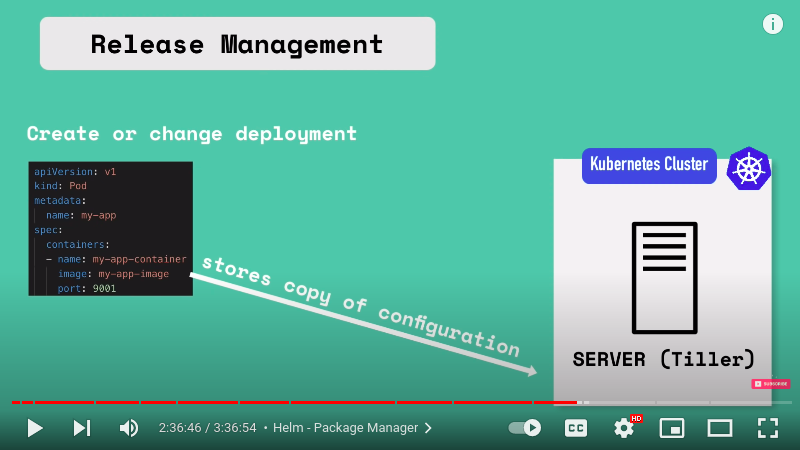
helm install <chartname>client will send the yaml files to Tiller that actually runs or has to run in a kubernetes cluster and Tiller then will execute these request and create components from these yaml files inside the kubernetes cluster and exactly this architecture offers additional valuable feature of Helm which is release management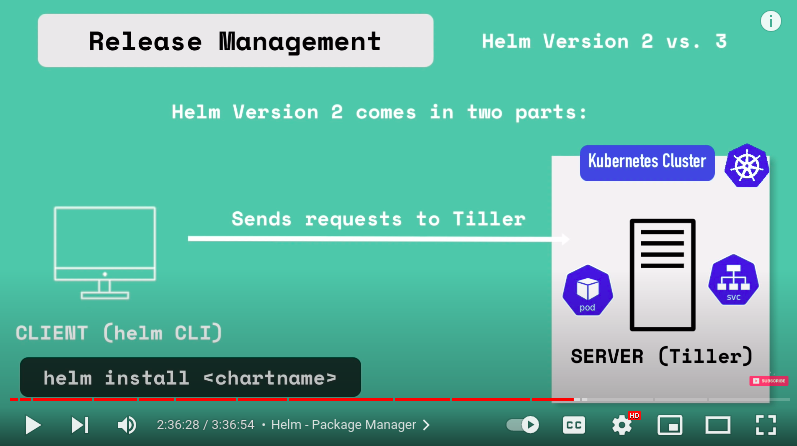
whenever you create or change deployment tiller will store copy of configuration thus creating a history of chart execution.

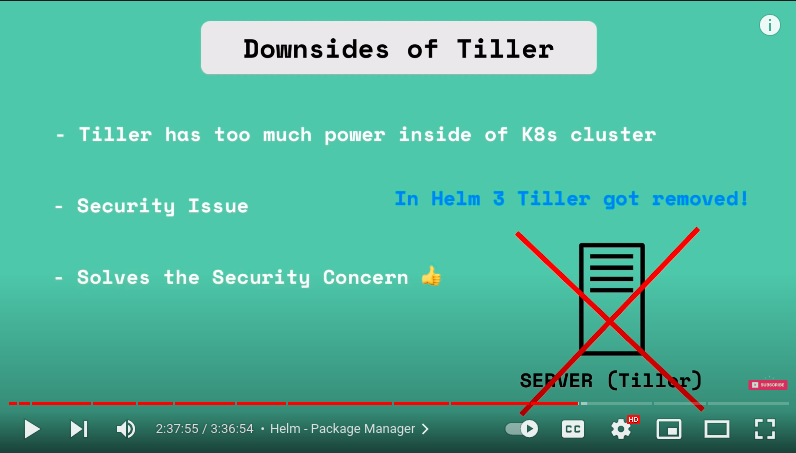
downsides of tiller
tiller has too much power inside of k8s cluster. it can create, update , delete components and it has too much permissions.
therefore : security issue
therefore, in helm v3 tiller got removed and its simple helm binary now.
K8s volumes
it’d better to watch this part of the video instead of making notes : https://youtu.be/X48VuDVv0do?t=9488
pods-with-volume.yaml
apiVersion: v1
kind: Pod
metadata:
  name: mypod
spec:
  containers:
    - name: myfrontend
      image: nginx
      volumeMounts:
      - mountPath: "/var/www/html"
        name: mypd
  volumes:
    - name: mypd
      persistentVolumeClaim:
        claimName: pvc-name

---
apiVersion: v1
kind: Pod
metadata:
  name: mypod
spec:
  containers:
    - name: busybox-container
      image: busybox
      volumeMounts:
        - name: config-dir
          mountPath: /etc/config
  volumes:
    - name: config-dir
      configMap:
        name: bb-configmap

---
apiVersion: v1
kind: Pod
metadata:
  name: mypod
spec:
  containers:
  - name: busybox-container
    image: busybox
    volumeMounts:
    - name: secret-dir
      mountPath: /etc/secret
      readOnly: true
  volumes:
  - name: secret-dir
    secret:
      secretName: bb-secret
persistent-volumes.yaml
apiVersion: v1
kind: PersistentVolume
metadata:
  name: pv-name
spec:
  capacity:
    storage: 5Gi
  volumeMode: Filesystem
  accessModes:
    - ReadWriteOnce
  persistentVolumeReclaimPolicy: Recycle
  storageClassName: slow
  mountOptions:
    - hard
    - nfsvers=4.0
  nfs:
    path: /dir/path/on/nfs/server
    server: nfs-server-ip-address

---
apiVersion: v1
kind: PersistentVolume
metadata:
  name: test-volume
  labels:
    failure-domain.beta.kubernetes.io/zone: us-central1-a__us-central1-b
spec:
  capacity:
    storage: 400Gi
  accessModes:
  - ReadWriteOnce
  gcePersistentDisk:
    pdName: my-data-disk
    fsType: ext4

---
apiVersion: v1
kind: PersistentVolume
metadata:
  name: example-pv
spec:
  capacity:
    storage: 100Gi
  volumeMode: Filesystem
  accessModes:
  - ReadWriteOnce
  persistentVolumeReclaimPolicy: Delete
  storageClassName: local-storage
  local:
    path: /mnt/disks/ssd1
  nodeAffinity:
    required:
      nodeSelectorTerms:
      - matchExpressions:
        - key: kubernetes.io/hostname
          operator: In
          values:
          - example-node
persistent-volume-claims.yaml
kind: PersistentVolumeClaim
apiVersion: v1
metadata:
  name: pvc-name
spec:
  storageClassName: manual
  volumeMode: Filesystem
  accessModes:
    - ReadWriteOnce
  resources:
    requests:
      storage: 10Gi

---
apiVersion: v1
kind: PersistentVolumeClaim
metadata:
     name: mypvc
spec:
     accessModes:
     - ReadWriteOnce
     resources:
       requests:
         storage: 100Gi
     storageClassName: storage-class-name
deployment-with-multiple-volumes.yaml
apiVersion: apps/v1
kind: Deployment
metadata:
  name: elastic
spec:
  selector:
    matchLabels:
      app: elastic
  template:
    metadata:
      labels:
        app: elastic
    spec:
      containers:
      - image: elastic:latest
        name: elastic-container
        ports:
        - containerPort: 9200
        volumeMounts:
        - name: es-persistent-storage
          mountPath: /var/lib/data
        - name: es-secret-dir
          mountPath: /var/lib/secret
        - name: es-config-dir
          mountPath: /var/lib/config
      volumes:
      - name: es-persistent-storage
        persistentVolumeClaim:
          claimName: es-pv-claim
      - name: es-secret-dir
        secret:
          secretName: es-secret
      - name: es-config-dir
        configMap:
          name: es-config-map
storage-class.yaml
apiVersion: storage.k8s.io/v1
kind: StorageClass
metadata:
  name: storage-class-name
provisioner: kubernetes.io/aws-ebs
parameters:
  type: io1
  iopsPerGB: "10"
  fsType: ext4

---
apiVersion: v1
kind: PersistentVolumeClaim
metadata:
     name: mypvc
spec:
     accessModes:
     - ReadWriteOnce
     resources:
       requests:
         storage: 100Gi
     storageClassName: storage-class-name
k8s statefulSet
better to watch video as it is complex topic : https://youtu.be/X48VuDVv0do?t=10724
what is statefulSet?
why statefulSet is used?
How statefulSet works and how it’s different from Deployment?
kubernetes services
different service types in kubernetes:
- clusterIP services
- NodePort services
- Headless services
- LoadBalancer services
when we create a service, kubernetes creates a service endpoint object with the same name as service - keep tracks of , which pod are members/endpoints of the service. the endpoints get updated whenever the pod dies or recreated.
kubectl get endpoints
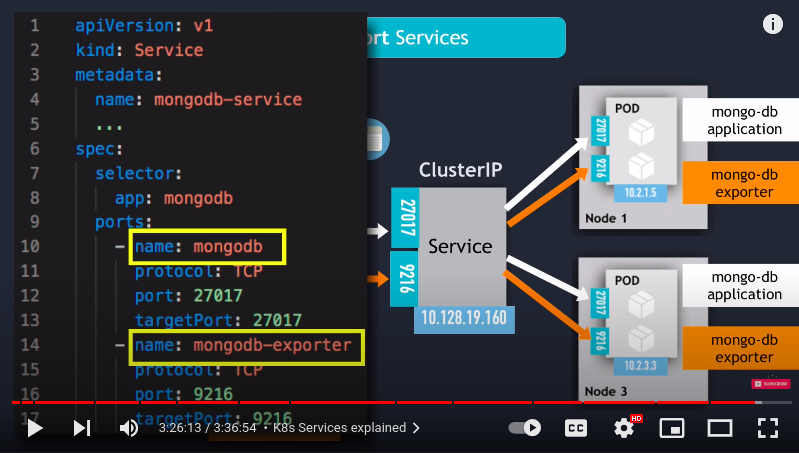
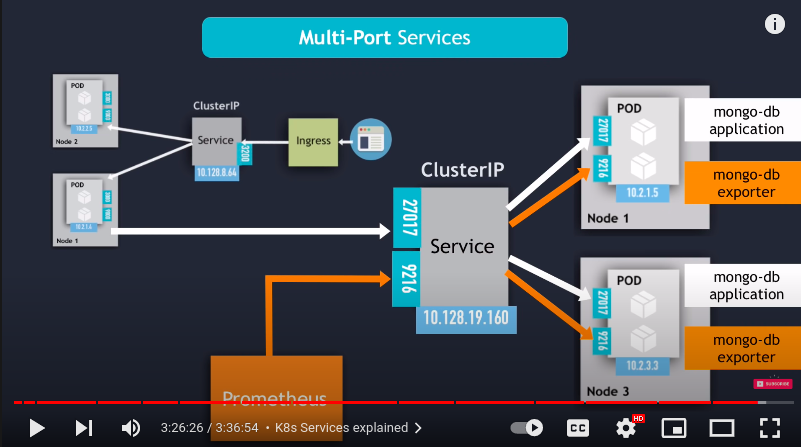
- multiport service ports has to be named
- headless services : used when :
- no cluster IP is assigned
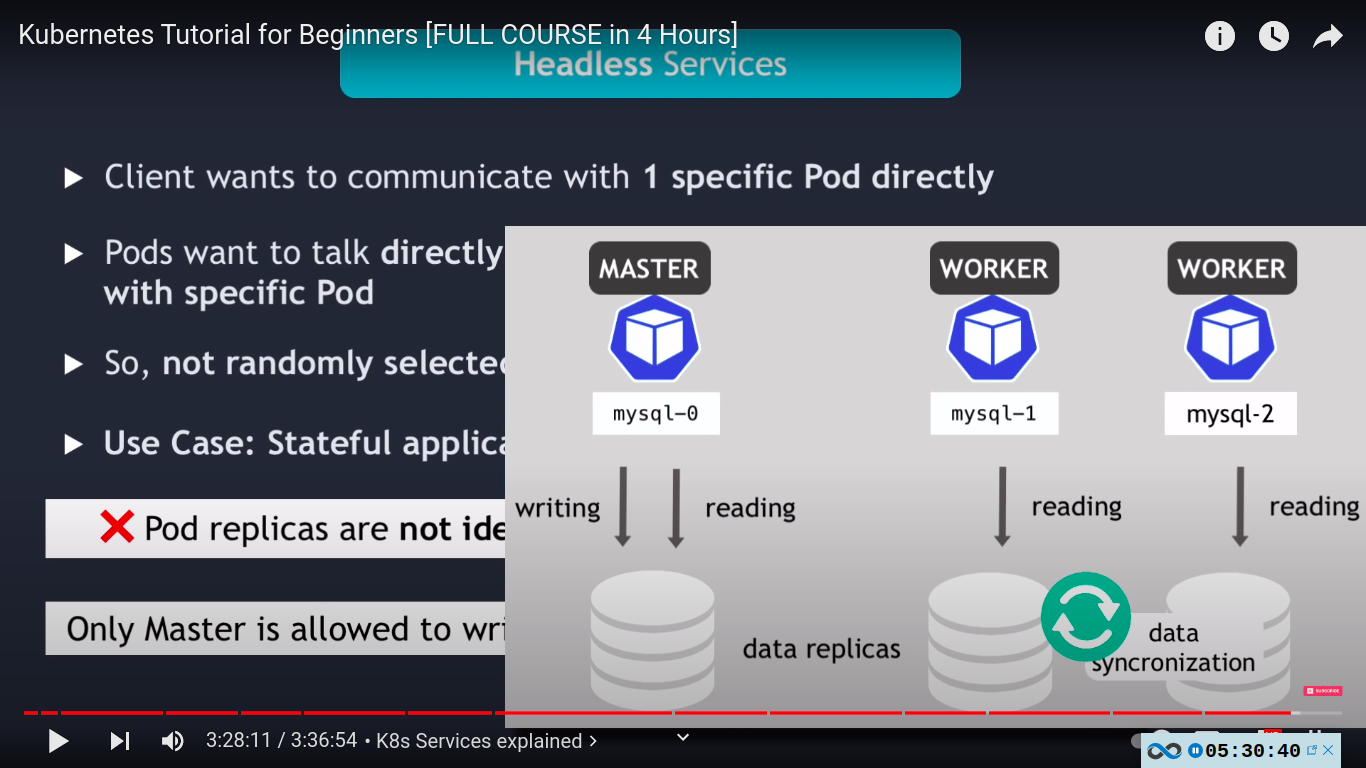
- client wants to communicate with 1 specific pod directly
- pods want to talk to each other directly with specific pod without needing service
- use case: stateful application like databases - in such applications pod replicas are not identical e.g master and worker instances of mysql and only master is allowed to write to DB an worker pod must connect to the master to syncronize their data after master pod has made changed to the database. and when new worker pods starts it must need to connect directly to most recent worker node to clone the data from and also get up to date with the data set.

new worker added
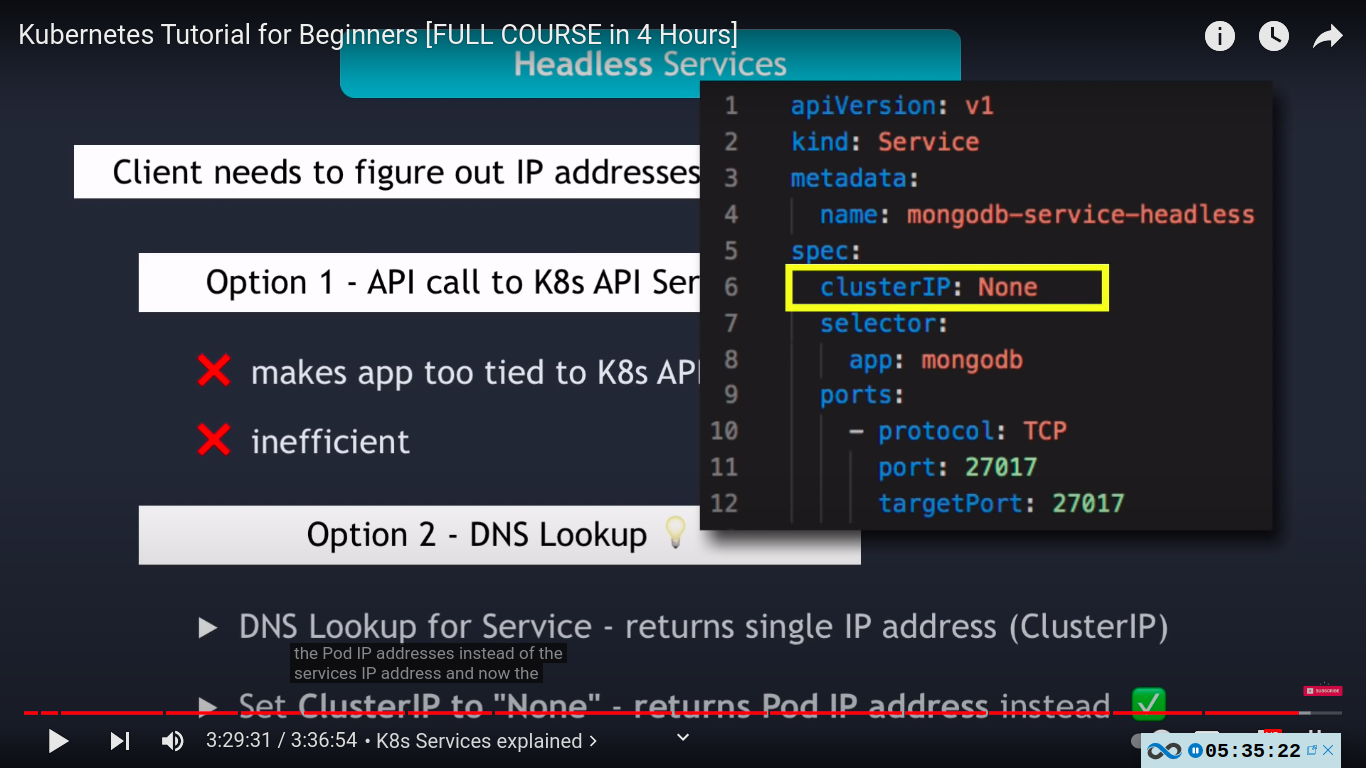
- client needs to figure out IP address of each pod
- option 1 - API call to k8s API server
- makes app too tied to k8s API
- inefficient
- option 2 - DNS lookup
- DNS lookup for service - returns single IP address(clusterIP) however if you tell kubernetes that you don’t need IP address of a cluster by setting the clusterIP field to None when creating your service then the DNS server will return the pod IP address instead.
service type:
clusterIp
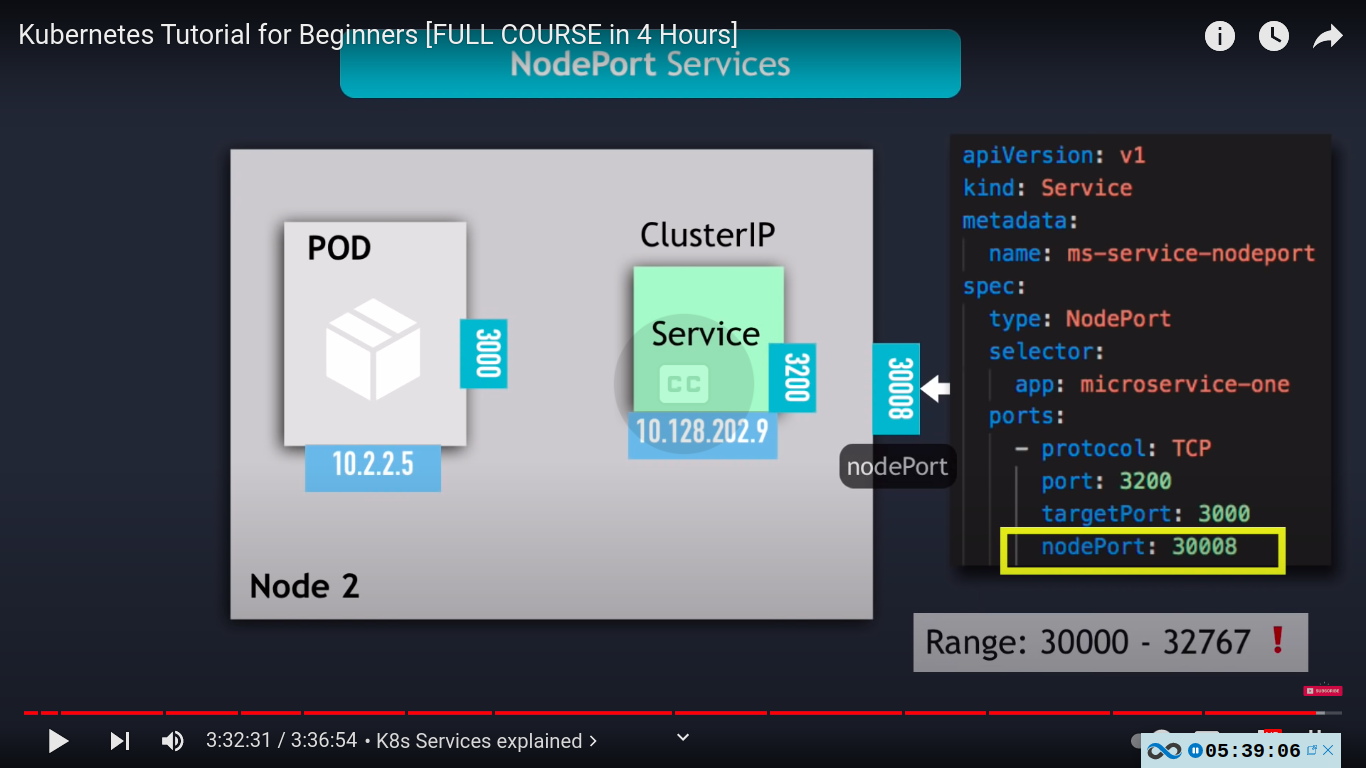
nodeport service type - extension of clusterip service
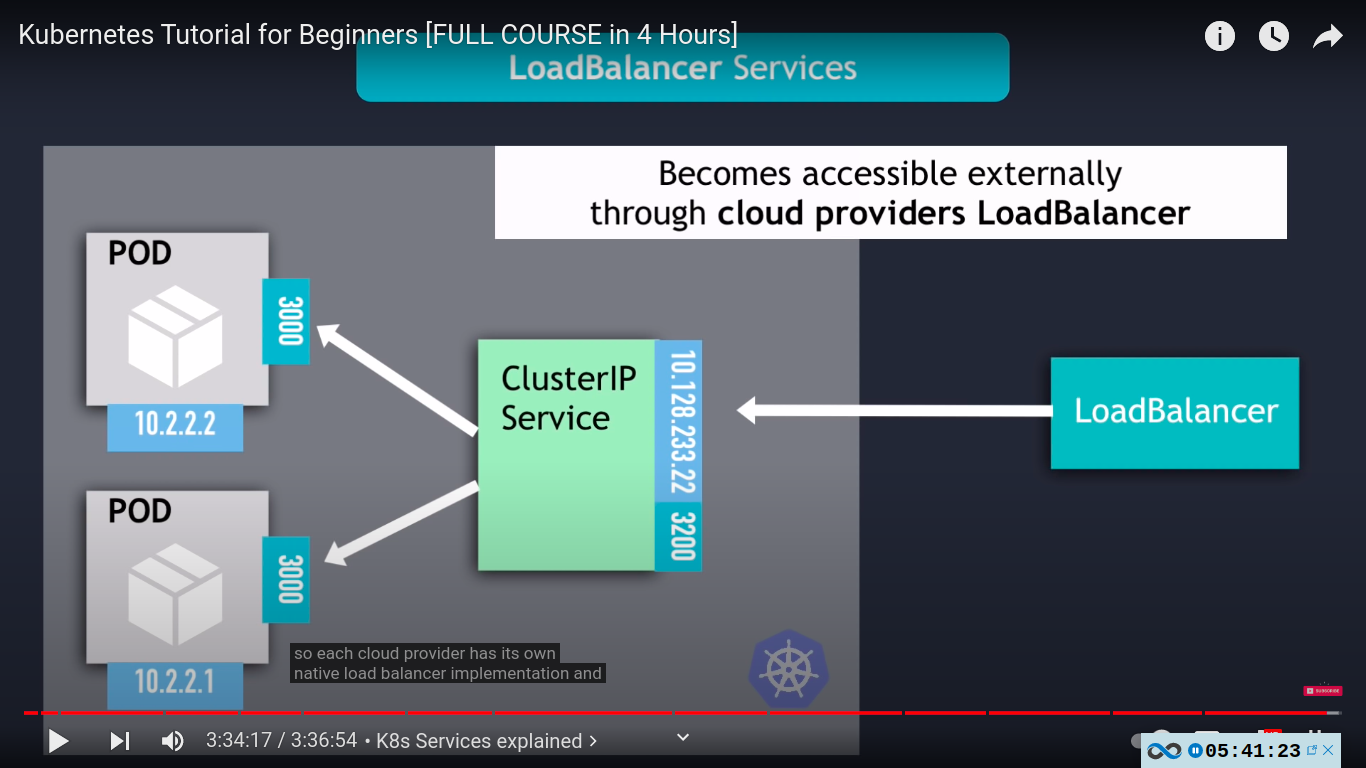
loadbalancer SERVICE TYPE - extension of nodeport sercvice
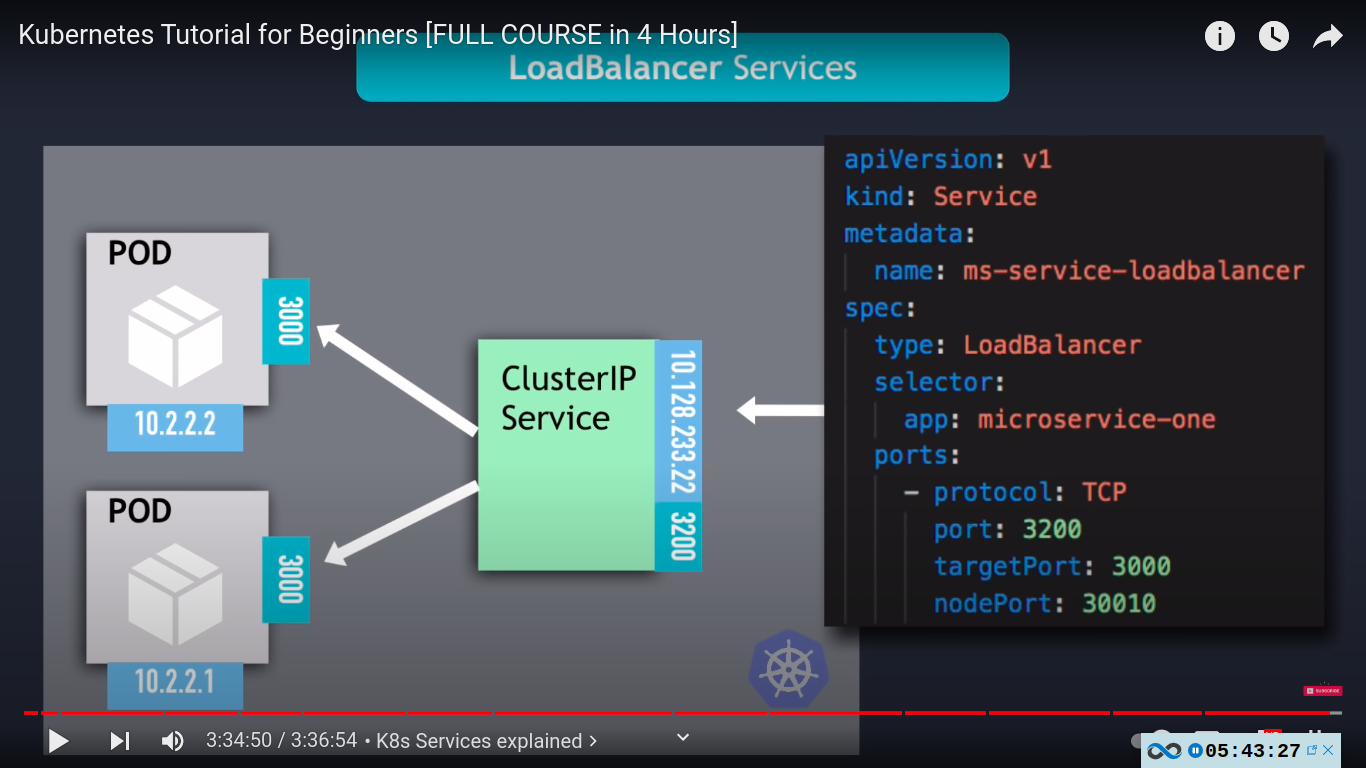

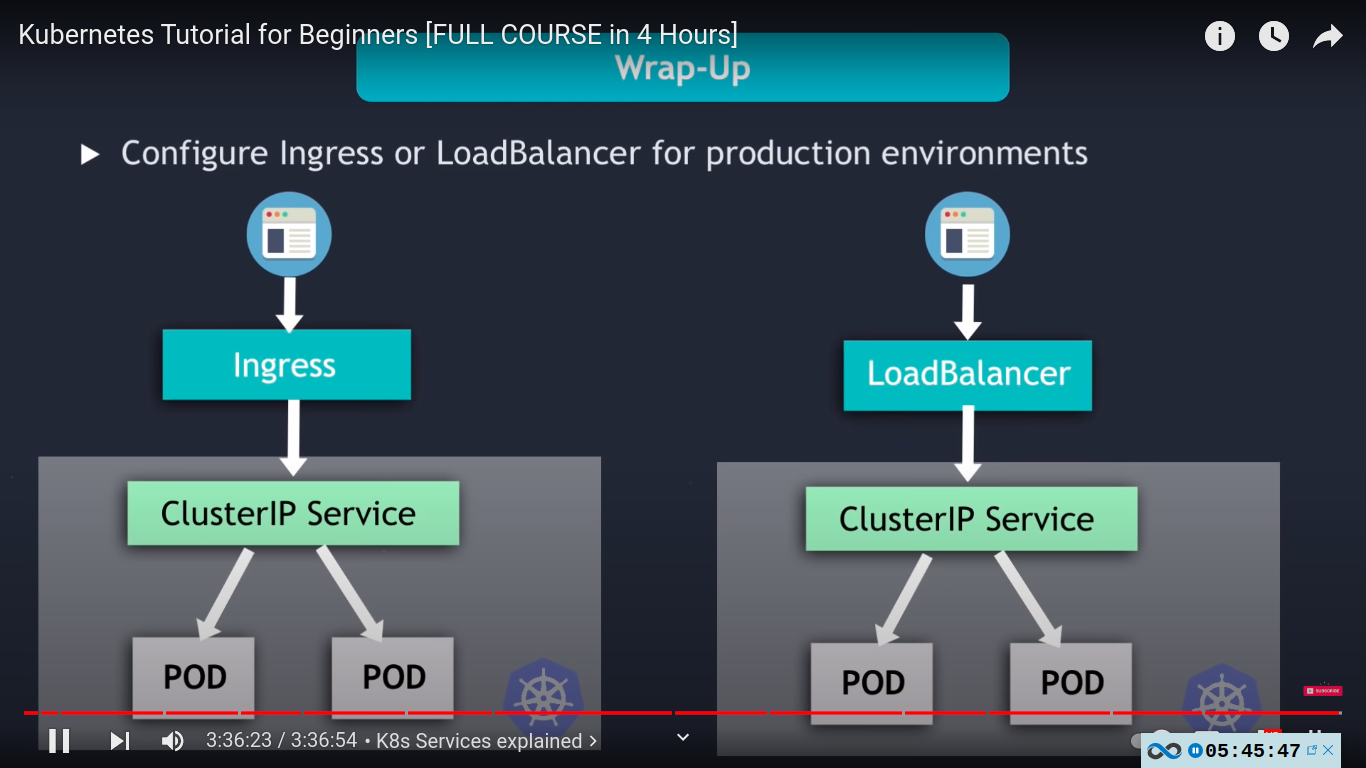
nodeport used for testing .
in production we use either ingress or loadbalancer service
- option 1 - API call to k8s API server
Port forwarding
Use Port Forwarding to Access Applications in a Cluster
kubectl port-forwardforwards connections to a local port to a port on a pod. Compared to kubectl proxy, kubectl port-forwardis more generic as it can forward TCP traffic while kubectl proxycan only forward HTTP traffic.Creating MongoDB deployment and service
- Create a Deployment that runs MongoDB:
kubectl apply -f https://k8s.io/examples/application/mongodb/mongo-deployment.yamlThe output of a successful command verifies that the deployment was created:
deployment.apps/mongo createdView the pod status to check that it is ready:
kubectl get podsThe output displays the pod created:
NAME                     READY   STATUS    RESTARTS   AGE
mongo-75f59d57f4-4nd6q   1/1     Running   0          2m4s
View the Deployment's status:
kubectl get deploymentThe output displays that the Deployment was created:
NAME    READY   UP-TO-DATE   AVAILABLE   AGE
mongo   1/1     1            1           2m21s
The Deployment automatically manages a ReplicaSet. View the ReplicaSet status using:
kubectl get replicasetThe output displays that the ReplicaSet was created:
NAME               DESIRED   CURRENT   READY   AGE
mongo-75f59d57f4   1         1         1       3m12s
- Create a Service to expose MongoDB on the network:
kubectl apply -f https://k8s.io/examples/application/mongodb/mongo-service.yamlThe output of a successful command verifies that the Service was created:
service/mongo createdCheck the Service created:
kubectl get service mongoThe output displays the service created:
NAME    TYPE        CLUSTER-IP     EXTERNAL-IP   PORT(S)     AGE
mongo   ClusterIP   10.96.41.183   <none>        27017/TCP   11s
- Verify that the MongoDB server is running in the Pod, and listening on port 27017:
# Change mongo-75f59d57f4-4nd6q to the name of the Podkubectl get pod mongo-75f59d57f4-4nd6q --template='{{(index (index .spec.containers 0).ports 0).containerPort}}{{"\n"}}'The output displays the port for MongoDB in that Pod:
2701727017 is the TCP port allocated to MongoDB on the internet.
Forward a local port to a port on the Pod
kubectl port-forwardallows using resource name, such as a pod name, to select a matching pod to port forward to.# Change mongo-75f59d57f4-4nd6q to the name of the Podkubectl port-forward mongo-75f59d57f4-4nd6q 28015:27017which is the same as
kubectl port-forward pods/mongo-75f59d57f4-4nd6q 28015:27017or
kubectl port-forward deployment/mongo 28015:27017or
kubectl port-forward replicaset/mongo-75f59d57f4 28015:27017or
kubectl port-forward service/mongo 28015:27017Any of the above commands works. The output is similar to this:
Forwarding from 127.0.0.1:28015 -> 27017
Forwarding from [::1]:28015 -> 27017
Note:
kubectl port-forwarddoes not return. To continue with the exercises, you will need to open another terminal.
- Start the MongoDB command line interface:
mongosh --port 28015
- At the MongoDB command line prompt, enter the
pingcommand:db.runCommand( { ping: 1 } )A successful ping request returns:
{ ok: 1 }
Optionally let kubectl choose the local port
If you don't need a specific local port, you can let kubectl choose and allocate the local port and thus relieve you from having to manage local port conflicts, with the slightly simpler syntax:
kubectl port-forward deployment/mongo :27017
The kubectl tool finds a local port number that is not in use (avoiding low ports numbers, because these might be used by other applications). The output is similar to:
Forwarding from 127.0.0.1:63753 -> 27017
Forwarding from [::1]:63753 -> 27017