

Jenkins and CI/CD
Jenkins is an open source automation server. It helps automate the parts of software development related to building, testing, and deploying, facilitating continuous integration and continuous delivery. It is a server-based system that runs in servlet containers such as Apache Tomcat. With hundreds of plugins available, Jenkins supports building, deploying, and automating for software development projects.
• Since Jenkins runs on Java, you need either latest version of Java Development Kit (JDK) or Java Runtime Environment (JRE).
There are more tools for CI other than jenkins like : travisCI, circleCI, gitlab, bamboo but jenkins is open source, free and highly customizable. Although with jenkins initial setup takes time.
What is CI/CD? Continuous Integration and Continuous Delivery
https://www.guru99.com/continuous-integration.html
Continuous Integration is a software development method where team members integrate their work at least once a day. In this method, every integration is checked by an automated build to detect errors. This concept was first introduced over two decades ago to avoid “integration hell,” which happens when integration is put off till the end of a project.
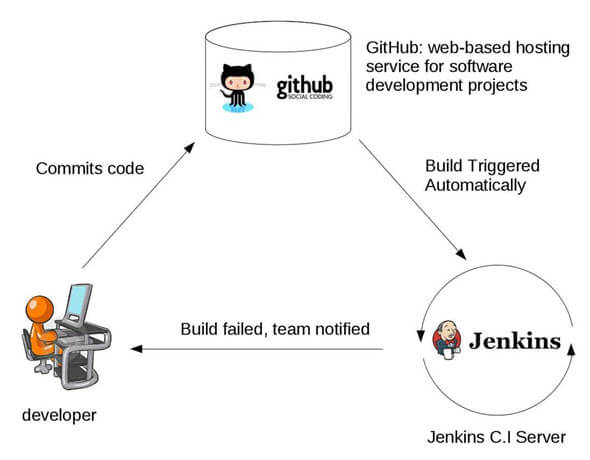
In Continuous Integration after a code commit, the software is built and tested immediately. In a large project with many developers, commits are made many times during a day. With each commit code is built and tested. If the test is passed, build is tested for deployment. If the deployment is a success, the code is pushed to Production. This commit, build, test, and deploy is a continuous process, and hence the name continuous integration/deployment.
What is Continuous Delivery (CD)?
Continuous Delivery is a software engineering method in which a team develops software products in a short cycle. It ensures that software can be easily released at any time. The main aim of continuous delivery is to build, test, and release software with good speed and frequency. It helps you to reduce the cost, time, and risk of delivering changes by allowing for frequent updates in production.
What is the difference between CI and CD?
CI vs CD: Continuous Integration (CI) is an approach of testing each change to codebase automatically, whereas Continuous Delivery (CD) is an approach to obtain changes of new features, configuration, and bug fixes.
What steps are in continuous integration?
CI process
- Ideally, the build should come from the command line and should not depend on IDE.
- The build should happen continuously using a dedicated Cl server, not a cron job.
- CI built should be triggered on every check-in and not just at midnight
- The build should provide immediate feedback and Require no developer effort
- Identify key metrics and track them visually. More importantly, act on them immediately
What do you need to conduct CI process?
Here, are the key elements which you need to perform the entire CI process:
- Version Control System (VCS): It offers a reliable method to centralize and preserve changes made to your project over time.
- Virtual Machine: You should have a spare server or at least one virtual machine to build your system.
- Hosted CI Tool Solutions: To avoid servers or virtual machines, you should go for hosted CI tool solutions. This tool helps in the maintenance of the whole process and offers easier scalability.
- Tools: If you select a self-hosted variant, you will need to install one of the many CI tools like Jenkins, TeamCity, Bamboo, GitLab, etc.
How Continuous integration work?
You are surely aware of the old phone Nokia. Nokia used to implement a procedure called nightly build. After multiple commits from diverse developers during the day, the software built every night. Since the software was built only once in a day, it’s a huge pain to isolate, identify, and fix the errors in a large codebase.
Later, they adopted the Continuous Integration approach. The software was built and tested as soon as a developer committed code. If any error is detected, the respective developer can quickly fix the defect.
Example of Continuous Integration
Features of CI
Here, are important features and benefits of Continuous Integration:
- Allows you to maintain just a single source repository
- You can test the clone of the production CI environment
- The built environment should be close to the production environment.
- One of the advantages of continuous integration is Constant availability of a current build
- The complete process of build and testing and deployment should be visible to all the stack holders.
Why Use CI?
Here are important reasons for using Continuous Integration:
- Helps you to build better quality software
- CI process helps to scale up headcount and delivery output of engineering teams.
- CI allows software developers to work independently on features in parallel.
- Helps you to conduct repeatable testing
- Increase visibility enabling greater communication
- Helps develop a potentially shippable product for fully automated build
- Helps you to reduced risks by making deployment faster and more predictable
- immediate feedback when issue arrives
- Avoid last-minute confusion at release date and timing
Best practices of using CI Systems
Here, are some important best practices while implementing
- Commit Early and Commit Often never Commit Broken Code
- Fix build failures immediately
- Act on metrics
- Build-in every target environment Create artifacts from every build
- The build of the software need to be carried out in a manner so that it can be automated
- Do not depend on an IDE
- Build and test everything when it changes
- The database schema counts as everything
- Helps you to find out key metrics and track them visually
- Check-in often and early
- Stronger source code control
- Continuous integration is running unit tests whenever you commit code
- Automate the build and test everyone
- Keep the build fast with automated deployment
Disadvantages of CI
Here, are cons/drawbacks of Continuous Integration process:
- Initial setup time and training is required to get acquainted with Cl server
- Development of suitable test procedures is essential
- Well-developed test-suite required many resources for Cl server
- Conversion of familiar processes
- Requires additional servers and environments
- Waiting times may occur when multiple developers want to integrate their code around the same time
How does Jenkins work?
Jenkins is a server-based application and requires a web server like Apache Tomcat to run on various platforms like Windows, Linux, macOS, Unix, etc. To use Jenkins, you need to create pipelines which are a series of steps that a Jenkins server will take. Jenkins Continuous Integration Pipeline is a powerful instrument that consists of a set of tools designed to host, monitor, compile and test code, or code changes, like:
- Continuous Integration Server (Jenkins, Bamboo, CruiseControl, TeamCity, and others)
- Source Control Tool (e.g., CVS, SVN, GIT, Mercurial, Perforce, ClearCase and others)
- Build tool (Make, ANT, Maven, Ivy, Gradle, and others)
- Automation testing framework (Selenium, Appium, TestComplete, UFT, and others)
Jenkins Plugins
By default, Jenkins comes with a limited set of features. If you want to integrate your Jenkins installation with version control tools like Git, then you need to install plugins related to Git. In fact, for integration with tools like Maven, Amazon EC2, you need to install respective plugins in your Jenkins.
Jenkins has outstanding plugin support. There are thousands of third-party application plugins available on their website. To know if Jenkins supports the third-party applications you have in mind, check their plugins directory at https://plugins.jenkins.io/
How to Install Git Plugin in Jenkins
Manage jenkins > Manage plugins > Select the GIT Plugin > Install without restart
Once the plugins have been installed,Go to Manage Jenkins on your Jenkins dashboard. You will see your plugins listed among the rest.
How to Integrate Jenkins With GitHub
https://www.guru99.com/jenkins-github-integration.html
Step 1) Create a new job in Jenkins, open the Jenkins dashboard with your Jenkins URL. For example, http://localhost:8080/
Click on create new jobs:
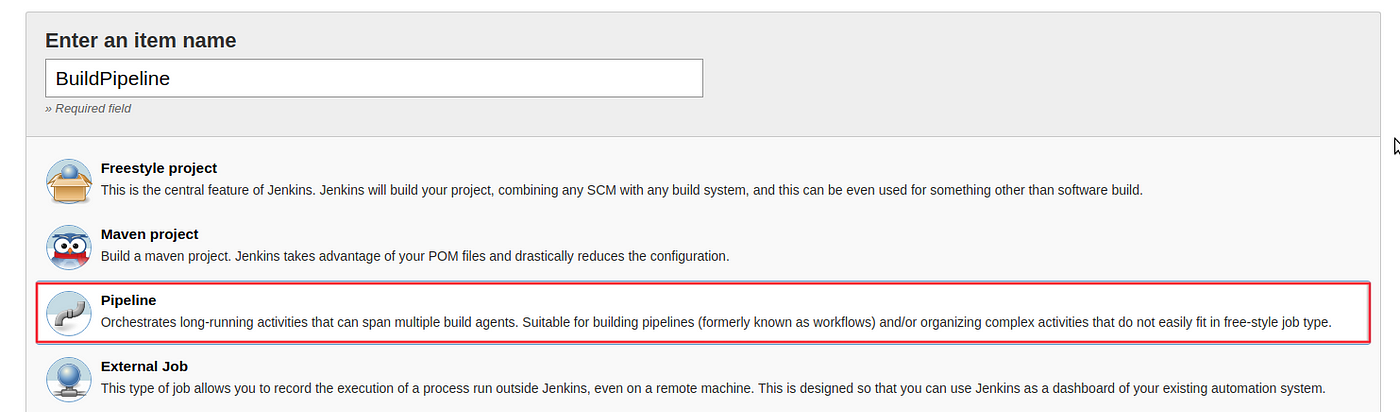
Step 2) Enter the item name, select job type and click OK. We shall create a Freestyle project as an example.
Step 3) Once you click OK, the page will be redirected to its project form. Here you will need to enter the project information:
Step 4) You will see a Git option under Source Code Management if your Git plugin has been installed in Jenkins:
NOTE: If the Git option does not appear, try re-installing the plugins, followed by a restart and a re-login into your Jenkins dashboard. You will now be able to see the Git option as mentioned above.
Step 5) Enter the Git repository URL to pull the code from GitHub.
Step 6) You might get an error message the first time you enter the repository URL.
This happens if you do not have Git installed in your local machine. install Git in your local machine.
Note: If you have GIT already installed in your system, just add git path in Global Tool Configuration.
Step 7) Once you have everything in place, try adding the Git URL into Jenkins. You will not see any error messages for Jenkins Git integration:

Git is now properly configured on your system.
How to Create/Add Users in Jenkins & Manage Permissions
https://www.guru99.com/create-users-manage-permissions.html
Generally, in a large organization, there are multiple, separate teams to manage and run jobs in Jenkins. But managing this crowd of users and assigning roles to them can prove troublesome.
By default, Jenkins comes with very basic user creation options. You can create multiple users but can only assign the same global roles and privileges to them. This not ideal, especially for a large organization.
The Role Strategy Plugin enable you to assign different roles and privileges to different users. You will first need to install the plugin in your Jenkins mange environment.
- Select Rolebased Authorization Strategy plugin
- Click on “Install without restart” (make sure you have an active internet connection
visit this link for more.
How to Create a New Build Job in Jenkins Freestyle Project
https://www.guru99.com/create-builds-jenkins-freestyle-project.html
Jenkins Freestyle Project is a repeatable build job, script, or pipeline that contains steps and post-build actions. It is an improved job or task that can span multiple operations. It allows you to configure build triggers and offers project-based security for your Jenkins project. It also offers plugins to help you build steps and post-build actions.
The types of actions you can perform in a Jenkins build step or post-build action are quite limited. There are many standard plugins available within a Jenkins Freestyle Project to help you overcome this problem.
- Create New Item
Click on “New Item” at the top left-hand side of your dashboard.
- Enter Item details
In the next screen,
- Enter the name of the item you want to create. We shall use the “Hello world” for this demo.
- Select Freestyle project
- Click Okay
3. Enter repository URL
Under Source Code Management, Enter your repository URL. We have a test repository located at https://github.com/kriru/firstJava.git
It is also possible for you to use a local repository.
If your GitHub repository is private, Jenkins will first validate your login credentials with GitHub and only then pull the source code from your GitHub repository.
- Tweak the settings
Now that you have provided all the details, it’s time to build the code. Tweak the settings under the build section to build the code at the time you want. You can even schedule the build to happen periodically, at set times.
Under build,
4. Click on “Add build step”
5.
for windows : →Click on “Execute Windows batch command” and add the commands you want to execute during the build process.
for linux : →Click on “Execute Shell” and add the commands you want to execute during the build process.
Here, I have added the java commands to compile the java code.
I have added the following windows commands: paste this.
javac HelloWorld.java
java HelloWorld
- save and apply
- Now, in the main screen, Click the Build Now button on the left-hand side to build the source code.
- Check the status
After clicking on Build now, you can see the status of the build you run under Build History.
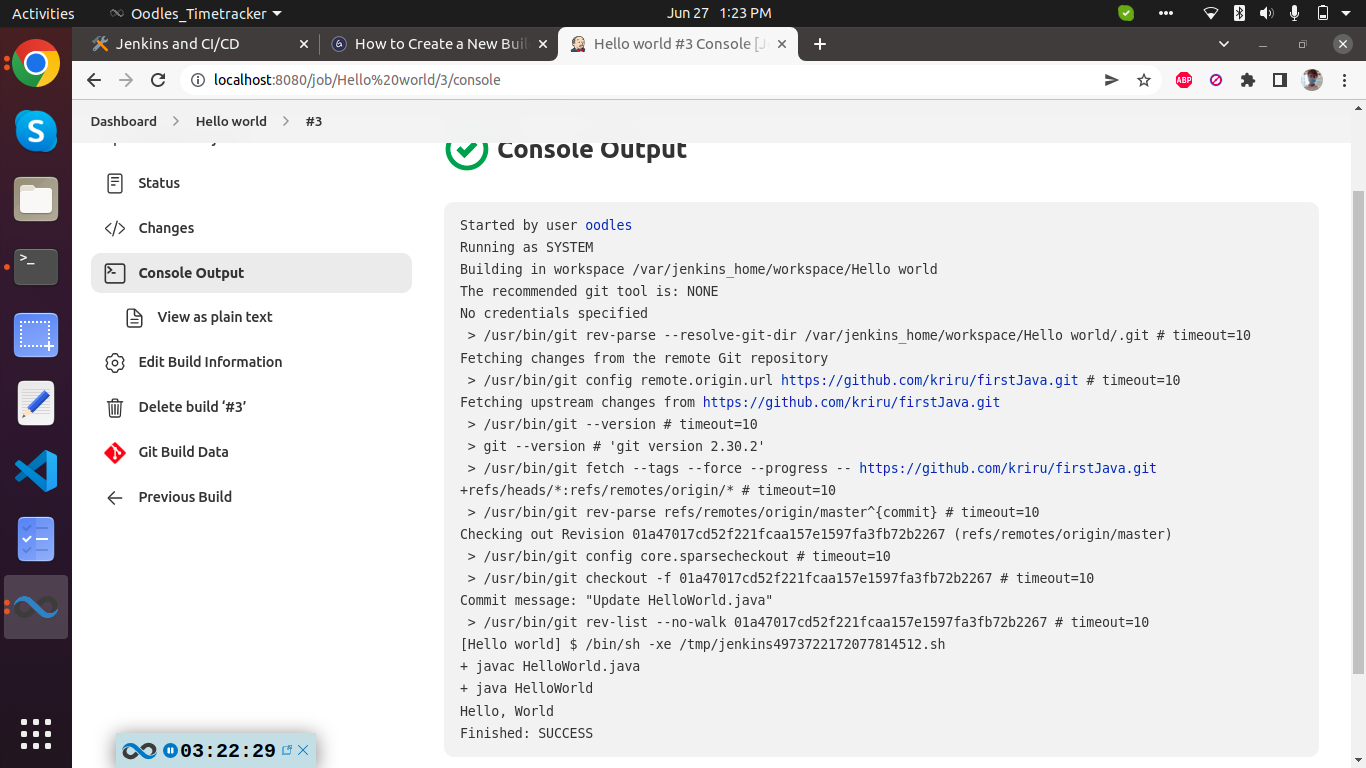
- See the console output
Click on the build number and then Click on console output to see the status of the build you run. It should show you a success message, provided you have followed the setup properly as shown in the below Jenkins create new job example.
In sum, we have executed a HelloWorld program hosted on GitHub. Jenkin pulls the code from the remote repository and builds continuously at a frequency you define.
Jenkins Pipeline Tutorial: How to Create JenkinsFile (Example)
What is Jenkins Pipeline?
Jenkins Pipeline is a combination of plugins that supports integration and implementation of continuous delivery pipelines. It has an extensible automation server to create simple and complex delivery pipelines as code via Pipeline DSL (domain-specific language) based on the Groovy programming language. A Pipeline is a group of events interlinked with each other in a sequence.
What is Continuous Delivery Pipelines? How it Works?
In a Jenkins pipeline, every job or event has some sort of dependency on at least one or more events.
Working of Jenkins Continuous Delivery Pipelines
build →deploy → test → release
The stages above represents a continuous delivery pipeline in Jenkins. It contains a group of states called build, deploy, test and release. These events are interlinked with each other. Every state has its events, which work in a sequence called a continuous delivery pipeline.
A continuous delivery pipeline is an automated expression to display your process for getting software for version control. Thus, every change made in your software goes through a number of complex processes on its way to being released. It also involves developing the software in a reliable and repeatable manner, and progression of the built software through multiple stages of testing and deployment.
What is a JenkinsFile?
Jenkins pipelines can be defined using a text file called JenkinsFile. You can implement pipeline as code using JenkinsFile, and this can be defined by using a domain specific language (DSL). With JenkinsFile, you can write the steps needed for running a Jenkins pipeline.
The benefits of using JenkinsFile are:
- You can create pipelines automatically for all branches and execute pull requests with just one JenkinsFile.
- You can review your Jenkins code on the pipeline
- You can audit your Jenkins pipeline
- This is the singular source for your pipeline and can be modified by multiple users.
JenkinsFile can be defined by either Web UI or with a Jenkins File.
Declarative versus Scripted pipeline syntax:
There are two types of Jenkins pipeline syntax used for defining your JenkinsFile.
- Declarative
- Scripted
Declarative:
Declarative pipeline syntax offers an easy way to create pipelines. It contains a predefined hierarchy to create Jenkins pipelines. It gives you the ability to control all aspects of a pipeline execution in a simple, straight-forward manner.
Scripted:
Scripted Jenkins pipeline runs on the Jenkins master with the help of a lightweight executor. It uses very few resources to translate the pipeline into atomic commands. Both declarative and scripted syntax are different from each other and are defined totally differently.
Why Use Jenkin’s Pipeline?
Jenkins is an open continuous integration server which has the ability to support the automation of software development processes. You can create multiple automation jobs with the help of use cases, and run them as a Jenkins pipeline.
Here are the reasons why you use should use Jenkins pipeline:
- Jenkins pipeline is implemented as a code which allows multiple users to edit and execute the pipeline process.
- Pipelines are robust. So if your server undergoes an unforeseen restart, the pipeline will be automatically resumed.
- You can pause the pipeline process and make it wait to resume until there is an input from the user.
- Jenkins Pipelines support big projects. You can run multiple jobs, and even use pipelines in a loop.
Jenkins Pipeline Concepts
Pipeline : The pipeline is a set of instructions given in the form of code for continuous delivery and consists of instructions needed for the entire build process. With pipeline, you can build, test, and deliver the application.
Node: The machine on which Jenkins runs is called a node. A node block is mainly used in scripted pipeline syntax.
Stage: A stage block contains a series of steps in a pipeline. That is, the build, test, and deploy processes all come together in a stage. Generally, a stage block is used to visualize the Jenkins pipeline process.
Step: A step is nothing but a single task that executes a specific process at a defined time. A pipeline involves a series of steps.
Install Build Pipeline Plugin in Jenkins
With the build pipeline plugin, you can create a pipeline view of incoming and outgoing jobs, and create triggers which require manual intervention.
How to Create Jenkins Pipeline
Once you are logged in to your Jenkins dashboard:
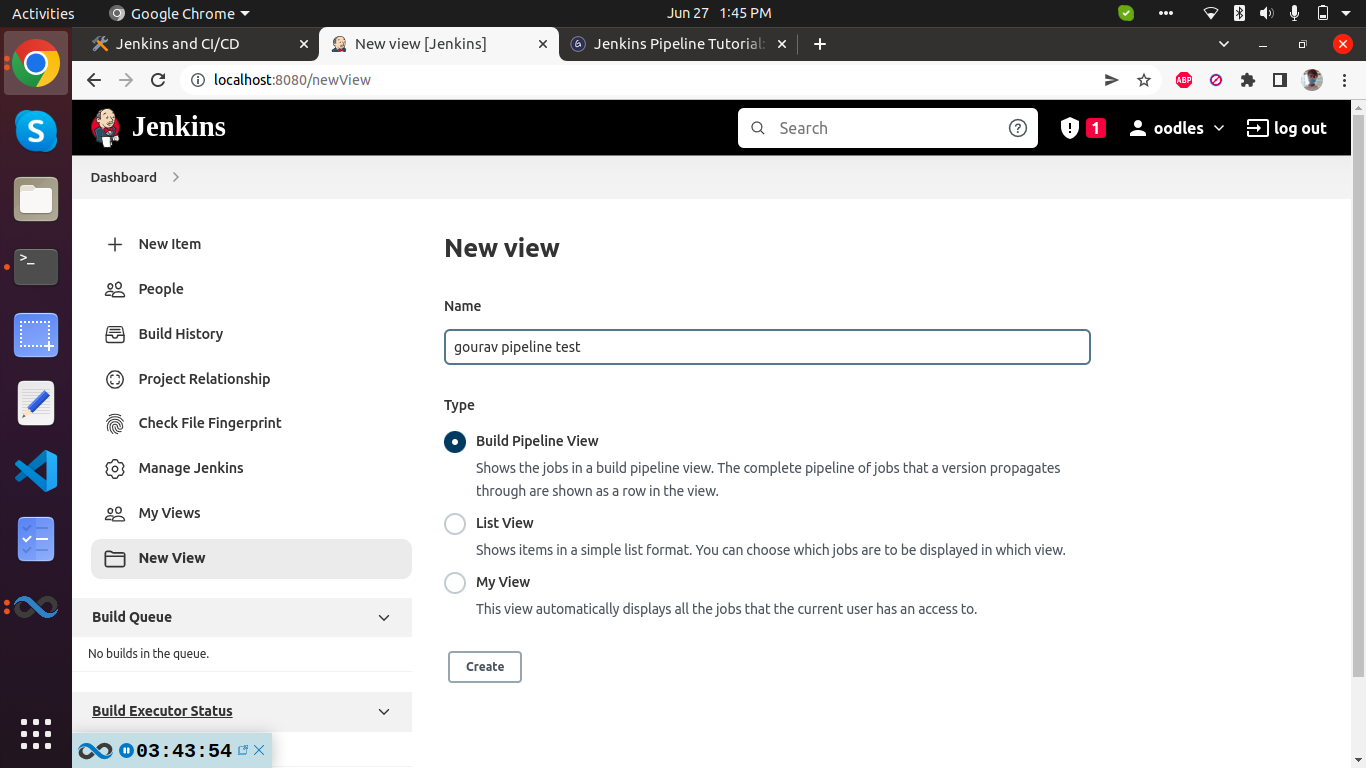
Step 1) Click on the “+” button on the left-hand side of your Jenkins dashboard to create a pipeline.
Step 2)
- You will be asked to give a name to the pipeline view. We shall call it “gourav pipeline view” or “gourav pipeline view” for the duration of this demo.
- Select Build a pipeline view under options
- Click ok
Step 3) In the next page, you will be asked for some more details to configure your Jenkins pipeline. Just accept the default settings, and make sure you choose the first job under the settings. Here I will be selecting “Hello world” Job.
Running a Pipeline build
Step 1) For running a pipeline build, you need to chain your jobs first. For this, go to your first job and click on configure.
Step 2) Now, under Build Triggers, check the Build after other projects are built option.
Thus, a chain for all your jobs has been created.
Step 3) Install the Build Pipeline view plugin if you don’t have it installed already.
Step 4) Go to your Jenkins dashboard and create a view by clicking on the “+” button. Select the Build Pipeline View option and click OK.
Step 5) Under Pipeline view configuration, locate Pipeline Flow.
Under Pipeline flow, select the initial job to run. Now choose the job which has chains to other jobs, as shown in Step 1 and Step 2. Here I will select “jenkins-gourav-test” as job.
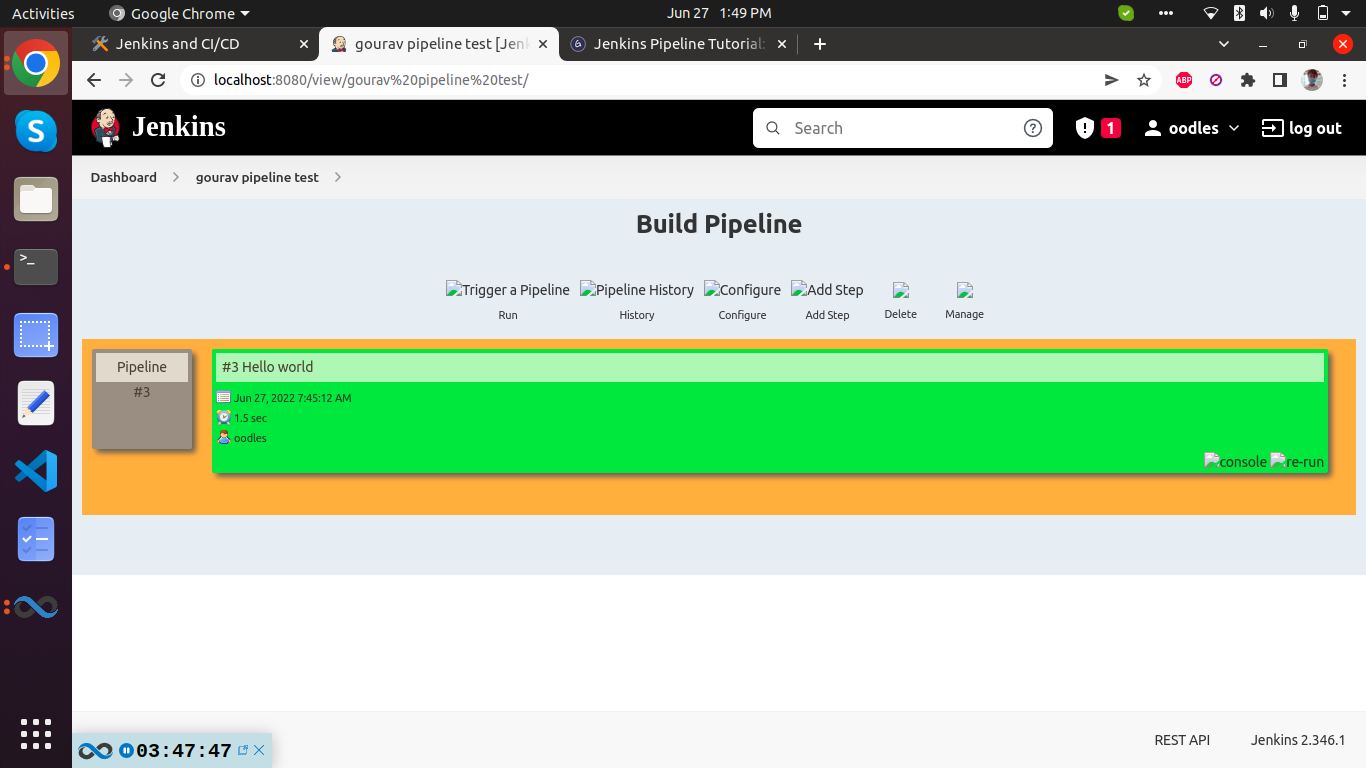
Here we have selected “jenkins-gourav-test” as the initial job, chained to other jobs. So, one by one, the jobs will run in the pipeline.
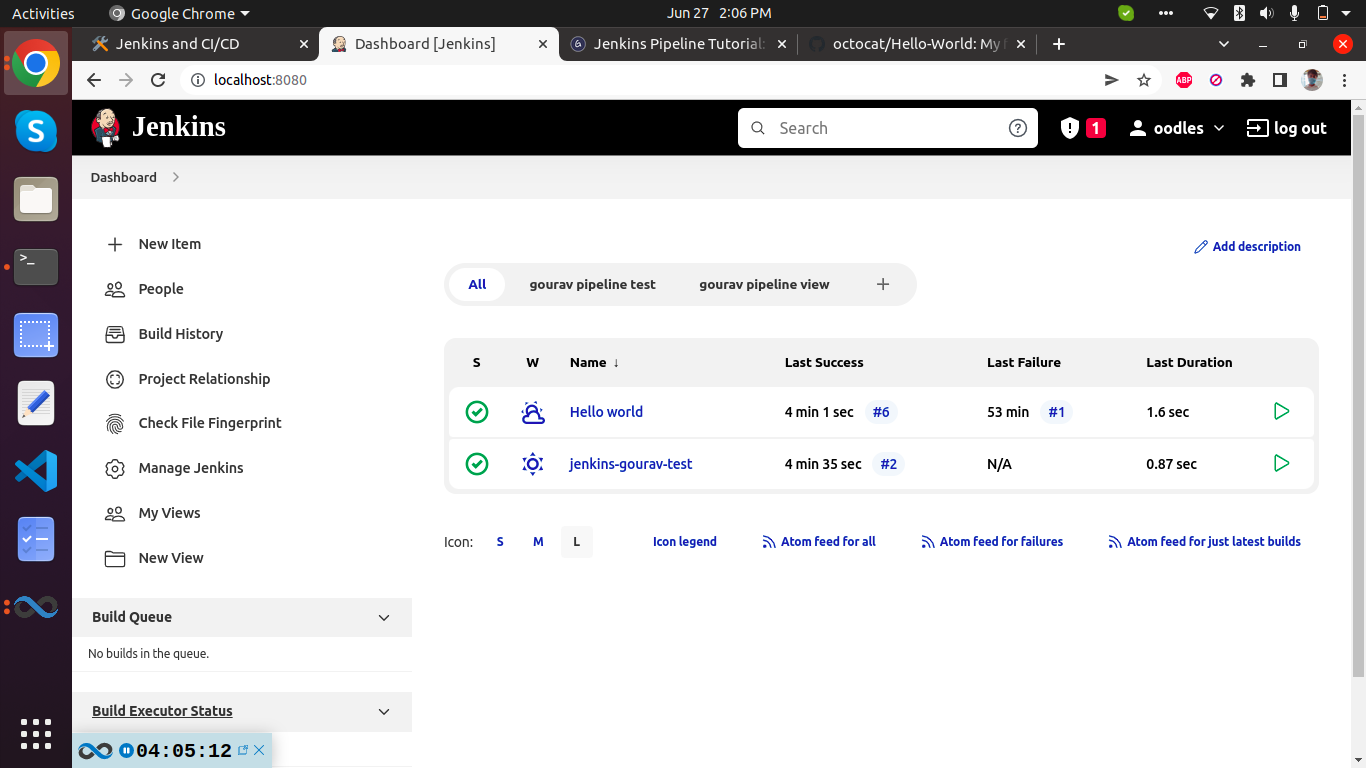
When the Jenkins pipeline is running, you can check its status with the help of Red and Green status symbols. Red means the pipeline has failed, while green indicates success.
In this Jenkins pipeline example, we see that the button is green. Hence, the pipeline is successful.
Running Jenkins pipeline
Click on Run to run the Jenkins pipeline. It will look something like this:
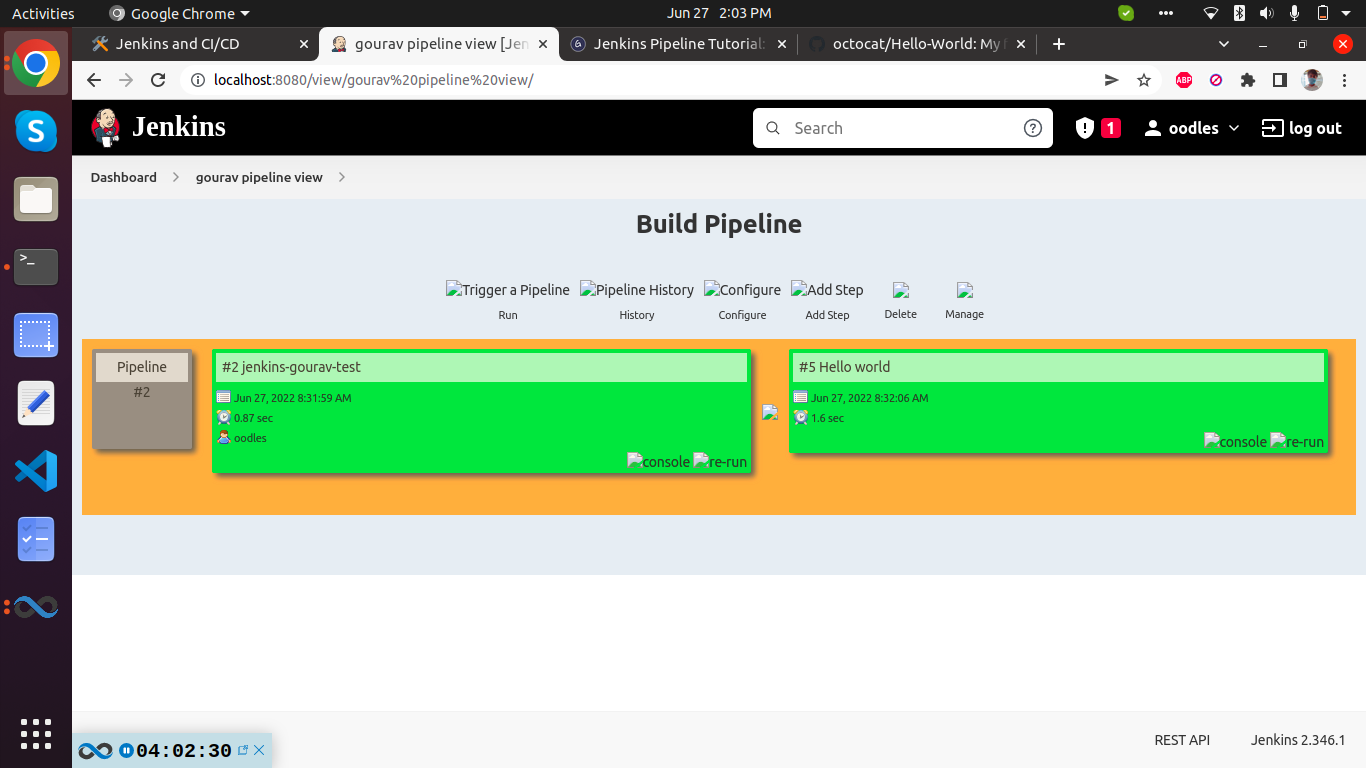
In the Jenkins pipeline script example above, we are demonstrating a simple “helloworld.java” program. But in real time projects, you will be responsible for creating and building complex pipelines in Jenkins.
Best Practices using Jenkins Pipeline:
- Use the genuine Jenkins Pipeline
- Develop your pipeline as code
- Any non-setup work in your pipeline should occur within a stage block.
- Any material work in a pipeline must be performed within a node block.
- Don’t use input within a node block.
- Never set environment variables with env global variable
- Wrap your inputs in a timeout
Deploying docker app using Jenkins pipeline[here : jenkins JAVA APP build with maven]
 https://www.youtube.com/watch?v=gdbA3vR2eDs
Jenkins pipeline script :
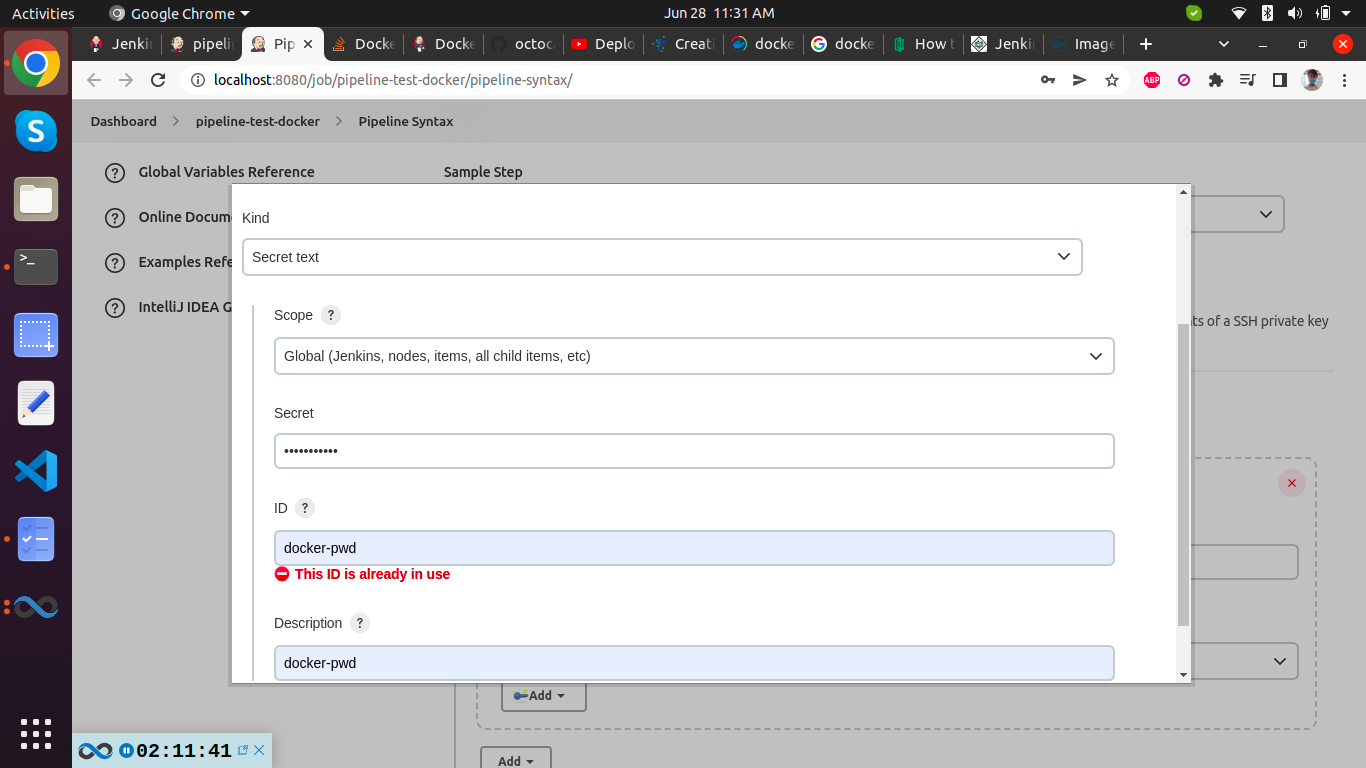
dockerhub credentials need to be provided for pushing image from the below script.

node{
   stage('SCM Checkout'){
       git credentialsId: 'gourav-github-creds-username-pass', url: 'https://github.com/javahometech/my-app'
   }
   stage('Mvn Package'){
     def mvnHome = tool name: 'maven-1', type: 'maven'
     def mvnCMD = "${mvnHome}/bin/mvn"
     sh "${mvnCMD} clean package"
   }
   stage('Build Docker Image'){
     sh 'docker build -t gouravthakur39/my-app:2.0.0 .'
   }
   stage('Push Docker Image'){
     withCredentials([string(credentialsId: 'docker-pwd', variable: 'dockerHubPwd')]) {
        sh "docker login -u kammana -p ${dockerHubPwd}"
     }
     sh 'docker push kammana/my-app:2.0.0'
   }
   stage('Run Container on Dev Server'){
     def dockerRun = 'docker run -p 8080:8080 -d --name my-app kammana/my-app:2.0.0'
     sshagent(['dev-server']) {
       sh "ssh -o StrictHostKeyChecking=no ec2-user@172.31.18.198 ${dockerRun}"
     }
   }
}
If your jenkins container and the container you are deploying to are in same VPC then use private IP, otherwise use Public ec2 IP. Here’ my jenkins containe is running locally and my dev-server is running on ec2. therefore, I have used public ip of ec2 → ec2-user@172.31.18.198credentialsId in Jenkinsfile if you have git setup with SSH locally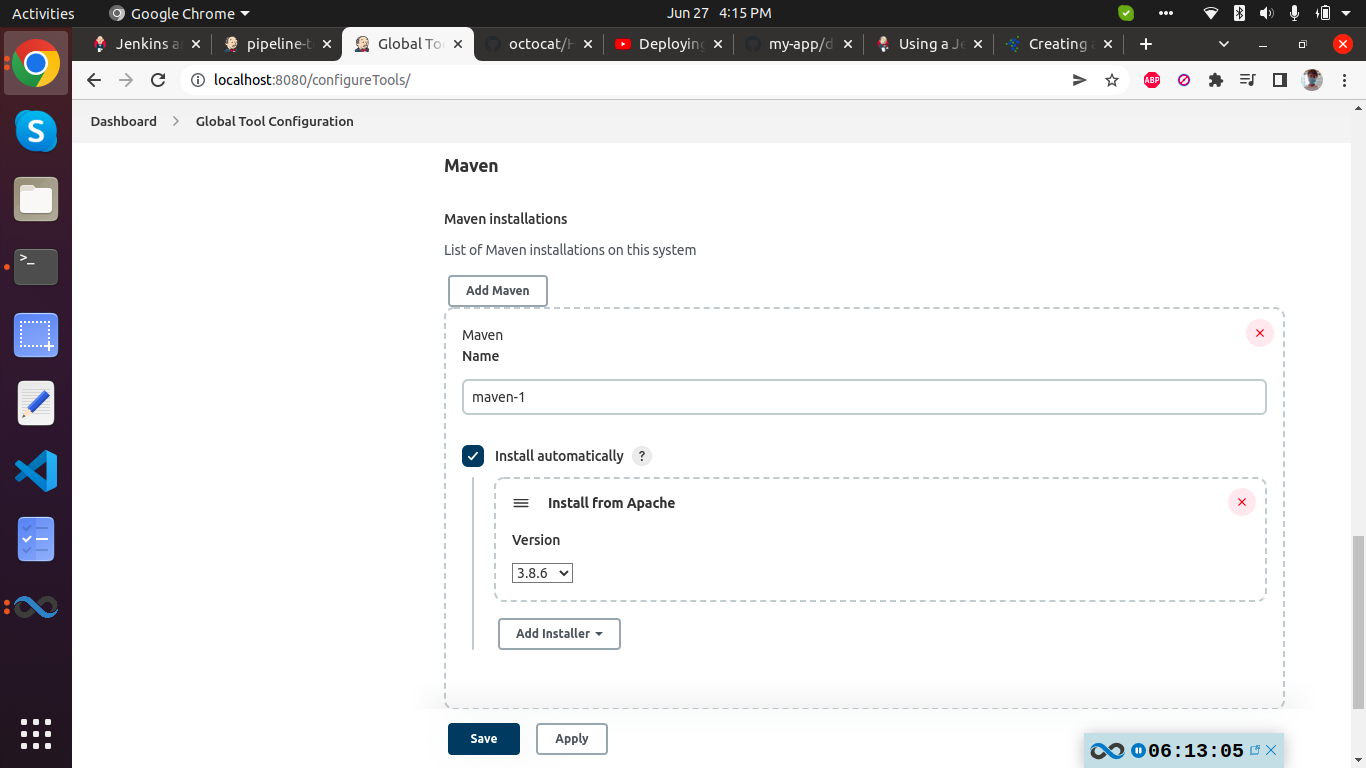
error:
+ docker build -t gouravthakur39/my-app:2.0.0 .
/var/jenkins_home/workspace/pipeline-test-docker@tmp/durable-c2b661c8/script.sh: 1: docker: not found
[Pipeline] }
This error can be resolved by installing docker inside the jenkins container. Enter inside already running jenkins container :
docker exec -it <container name> /bin/bash
eg→ docker exec -it jenkins /bin/bash
Now, we can use script to install docker quickly inside our jenkins container.
$ curl -fsSL get.docker.com -o get-docker.sh$ sudo sh get-docker.shThis is fine for now. But we must write this in a Dockerfile.
After successful build : Output can be found on→ http://107.21.86.186:8080/myweb/ or http://[ec2-ip]/myweb/
There are three ways to achieve docker in docker
- Run docker by mounting
docker.sock(DooD Method)
- dind method
- Using Nestybox sysbox Docker runtime
Docker in Docker Use Cases
Here are a few use cases to run docker inside a docker container.
- One potential use case for docker in docker is for the CI pipeline, where you need to build and push docker images to a container registry after a successful code build.
- Building Docker images with a VM is pretty straightforward. However, when you plan to use Jenkins Docker-based dynamic agents for your CI/CD pipelines, docker in docker comes as a must-have functionality.
- Sandboxed environments.
- For experimental purposes on your local development workstation.
More about this can be find in Docker wiki.
Integration Of Jenkins With AWS EC2 Instance Using SSH Plugin
https://www.thesunflowerlab.com/blog/jenkins-aws-ec2-instance-ssh/
If you want to run commands on the AWS EC2 Instance tool using Jenkins, this blog can help you to connect your self-hosted Jenkins with AWS EC2 Instance, using the SSH remote host plugin provided by Jenkins.
Pre-requisites
- One Up & Running AWS – EC2 Instance
- One UP & Running Jenkins Server
- AWS EC2 Public IP Address
- AWS EC2 Pem File
Step 1
- Go to: Jenkins -> Manage Jenkins -> Manage Plugins -> Available Tab
- Search For ‘SSH Plugin‘
- Download and Install that Plugin
The plugin shall appear in the installed tab.

Step 2
- Go to: Jenkins -> Manage Jenkins -> Configure System
Now “SSH remote hosts” option will appear on this page.

- “Add” button will appear in the SSH remote hosts section.
- This plugin can connect multiple EC2 Instances.
- Add button will ask for a number of parameters as described in the image above.
Parameter Values
- Hostname: Public IP of EC2 Instance or any Domain name of EC2 Instance
- Port: 22 ‘Because 22 Port is for SSH Connections’
- pty, serverAliveInterval, timeout: put the value as described in above image
- Need to Add Credentials by clicking Add button next to Credentials Drop Down.
Step 3
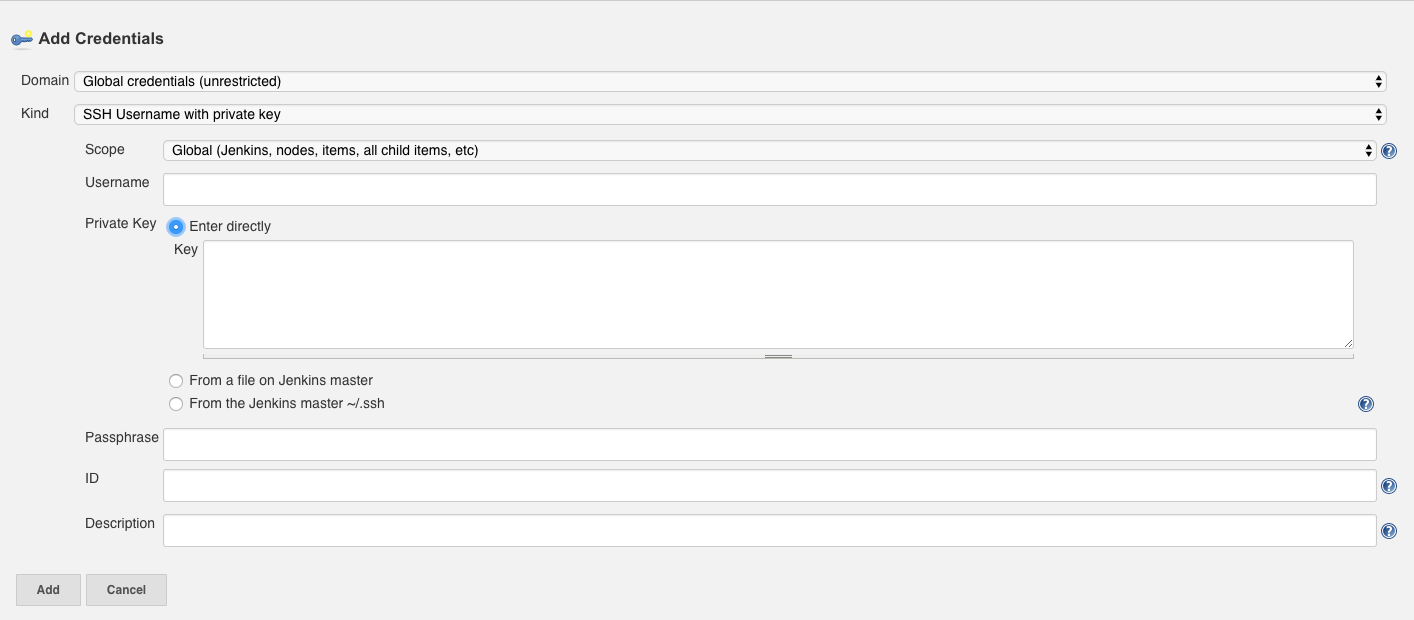
- Add Credentials Popup will appear as explained in the image above.
Parameter Values
- Kind: SSH Username with Private Key
- Scope: Global
- Username: ec2-user ‘or Any Username of your AWS EC2 Instance’
- Private Key: Select ‘Enter directly’. Here we will add Pem file
- Key: Open Pem file with text -> Copy Content -> Paste here.
- Passphrase: leave it blank
- ID: leave it blank
- Description: Put any Name for your Connection.
Step 4
- Back to SSH remote hosts in Manage Jenkins -> Configure System.
- Select the credentials that you created recently.
- Then hit ‘Check Connection’ Button.

That’s it. SSH is successfully connected.
- [TODO] Using Jenkins CI/CD for your NodeJS app: Building, Testing and Deploying
https://blog.harveydelaney.com/jenkins-build-test-deploy-node-app/
CI/CD Pipeline for a NodeJS Application with Jenkins
we need to configure NodeJS on Jenkins.
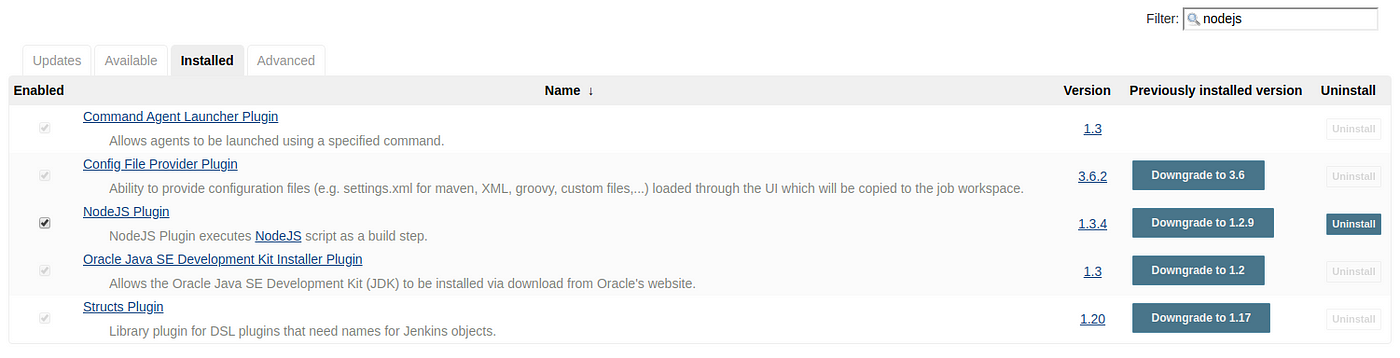
Install NodeJS plugin
Open Jenkins: Manage Jenkins > Plugin Manager > Install NodeJS plugin.
Global Tool Configuration
Open Jenkins: Manage Jenkins > Global Tool Configuration > NodeJS
Set your compatible node version. We can set multiple NodeJS version for multiple application.

1: Build Application with freestyle.
Create a Node application job
- Open
Jenkins> New Item > Enter any job name> Choose Freestyle Project > Click on Save button.

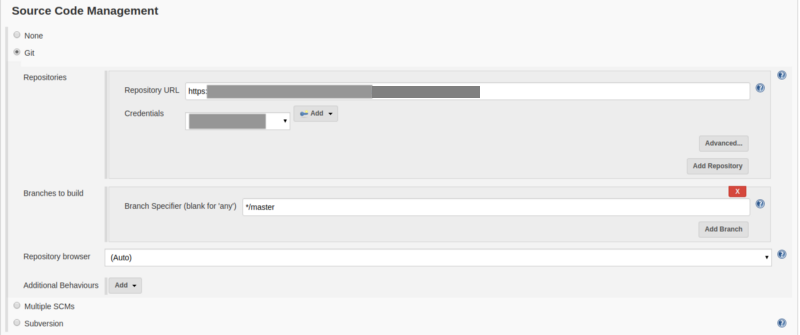
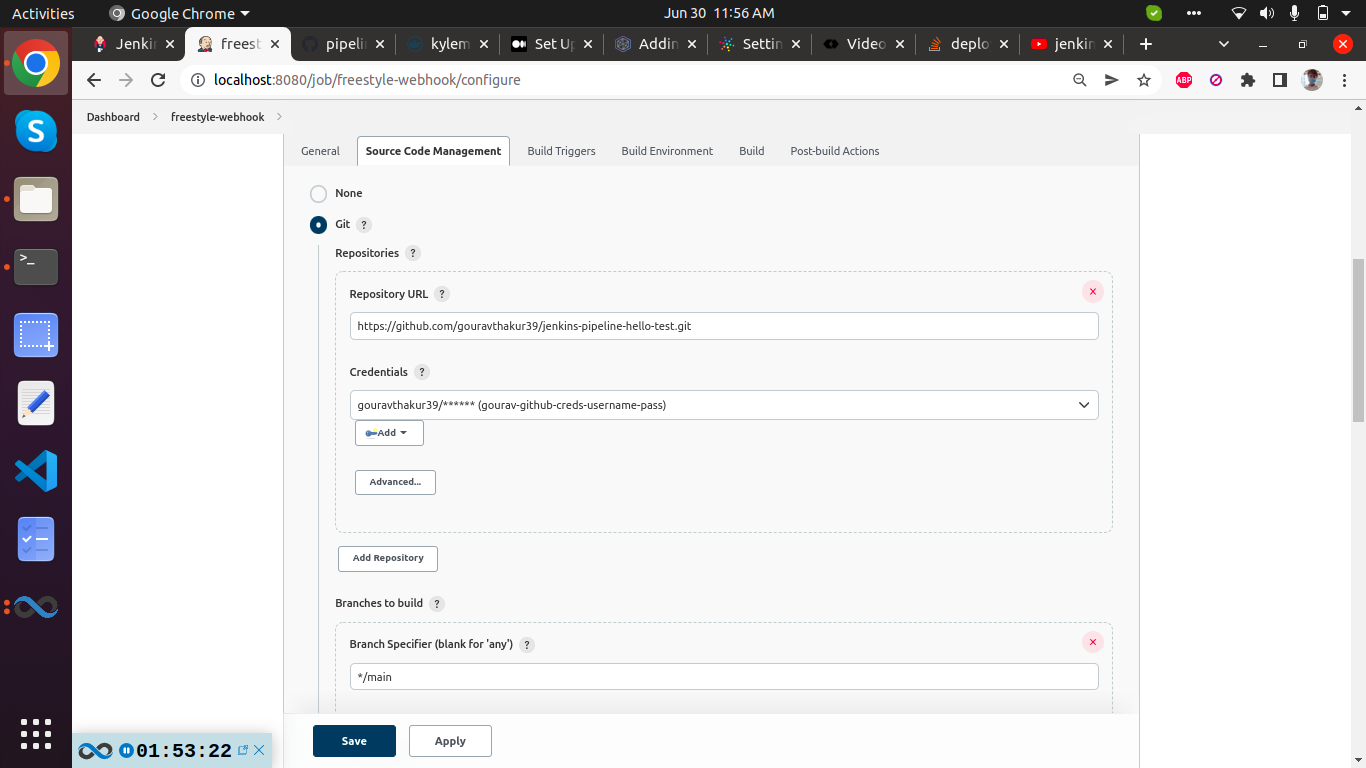
2. Source Code Management > Check Git and give Repository URL:
- Git URL to your repo. Take this URL from Github. It should be the format of git@github.com:{username}/{repo}.git
- here we can use → https://github.com/fhinkel/nodejs-hello-world.git
- Credentials: Select the one you created before.
- Branches to build:
$branch
3. Build Environment > Provide Node & npm bin/ folder to PATH
Select the Nodejs version that is compatible with your application.

- NodeJS Installation: It will display all Node version that is added through Manage Jenkins > Global Tool Configuration > NodeJS
4. Build > Execute shell:
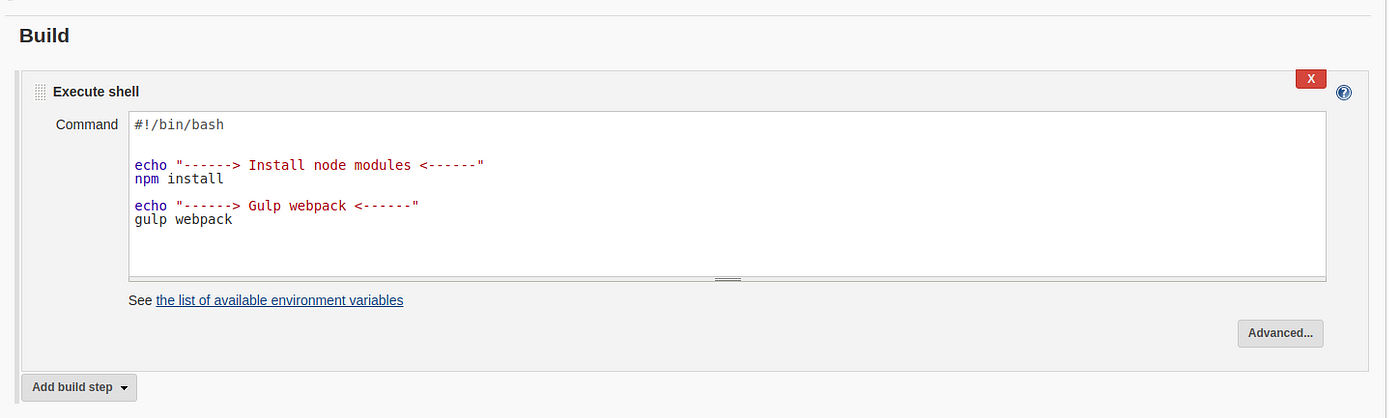
we will modify commands in execute shell according to our needs.
#!/bin/bash
echo "------> Install node modules <------"
npm install
npm start
Here I’m using webpack for my NodeJS application build tool but you can use Gulp, Grunt, Webpack,Express.js, pm2, Babel Any tool that you want to use.
2: Build Application with Jenkins Pipeline.
you can build an application with the Jenkins Pipeline project.
Create a NodeJS application job
- Open
Jenkins-> New Item. Enter any job name > Choose Pipeline > Click OK.
- Pipeline > There 2 options for Jenkinsfile.
Pipeline ScriptPipeline Script From SCM
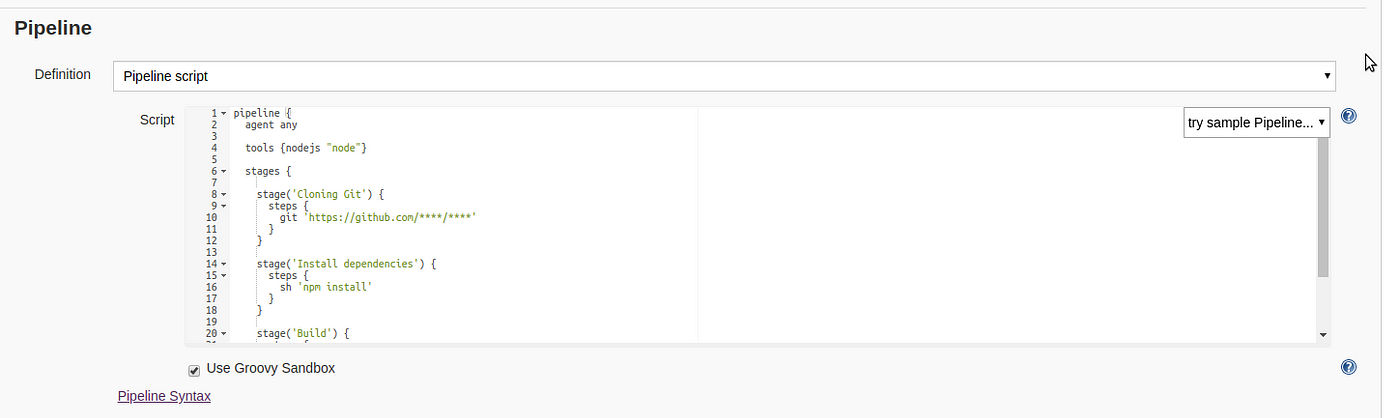
Pipeline Script:
You can write your Pipeline code directly on Jenkins job.
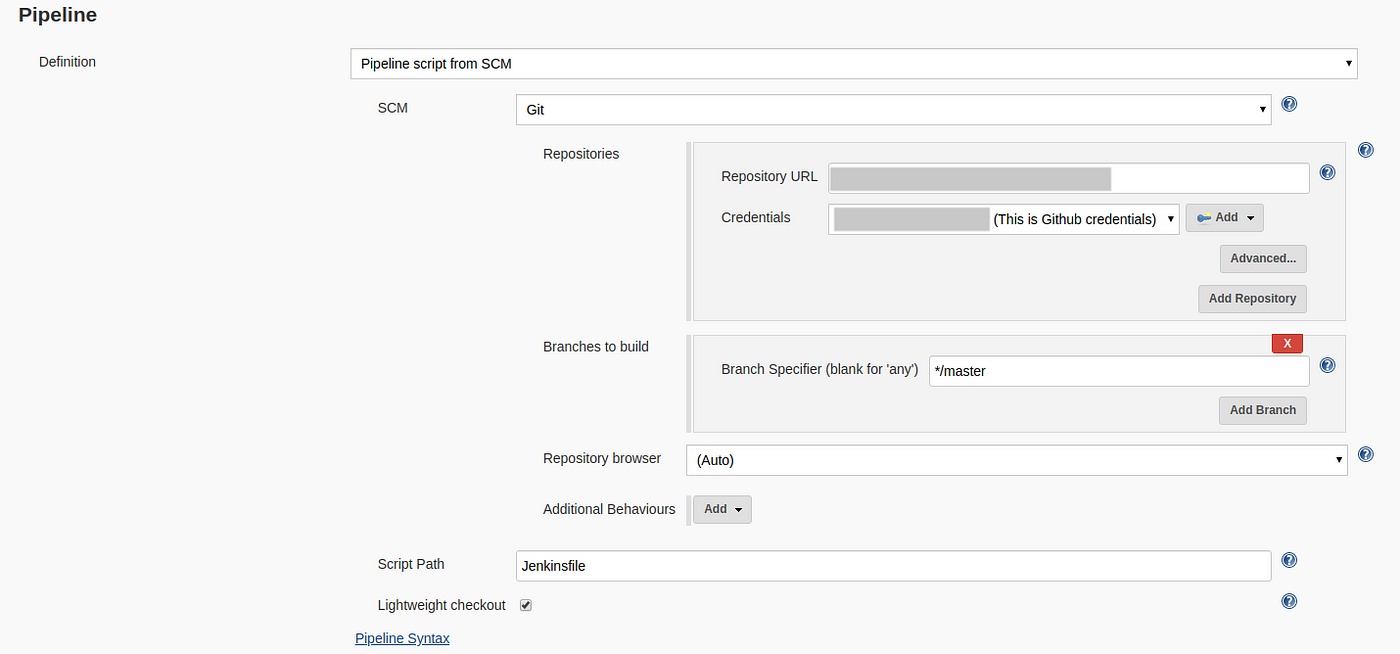
Pipeline Script From SCM:
Pipeline supports fetching the DSL (Domain Specific Language) script from the SCM. Typically called Jenkinsfile and located in the root of the project.
- Select
Pipeline script from SCMfrom the definition.
- Select Git as SCM
- Git URL to your repo. Take this URL from Github. It should be the format of git@github.com:{username}/{repo}.git
- here we can use → https://github.com/l3lackcurtains/nodejs-mocha-chai-test-tdd.git this repo has test also. so it’s good for our use.
- Credentials: Select the one you created before.
- Branches to build:
$branch
For both types of the pipeline, you can use this demo pipeline:
pipeline {
  agent any

  tools {nodejs "NodeJS"}

  stages {

    stage('Git') {
      steps {
        git 'https://github.com/l3lackcurtains/nodejs-mocha-chai-test-tdd.git'
      }
    }

    stage('Build') {
      steps {
        sh 'npm install'
      }
    }


    stage('Test') {
      steps {
        sh 'npm i -g mocha'
        sh 'npm run coverage'
      }
    }
  }
}
Pipeline Examples
The following examples are sourced from the the pipeline-examples repository on GitHub and contributed to by various members of the Jenkins project. this is for reference only. no need to read. just scan quickly.
Examples includes:
Setting Up Ngrok for Local Development
Automatically trigger jenkins jobs using github webhook
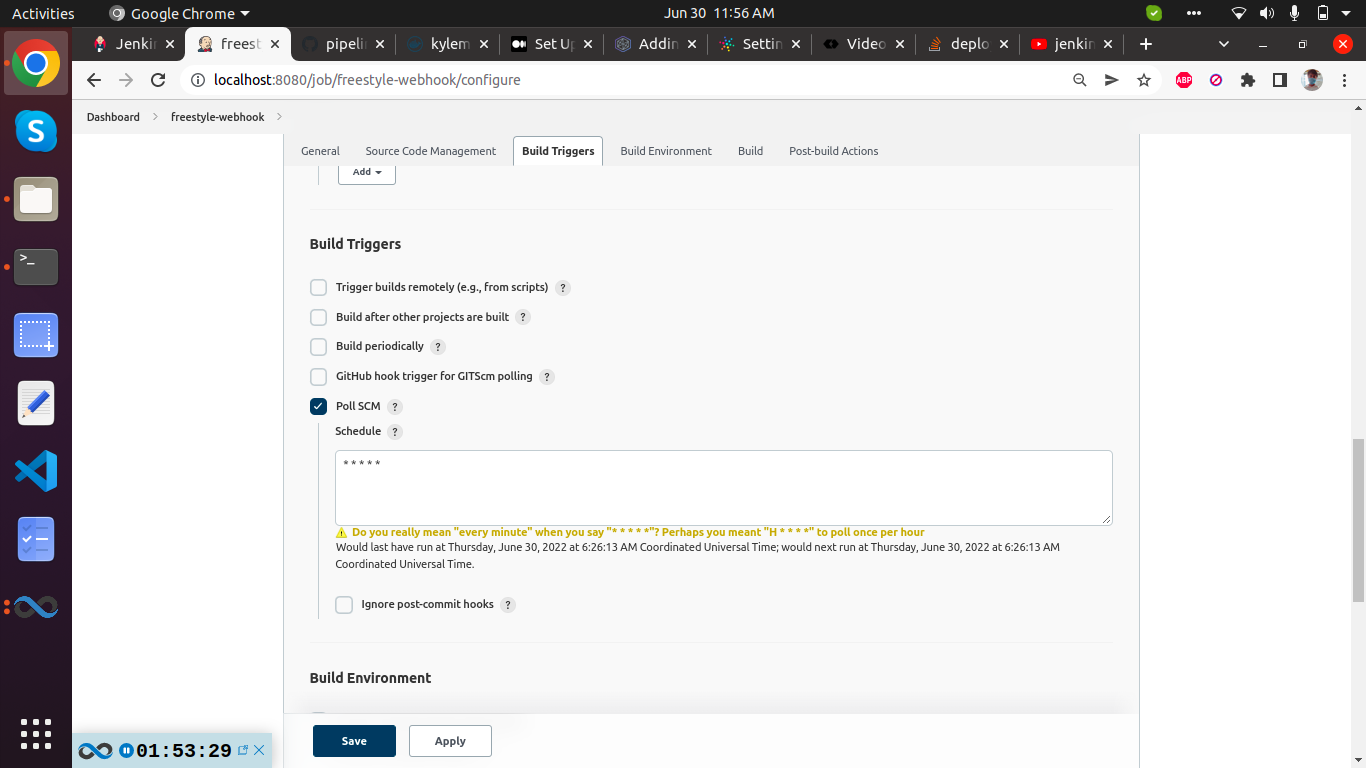
1. Freestyle
Setup freestyle and check poll scm if you want to trigger build every minute or every hour → Use five stars with whitespaces to trigger build every minute.
* * * * *check GitHub hook trigger for GITScm polling if you want to trigger build immediately after commit.[github plugin]
Now to trigger webhook our url need to be not on localhost. So we will use ngrok to tunnel our localhost.
ngrok http 8080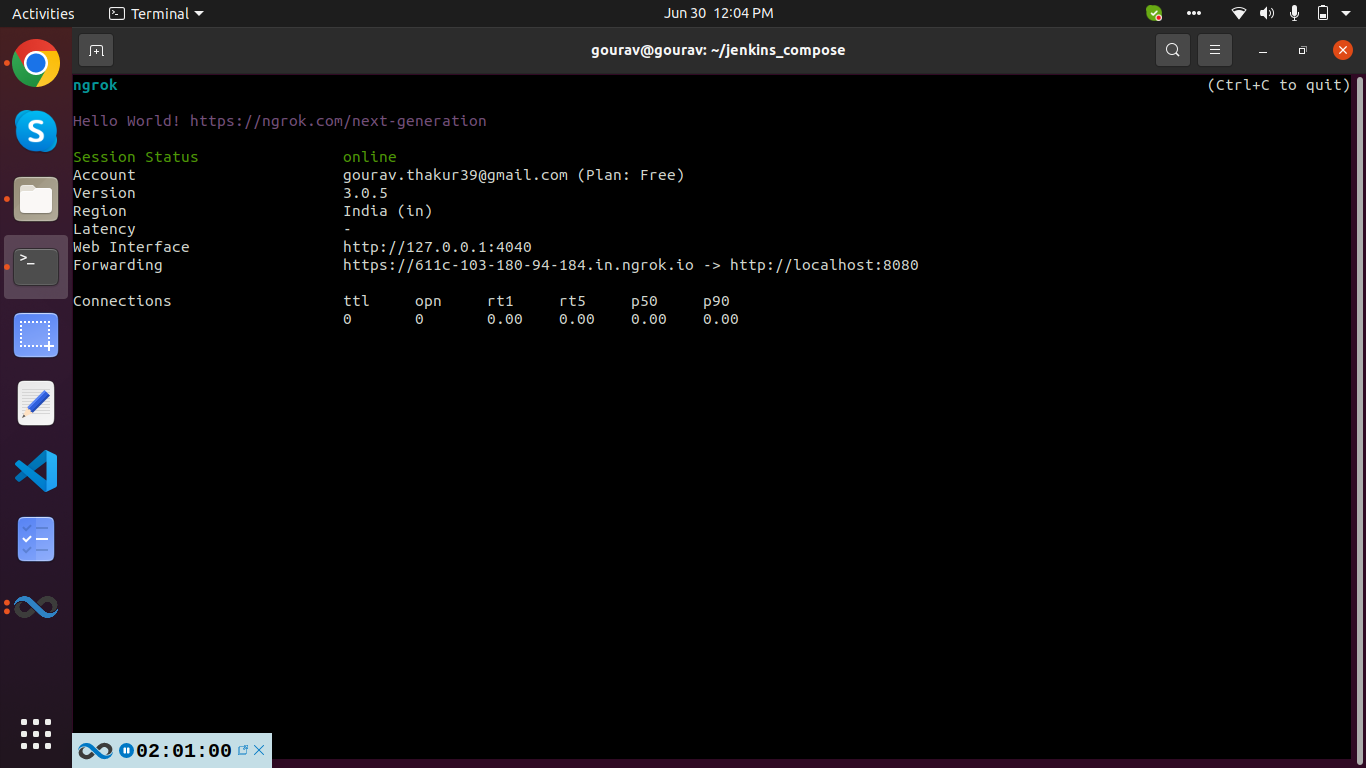
Now go to github repository settings and click on webhook and enter details like this.
https://09e2-103-180-94-135.in.ngrok.io/github-webhook/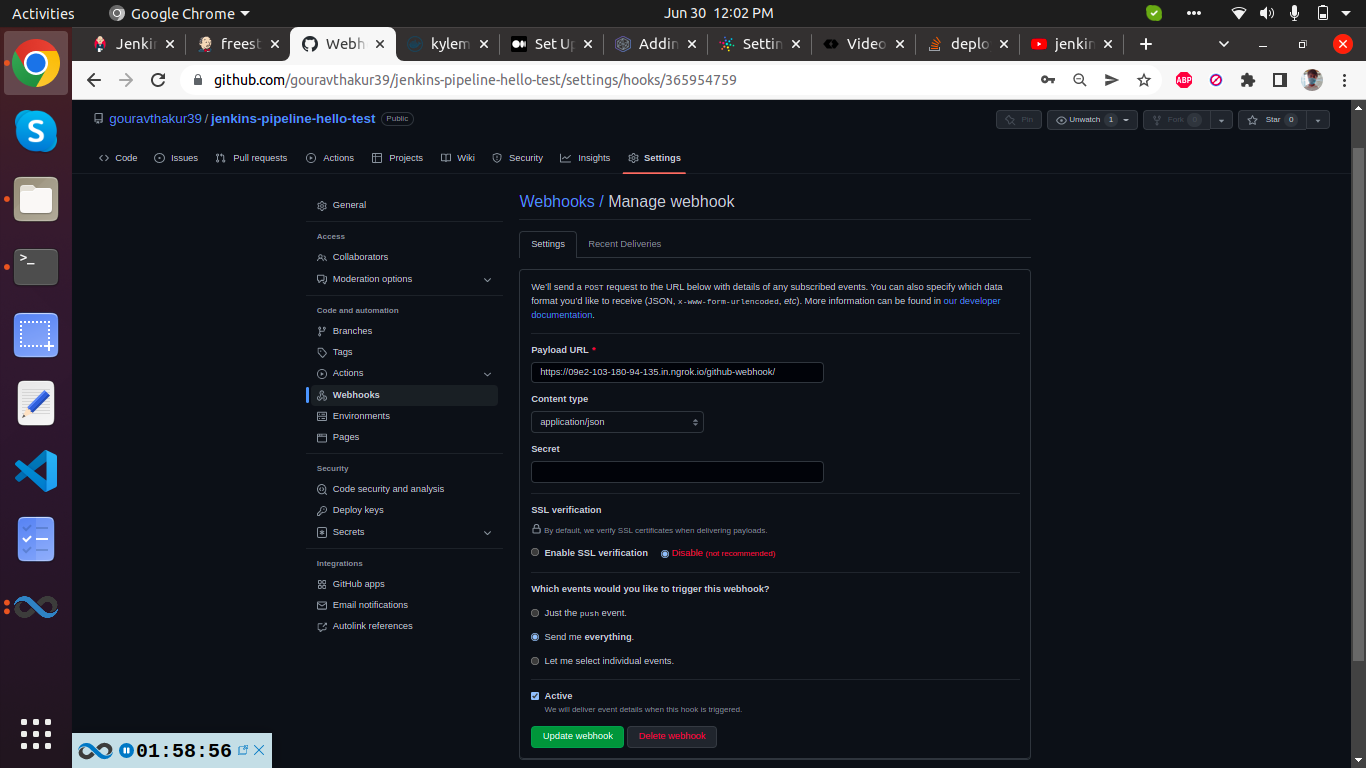
2. Pipeline
For pipeline the procedure is same. This pipeline script can be used to test build
node{
   stage('SCM Checkout'){
       git branch: 'main', credentialsId: 'gourav-github-creds-username-pass', url: 'https://github.com/gouravthakur39/jenkins-pipeline-hello-test.git'
   }
   stage('hello'){
       echo "heyyyyy $BUILD_NUMBER"
   }
}