
AWS - 2
Amazon Web Services : It is a platform that offers flexible, reliable, scalable, easy-to-use and, cost-effective cloud computing solutions.
To Learn
RDS
Amazon RDS
Set up, operate, and scale a relational database in the cloud with just a few clicks.
Amazon RDS (Relational Database Service) is a fully-managed SQL database cloud service that allows to create and operate relational databases. Using RDS you can access your files and database anywhere in a cost-effective and highly scalable way.
Features of Amazon RDS
Amazon RDS has the following features −
- Scalable − Amazon RDS allows to scale the relational database by using AWS Management Console or RDS-specific API. We can increase or decrease your RDS requirements within minutes.
- Host replacement − Sometimes these situations occur when the hardware of Amazon RDS fails. There is no need to worry, it will be automatically replaced by Amazon.
- Inexpensive − Using Amazon RDS, we pay only for the resources we consume. There is no up-front and long-term commitment.
- Secure − Amazon RDS provides complete control over the network to access their database and their associated services.
- Automatic backups − Amazon RDS backs up everything in the database including transaction logs up to last five minutes and also manages automatic backup timings.
- Software patching − Automatically gets all the latest patches for the database software. We can also specify when the software should be patched using DB Engine Version Management.
Launch a RDS MySQL instance and connect to it using Linux EC2
https://www.youtube.com/watch?v=xzCgeRxSzy4
https://www.youtube.com/watch?v=I9Fzm1obG7U
command to log into mysql from ec2 terminal/ssh :
mysql -h example.database-3.i.us-east-1.rds.amazonaws.com -u admin -p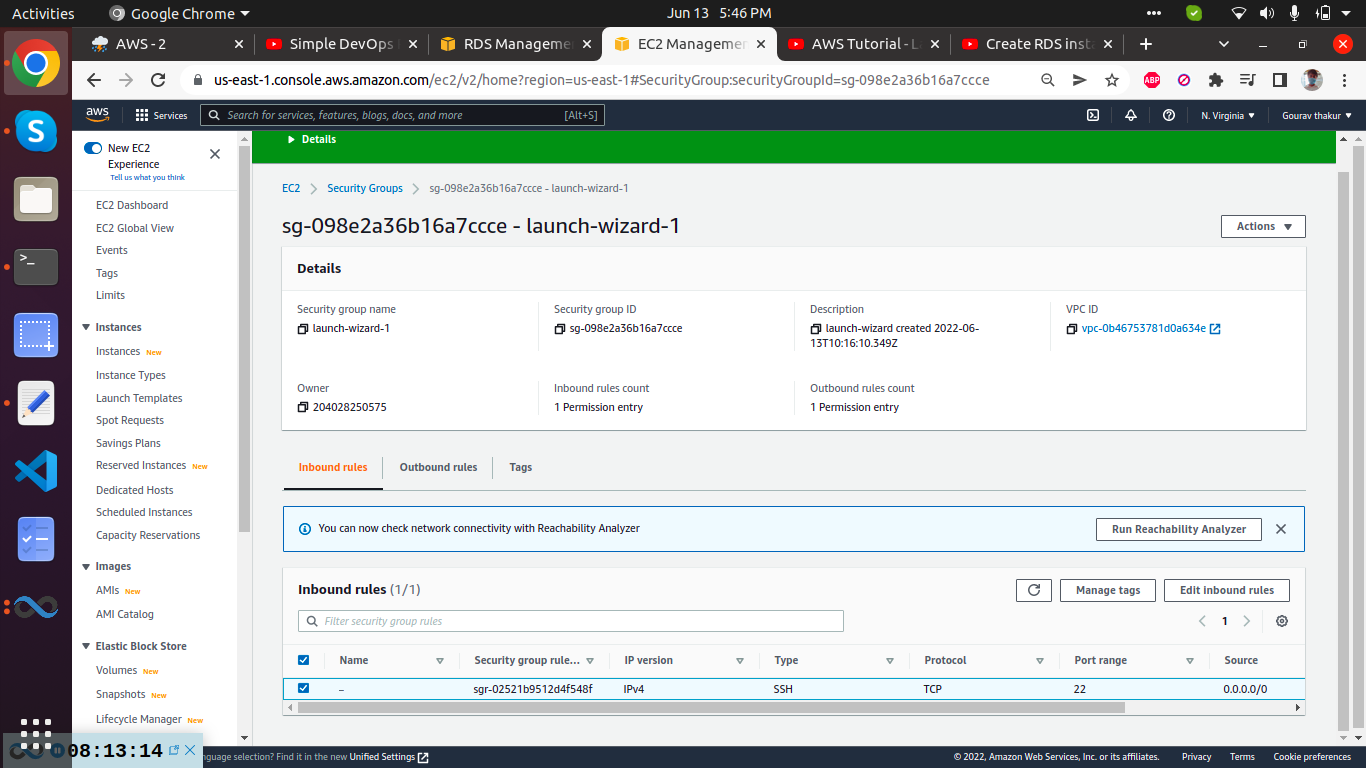
image : EC2 instance security group inbound rule : port 22 allow ⬆️
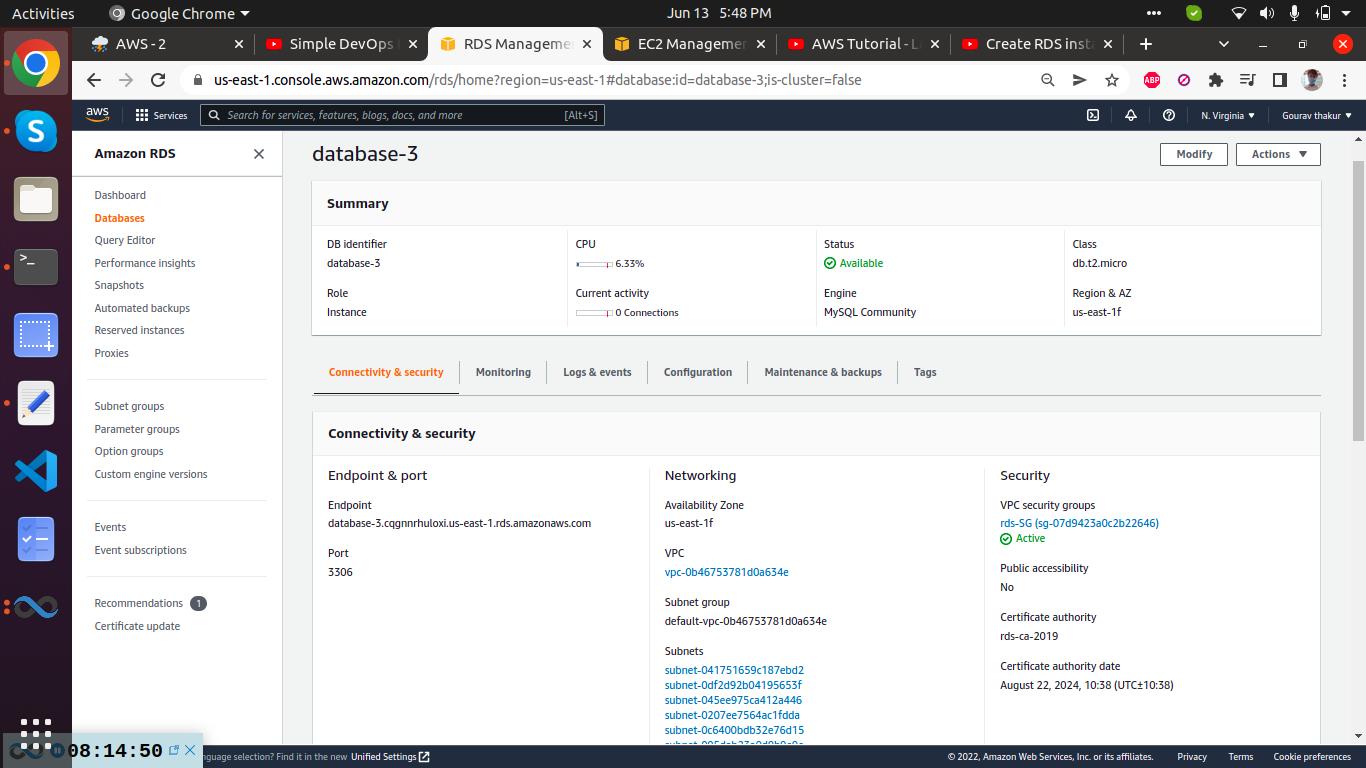
RDS instance has a different Security group : rds-SG ⬆️

RDS Security group inbound rules in detail : ⬆️ here sgr-0dc3v.. was added by RDS and sgr-0d1b.. was manually added by us where we referenced sg-098(launch wizard 1) of ec2.
How to backup and restore MySQL databases using the mysqldump command
We can generate the backup of the MySQL database using any of the following methods:
- Generate the backup using mysqldump utility
- Generate Incremental backups using Binary Log
- Generate backups using the Replication of Slaves
Mysqldump is a command-line utility that is used to generate the logical backup of the MySQL database. It produces the SQL Statements that can be used to recreate the database objects and data. The command can also be used to generate the output in the XML, delimited text, or CSV format.
This command is easy to use, but the only problem that occurs while restoring the database. As I mentioned, when we generate a backup of the MySQL database, it creates a backup file that contains SQL commands that are necessary to rebuild or restore the database. Now, when we restore the database, the command executes all the SQL Statements to create tables and insert the data. If you have a large database, then the restoration process takes a long time to complete.
Note: By default, mysqldump command does not dump the information_schema database, performance_schema, and MySQL Cluster ndbinfo database.
If you want to include the information_schema tables, you must explicitly specify the name of the database in the mysqldump command, also include the —skip-lock-tables option.
There are lots of options and features that can be used with mysqldump. You can view the complete list of options here. I am going to some of the basic features. Following is the syntax of the mysqldump utility.
mysqldump -u [user name] –p [password] [options] [database_name] [tablename] > [dumpfilename.sql]
The parameters are as following:
- u [user_name]: It is a username to connect to the MySQL server. To generate the backup using mysqldump, ‘Select‘ to dump the tables, ‘Show View‘ for views, ‘Trigger‘ for the triggers. If you are not using —single-transaction option, then ‘Lock Tables‘ privileges must be granted to the user
- p [password]: The valid password of the MySQL user
- [option]: The configuration option to customize the backup
- [database name]: Name of the database that you want to take backup
- [table name]: This is an optional parameter. If you want to take the backup specific tables, then you can specify the names in the command
- “<” OR ”>”: This character indicates whether we are generating the backup of the database or restoring the database. You can use “>” to generate the backup and “<” to restore the backup
- [dumpfilename.sql]: Path and name of the backup file. As I mentioned, we can generate the backup in XML, delimited text, or SQL file so we can provide the extension of the file accordingly
TO CONNECT TO MYSQL CLIENT LOCALLY
install mysql client
install mysql server with command → sudo apt-get install mysql-server
elevate your privilege to root with sudo su command
mysql -u root -p
type password of root account
SHOW DATABASES;Creating a New User
mysql>
CREATE USER 'sammy'@'localhost' IDENTIFIED BY 'password';granting permission
GRANT CREATE, ALTER, DROP, INSERT, UPDATE, DELETE, SELECT, REFERENCES, RELOAD on *.* TO 'sammy'@'localhost' WITH GRANT OPTION;FLUSH PRIVILEGES;Log out of MySQL by typing: \q
Log in as the new database user you just created:
mysql -u db_user -pcreate new database
CREATE DATABASE db_name;
SHOW DATABASES;
USE database_name;
CREATE TABLE Employee(
EmployeeID NOT NULL PRIMARY KEY,
FirstName varchar(255) NOT NULL,
LastName varchar(255),
City varchar(255)
);
SHOW TABLES;SELECT what_to_select
FROM which_table
WHERE conditions_to_satisfy;INSERT INTO Customers (CustomerName, ContactName, Address, City, PostalCode, Country)VALUES ('Cardinal', 'Tom B. Erichsen', 'Skagen 21', 'Stavanger', '4006', 'Norway');
mysql> SELECT * FROM article;
+-----------+--------+-----------------+
| articleID | author | email           |
+-----------+--------+-----------------+
|     37237 | john   | john@gmail.com  |
|      7323 | rajesh | rajes@gmail.com |
+-----------+--------+-----------------+
2 rows in set (0.00 sec)Take dump of database
exit from mysql
gourav@gourav:~$ sudo mysqldump -u gourav -p test_blog > backup-sql-test.sqlSimilarly, if you want to generate the backup of all the databases, you must use –all-databases option in the mysqldump command. The following command will generate the backup of all databases within MySQL Server.
mysqldump -u root -p --all-databases > all_databases_20200424.sqlif you get this error : mysqldump: Got error: 1044: Access denied for user 'gourav'@'localhost' to database 'test_blog' when using LOCK TABLES
elevate to root
root@gourav:/home/gourav# sudo mysqldump -u root -p test_blog > backup-test.sqlif problem persists use --single-transaction as a flag
https://www.inmotionhosting.com/support/server/databases/create-a-mysql-database/
if you want to generate the backup of the data without the database structure, then you must use the –no-create-info option in the mysqldump command. The following command generates the backup of data of the sakila database.
mysqldump -u root -p test_blog --no-create-info > data_only_20200424.sql
Restore from dump
Restoring a MySQL database using mysqldump is simple. To restore the database, you must create an empty database. First, let us drop and recreate the sakila database by executing the following command.
mysql> drop database sakila;Query OK, 24 rows affected (0.35 sec)mysql> create database sakila;Query OK, 1 row affected (0.01 sec)MySQL>
When you restore the database, instead of using mysqldump , you must use mysql; otherwise, the mysqldump will not generate the schema and the data. Execute the following command to restore the sakila database:
root@gourav:/home/gourav# mysql -u root -p test_blog_second < backup-test.sql
Enter password:
Restore a specific table in the database
For instance, someone dropped a table from the database. Instead of restoring the entire database, we can restore the dropped table from the available backup. To demonstrate, drop the actor table from the sakila database by executing the following command on the MySQL command-line tool.
mysql> use sakila;
Database changed
mysql> drop table actor;
To restore the actor table, perform the following step by step process.
Step 1 :
Create a dummy database named sakila_dummy and restore the backup of the sakila database on it. Following is the command.
mysql> create database sakila_dummy;
mysql> use sakila_dummy;
mysql> source C:\MySQLBackup\sakila_20200424.sql
Step 2:
Backup the actor table to sakila_dummy_actor_20200424.sql file. Following is the command
C:\Users\Nisarg> mysqldump -u root -p sakila_dummy actor > C:\MySQLBackup\sakila_dummy_actor_20200424.sqlStep 3:
Restore the actor table from the “sakila_dummy_actor_20200424.sql” file. Following is the command on the MySQL command-line tool.
mysql> source C:\MySQLBackup\sakila_dummy_actor_20200424.sqlExecute the following command to verify the table has been restored successfully.
mysql> use sakila;
Database changed
mysql> show tables;
Install MySQL 8 on Amazon Linux
https://techviewleo.com/how-to-install-mysql-8-on-amazon-linux-2/
sudo yum install https://dev.mysql.com/get/mysql80-community-release-el7-5.noarch.rpmA new repository file has been created inside the /etc/yum.repos.d directory.
$ls /etc/yum.repos.d
Once the repository has been added, install MySQL 8 server packages on Amazon Linux 2.
sudo amazon-linux-extras install epel -y
sudo yum -y install mysql-community-server
Core packages installed are:
- MySQL server: mysql-community-server
- MySQL client: mysql-community-client
- Common error messages and character sets for client and server: mysql-community-common
- Shared client libraries: mysql-community-libs
sudo systemctl enable --now mysqldsystemctl status mysqldA superuser account ‘root’@’localhost is created with initial password set and stored in the error log file. To reveal it, use the following command:
$sudo grep 'temporary password' /var/log/mysqld.log
2020-08-12T17:25:34.992227Z 6 [Note] [MY-010454] [Server] A temporary password i
Use this initial password to harden the server.
$sudo mysql_secure_installation -p
Enter password: <INPUT-PRINTED-PASSWORD>
You can update root password anytime from MySQL shell.
$mysql -uroot -p
mysql> ALTER USER 'root'@'localhost' IDENTIFIED BY 'MyNewStrongP@ssw0d!';
Dumping mysql database from RDS to ec2
same procedure as above
use host as the endpoint provided
mysql -u admin -h database-1.cqgnnrhuloxi.us-east-1.rds.amazonaws.com -p rds_test_recovery < backup-sql-from-ec2.sql--> other ways to take backup sql and store in s3: https://www.tutorialspoint.com/amazonrds/amazonrds_mysql_db_export_import.htm
[Pending ] Exporting data from a RDS MySQL DB instance by using replication[To Learn | Pending task]