
AWS - 1
Amazon Web Services : It is a platform that offers flexible, reliable, scalable, easy-to-use and, cost-effective cloud computing solutions.
To Learn
EC2, VPC, SECURITY GROUP, DEPLOYMENT, git, wordpress, ELB, AUTOSCALING etc
Before we start.. let’s take a look at AWS free tier limits, so that we don’t get charged
AWS free tier limits :
Services that are available in the AWS Free Usage Tier
- 750 hours of Amazon EC2 Linux or RHEL or SLES t2.micro instance usage (1 GiB of memory and 32-bit and 64-bit platform support) – enough hours to run continuously each month
- 750 hours of an Elastic Load Balancer plus 15 GB data processing
- 750 hours of Amazon RDS Single-AZ Micro DB Instances, running MySQL, MariaDB, PostgreSQL, Oracle BYOL or SQL Server Express Edition – enough hours to run a DB Instance continuously each month. You also get 20 GB of database storage and 20 GB of backup storage
- 750 hours of Amazon ElastiCache Micro Cache Node usage – enough hours to run continuously each month.
- 30 GB of Amazon Elastic Block Storage in any combination of General Purpose (SSD) or Magnetic, plus 2 million I/Os (with EBS Magnetic) and 1 GB of snapshot storage
- 5 GB of Amazon S3 standard storage, 20,000 Get Requests, and 2,000 Put Requests
- 25 GB of Storage, 25 Units of Read Capacity and 25 Units of Write Capacity, enough to handle up to 200M requests per month with Amazon DynamoDB
- 25 Amazon SimpleDB Machine Hours and 1 GB of Storage
- 1,000 Amazon SWF workflow executions can be initiated for free. A total of 10,000 activity tasks, signals, timers and markers, and 30,000 workflow-days can also be used for free
- 100,000 Requests of Amazon Simple Queue Service
- 100,000 Requests, 100,000 HTTP notifications and 1,000 email notifications for Amazon Simple Notification Service
- 10 Amazon Cloudwatch metrics, 10 alarms, and 1,000,000 API requests
- 50 GB Data Transfer Out, 2,000,000 HTTP and HTTPS Requests for Amazon CloudFront
- 15 GB of bandwidth out aggregated across all AWS services
Note: If you are linked to an Organization (under AWS Organizations), only one account within the organization can benefit from the Free Tier offers.
How to monitor your AWS Free Usage Tier?
You receive fairly generous credits of AWS resources as part of the Free Tier and you will not be billed unless your usage exceeds those credits. Additionally, AWS has brought in a new feature the Billing and Cost Management Dashboard to help you keep better track of your AWS usage, and see where you are at with respect to the Free Tier credits for each service. It’s easy to view your actual usage (month to date) and your forecasted usage (up to the end of the month).
This feature should be used to estimate and plan your AWS costs, ensuring you stay within your free tier limits. You can even receive alerts if your costs exceed a threshold that you set, which could be $0. All of this information is available to you in the AWS Billing and Cost Management Dashboard.
Can you host a website using the AWS Free Usage Tier?
This is one of the most common questions asked about the AWS Free Tier.
Yes, the credits offered by AWS Free Usage Tier are enough to host and run a website for a year, with enough left over for additional experimentation. Using AWS Free Tier Web Hosting, you can host a Static Website. Static websites deliver HTML, JavaScript, images, video, and other files to your website visitors, and contain no application code.
They are the best for sites with few authors and relatively infrequent content changes. Static websites are low cost, provide high levels of reliability, require almost no IT administration, and scale to handle enterprise-level traffic with no additional work.
Limits on the AWS Free Tier
The AWS free usage tier expires 12 months from the date you sign up. When your free usage expires, you simply pay standard, pay-as-you-go service rates.
The AWS free usage tier is available to new AWS accounts created on or after October 21, 2010.
Amazon Simple Workflow Service, Amazon DynamoDB, Amazon SimpleDB, Amazon Simple Notification Service(SNS), and Amazon Simple Queue Service(SQS) free tiers are some of the services that are available to both existing and new AWS customers indefinitely.
Services not available in the AWS Free Usage Tier
- AWS Reserved Instances
- AWS Support subscription
- Route 53 is not included so you’ll still need to pay for hosted availability zones and domains
- Any service that uses an instance size, like EC2, is generally limited to a rather small instance
- Many of the amounts are high enough that you can get locked in — like 50GB Glacier storage or 1M calls/month to API Gateway
- No transfers from existing solutions are included
- You cannot use free tier to mine for crypto. If you are caught, Amazon will charge you the normal rate and may suspend your account.
- Not all AMIs (machine images) are available so, if you plan on using a larger instance in the future, you might not be able to start with the free tier, or you might need to move your image
- The free 12 months are time-based, not usage-based so the clock is ticking after sign up
- There is no rollover of quota from one month to the next
- It does not include Amazon S3 RRS storage.
- The free tier is not restricted. There are no guard rails. If you start using the services that aren’t free, Amazon will charge you the necessary expense.
Why am I being billed for Elastic IP addresses when all my Amazon EC2 instances are terminated?
How do I associate a static public IP address with my EC2 Windows or Linux instance? https://aws.amazon.com/premiumsupport/knowledge-center/ec2-associate-static-public-ip/
Control your AWS costs
https://www.youtube.com/watch?v=FVwdlJ8lM0Q
EC2 instances and instance types
Launch an EC2 Instance in AWS free tier account
Amazon EC2 Spot Instances
Amazon EC2 Spot Instances let you take advantage of unused EC2 capacity in the AWS cloud. Spot Instances are available at up to a 90% discount compared to On-Demand prices. You can use Spot Instances for various stateless, fault-tolerant, or flexible applications such as big data, containerized workloads, CI/CD, web servers, high-performance computing (HPC), and test & development workloads. Because Spot Instances are tightly integrated with AWS services such as Auto Scaling, EMR, ECS, CloudFormation, Data Pipeline and AWS Batch, you can choose how to launch and maintain your applications running on Spot Instances.
Moreover, you can easily combine Spot Instances with On-Demand, RIs and Savings Plans Instances to further optimize workload cost with performance. Due to the operating scale of AWS, Spot Instances can offer the scale and cost savings to run hyper-scale workloads. You also have the option to hibernate, stop or terminate your Spot Instances when EC2 reclaims the capacity back with two-minutes of notice. Only on AWS, you have easy access to unused compute capacity at such massive scale - all at up to a 90% discount.
Savings Plans
Savings Plans are a flexible pricing model that offer low prices on EC2, Fargate and Lambda usage, in exchange for a commitment to a consistent amount of usage (measured in $/hour) for a 1 or 3 year term. Savings Plans provide you the flexibility to use the compute option that best suits your needs and automatically save money, all without having to perform exchanges or modifications. When you sign up for a Savings Plan, you will be charged the discounted Savings Plans price for your usage up to your commitmen
current state of an instance(AWS EC2 lifecycle.)
The valid values for instance-state-code will all be in the range of the low byte and they are:
0:pending
16:running
32:shutting-down
48:terminated
64:stopping
80:stopped
AWS EC2 Stop vs Terminate: The Difference in Status, Purpose, and Cost
https://www.parkmycloud.com/ec2-stop-vs-terminate/
EC2 stop vs terminate are two different instance states in the AWS EC2 lifecycle. Understanding the differences is important to ensure you’re best managing your resources, which has implications for your applications, resource costs, and more.
What Happens When You Stop EC2 Instances
To look at stop vs terminate EC2 actions, we’ll start with “stopped”. The EC2 “stopped” state indicates that an instance is shut down and cannot be used. Basically, it is a temporary shutdown for when you are not using an instance, but you will need it later. The attached bootable EBS volume will not be deleted.
Here are a few important things to know about how stopped instances behave:
- Host computer – after being stopped, once restarted, an instance will be moved to a new host computer (in most cases).
- IP Addresses
- IPv4 addresses – instances keep their private IPv4 addresses. When restarted, it will get a new public IPv4 address.
- Elastic IP addresses (IPv4) – the exception to the above is Elastic IP addresses, which will persist after an instance is stopped and restarted.
- IPv6 addresses – instances retain IPv6 addresses when stopped and restarted.
- Instance store volumes – data is erased when stopped.
- Root device volume – the volume attached to the instance is preserved.
- RAM (contents of memory) – the RAM is erased when stopped.
- Billing – you are not billed for stopped EC2 instances. This makes stopping instances when not in use a valuable cost-saving strategy – more on this later in the article.
- However, you are billed for some attached resources regardless of the instance state – such as Amazon EBS volumes and Elastic IP addresses. You are not charged for data transfer fees. When an instance is stopped and then started, a new billing period begins for a minimum of one minute.
AWS EC2 Stop Instances Use Cases
Reasons you may want to use the “stopped” state include:
- Stop and restart to resolve unexpected status check fails or incorrectly running applications.
- Save money by turning resources off when not needed – for example, turning non-production resources off on nights and weekends.
- Change the instance type and other attributes, for example, to achieve instance rightsizing. You can only modify the instance type, user data, kernel, and RAM disk when an instance is stopped.
Instance Types That Cannot Be Stopped
When you launch your instances from an AMI you can choose between AMIs backed by Amazon EBS or backed by instance store. Instance store-backed instances cannot be stopped.
Additionally, instances in auto scaling groups are not designed to be stopped individually. This will typically trigger a health check and your instances will be marked as unhealthy so your instances will be terminated or replaced. You can “suspend” this action for an individual auto scaling group, or detach the instance from the group and then stop it.
Previously, the AWS stop instance state could not be used for spot instances, but this functionality was added for persistent spot requests with EBS-backed spot instances in January 2020
Hibernate EC2 Instances
Notice also that there is a “stopping” state between running and stopped. If the instance is preparing to be stopped, you are not charged for usage, but if it is preparing to hibernate, usage is billed.
The hibernate action is a “suspend-to-disk” action that saves the contents from the instance memory to your Amazon EBS root volume. So, processes that were previously running can be restored when the instance is started. This allows a quick restart, without having to wait for caches and other memory-centric application components that slow down restarts.
Otherwise, hibernation is similar to stopping and a hibernated instance also goes from the “stopping” to “stopped” state (and as mentioned above, it is still billed while in the “stopping” state, but not “stopped.”)
Note that in order to be hibernated, instances must enable this ability when launching the instance – you can’t enable or disable after launch. Review AWS’s EC2 hibernation prerequisites for details regarding which types of instances can enable this option.
What Happens When You Terminate EC2 Instances
To terminate, on the other hand, is a permanent deletion. Use this when you are finished with an instance, as terminated instances can’t be recovered.
Here are a few things to note about the behavior of terminated instances:
- Host computer – none.
- IP Addresses
- IPv4 addresses – none.
- Elastic IP addresses (IPv4) – the Elastic IP address is disassociated from the instance.
- IPv6 addresses – none.
- Instance store volumes – data is erased when terminated.
- Root device volume – the volume is deleted by default.
- RAM (contents of memory) – the RAM is erased when terminated.
- Billing – you are not billed for terminated EC2 instances.
- The “shutting-down” state exists between running and terminated. You are not billed once an instance goes into this state. You will be billed for any volumes or snapshots Read more about orphaned resources here.
Regarding billing, there can be some confusion regarding reserved instances. Reserved instances are not capacity reservations, but more like pre-paid credits. Therefore, when you stop an instance that had a reservation applied to it, that does not reduce the cost of your reserved instance. To that end, check out savings plans instead.
As you can see, the AWS EC2 stop vs terminate statuses serve very different functions.
Start and Stop EC2 Instances on a Schedule to Reduce Costs
As mentioned above, temporarily stopping an EC2 instance is a great way to save money. The typical use case is to set non-production instances – such as those used for development, testing, staging, and QA – on an on/off schedule, to turn off nights and weekends when not in use. Just by turning an instance off for 12 hours/day and on weekends, you can reduce the cost by 65%.
AMI
An Amazon Machine Image (AMI) is a supported and maintained image provided by AWS that provides the information required to launch an instance. You must specify an AMI when you launch an instance. You can launch multiple instances from a single AMI when you require multiple instances with the same configuration. You can use different AMIs to launch instances when you require instances with different configurations.
An AMI includes the following:
- One or more Amazon Elastic Block Store (Amazon EBS) snapshots, or, for instance-store-backed AMIs, a template for the root volume of the instance (for example, an operating system, an application server, and applications).
- Launch permissions that control which AWS accounts can use the AMI to launch instances.
- A block device mapping that specifies the volumes to attach to the instance when it's launched.
An AMI is a template that contains the software configuration (operating system, application server, and applications) required to launch your instance. You can select an AMI provided by AWS, our user community, or the AWS Marketplace; or you can select one of your own AMIs.
volumes
https://docs.aws.amazon.com/AWSEC2/latest/UserGuide/ebs-volumes.html
An Amazon EBS volume is a durable, block-level storage device that you can attach to your instances. After you attach a volume to an instance, you can use it as you would use a physical hard drive. EBS volumes are flexible. For current-generation volumes attached to current-generation instance types, you can dynamically increase size, modify the provisioned IOPS capacity, and change volume type on live production volumes.
You can use EBS volumes as primary storage for data that requires frequent updates, such as the system drive for an instance or storage for a database application. You can also use them for throughput-intensive applications that perform continuous disk scans. EBS volumes persist independently from the running life of an EC2 instance.
You can attach multiple EBS volumes to a single instance. The volume and instance must be in the same Availability Zone. Depending on the volume and instance types, you can use Multi-Attach to mount a volume to multiple instances at the same time.
EBS volumes provide benefits that are not provided by instance store volumes.
Topics
- Data availability
- When you create an EBS volume, it is automatically replicated within its Availability Zone to prevent data loss due to failure of any single hardware component. You can attach an EBS volume to any EC2 instance in the same Availability Zone. After you attach a volume, it appears as a native block device similar to a hard drive or other physical device. At that point, the instance can interact with the volume just as it would with a local drive. You can connect to the instance and format the EBS volume with a file system, such as ext3, and then install applications.
- Data persistence
An EBS volume is off-instance storage that can persist independently from the life of an instance. You continue to pay for the volume usage as long as the data persists.
EBS volumes that are attached to a running instance can automatically detach from the instance with their data intact when the instance is terminated if you uncheck the Delete on Termination check box when you configure EBS volumes for your instance on the EC2 console. The volume can then be reattached to a new instance, enabling quick recovery. If the check box for Delete on Termination is checked, the volume(s) will delete upon termination of the EC2 instance. If you are using an EBS-backed instance, you can stop and restart that instance without affecting the data stored in the attached volume. The volume remains attached throughout the stop-start cycle.
- Snapshots
- The volume does not need to be attached to a running instance in order to take a snapshot.
snapshots
https://docs.aws.amazon.com/AWSEC2/latest/UserGuide/EBSSnapshots.html
Snapshots go across regions where volumes stay in the same region as the snapshot. You can create a copy of a snapshot but you can't create a copy of a volume. In order to make a copy of a volume you have to use a snapshot. Volumes, images, instances all depend on the snapshot. Snapshot is the glue between volumes, images and instances.
You can back up the data on your Amazon EBS volumes to Amazon S3 by taking point-in-time snapshots. Snapshots are incremental backups, which means that only the blocks on the device that have changed after your most recent snapshot are saved. This minimizes the time required to create the snapshot and saves on storage costs by not duplicating data. Each snapshot contains all of the information that is needed to restore your data (from the moment when the snapshot was taken) to a new EBS volume.
When you create an EBS volume based on a snapshot, the new volume begins as an exact replica of the original volume that was used to create the snapshot. The replicated volume loads data in the background so that you can begin using it immediately. If you access data that hasn't been loaded yet, the volume immediately downloads the requested data from Amazon S3, and then continues loading the rest of the volume's data in the background.
When you delete a snapshot, only the data unique to that snapshot is removed.
How incremental snapshots work
This section shows how an EBS snapshot captures the state of a volume at a point in time, and how successive snapshots of a changing volume create a history of those changes.
Relations among multiple snapshots of the same volume
The diagram in this section shows Volume 1 at three points in time. A snapshot is taken of each of these three volume states. The diagram specifically shows the following:
- In State 1, the volume has
10 GiBof data. Because Snap A is the first snapshot taken of the volume, the entire10 GiBof data must be copied.
- In State 2, the volume still contains
10 GiBof data, but4 GiBhave changed. Snap B needs to copy and store only the4 GiBthat changed after Snap A was taken. The other6 GiBof unchanged data, which are already copied and stored in Snap A, are referenced by Snap B rather than being copied again. This is indicated by the dashed arrow.
- In State 3,
2 GiBof data have been added to the volume, for a total of12 GiB. Snap C needs to copy the2 GiBthat were added after Snap B was taken. As shown by the dashed arrows, Snap C also references4 GiBof data stored in Snap B, and6 GiBof data stored in Snap A.
- The total storage required for the three snapshots is
16 GiB.
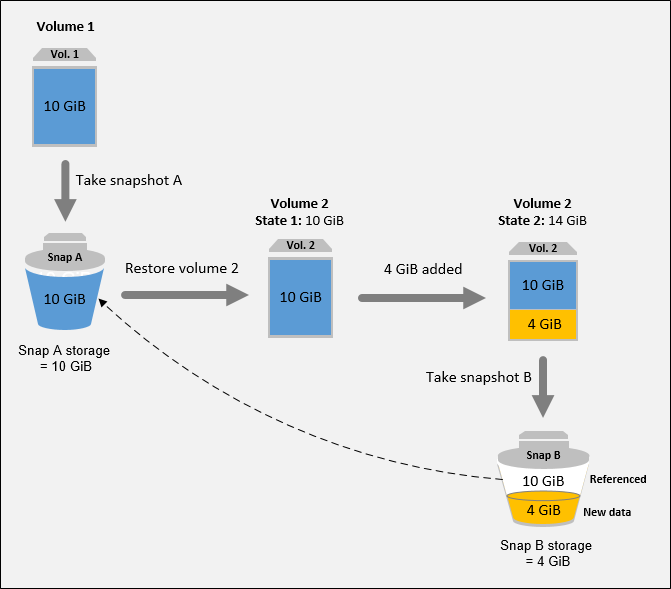
Relations among incremental snapshots of different volumes
The diagram in this section shows how incremental snapshots can be taken from different volumes.

Important
The diagram assumes that you own Vol 1 and that you have created Snap A. If Vol 1 was owned by another AWS account and that account took Snap A and shared it with you, then Snap B would be a full snapshot.
1. Vol 1 has 10 GiB of data. Because Snap A is the first snapshot taken of the volume, the entire 10 GiB of data is copied and stored.
2. Vol 2 is created from Snap A, so it is an exact replica of Vol 1 at the time the snapshot was taken.
3. Over time, 4 GiB of data is added to Vol 2 and its total size becomes 14 GiB.
4. Snap B is taken from Vol 2. For Snap B, only the 4 GiB of data that was added after the volume was created from Snap A is copied and stored. The other 10 GiB of unchanged data, which is already stored in Snap A, is referenced by Snap B instead of being copied and stored again.
Snap B is an incremental snapshot of Snap A, even though it was created from a different volume.
For more information about how data is managed when you delete a snapshot, see Delete an Amazon EBS snapshot.
Copy and share snapshots
You can share a snapshot across AWS accounts by modifying its access permissions. You can make copies of your own snapshots as well as snapshots that have been shared with you. For more information, see Share an Amazon EBS snapshot.
A snapshot is constrained to the AWS Region where it was created. After you create a snapshot of an EBS volume, you can use it to create new volumes in the same Region. For more information, see Create a volume from a snapshot. You can also copy snapshots across Regions, making it possible to use multiple Regions for geographical expansion, data center migration, and disaster recovery. You can copy any accessible snapshot that has a completed status. For more information, see Copy an Amazon EBS snapshot.
Encryption support for snapshots
EBS snapshots fully support EBS encryption.
- Snapshots of encrypted volumes are automatically encrypted.
- Volumes that you create from encrypted snapshots are automatically encrypted.
- Volumes that you create from an unencrypted snapshot that you own or have access to can be encrypted on-the-fly.
- When you copy an unencrypted snapshot that you own, you can encrypt it during the copy process.
- When you copy an encrypted snapshot that you own or have access to, you can reencrypt it with a different key during the copy process.
- The first snapshot you take of an encrypted volume that has been created from an unencrypted snapshot is always a full snapshot.
- The first snapshot you take of a reencrypted volume, which has a different CMK compared to the source snapshot, is always a full snapshot.
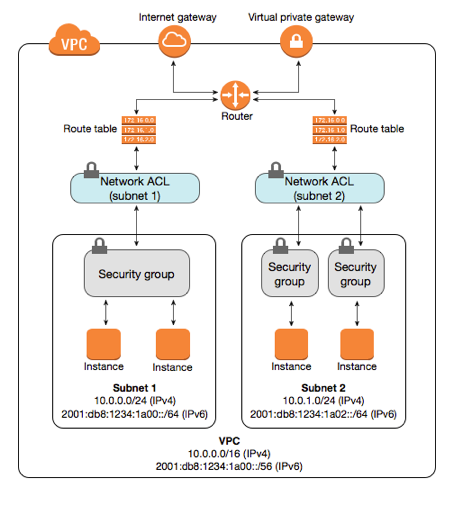
AWS Security groups or Control traffic to resources using security groups
https://docs.aws.amazon.com/vpc/latest/userguide/VPC_SecurityGroups.html
A security group acts as a virtual firewall, controlling the traffic that is allowed to reach and leave the resources that it is associated with. For example, after you associate a security group with an EC2 instance, it controls the inbound and outbound traffic for the instance.
When you create a VPC, it comes with a default security group. You can create additional security groups for each VPC. You can associate a security group only with resources in the VPC for which it is created.
For each security group, you add rules that control the traffic based on protocols and port numbers. There are separate sets of rules for inbound traffic and outbound traffic.
You might set up network ACLs with rules similar to your security groups in order to add an additional layer of security to your VPC. For more information about the differences between security groups and network ACLs, see Compare security groups and network ACLs.
• Security groups are stateful. For example, if you send a request from an instance, the response traffic for that request is allowed to reach the instance regardless of the inbound security group rules. Responses to allowed inbound traffic are allowed to leave the instance, regardless of the outbound rules.
- You have to decide here, in which VPC (Virtual Private Cloud) you want to launch your instance and under which subnets inside your VPC. It is better to determine and plan this prior to launching the instance. Your AWS architecture set-up should include IP ranges for your subnets etc. pre-planned for better management. (We will see how to create a new VPC in Networking section of the tutorial.
- Subnetting should also be pre-planned. E.g.: If it’s a web server you should place it in the public subnet and if it’s a DB server, you should place it in a private subnet all inside your VPC.
Security group basics
The following are the characteristics of security groups:
- When you create a security group, you must provide it with a name and a description. The following rules apply:
- A security group name must be unique within the VPC.
- Names and descriptions can be up to 255 characters in length.
- Names and descriptions are limited to the following characters: a-z, A-Z, 0-9, spaces, and ._-:/()#,@[]+=&;{}!$*.
- When the name contains trailing spaces, we trim the space at the end of the name. For example, if you enter "Test Security Group " for the name, we store it as "Test Security Group".
- A security group name cannot start with
sg-.
- Security groups are stateful. For example, if you send a request from an instance, the response traffic for that request is allowed to reach the instance regardless of the inbound security group rules. Responses to allowed inbound traffic are allowed to leave the instance, regardless of the outbound rules.
- There are quotas on the number of security groups that you can create per VPC, the number of rules that you can add to each security group, and the number of security groups that you can associate with a network interface. For more information, see Amazon VPC quotas.
The following are the characteristics of security group rules:
- You can specify allow rules, but not deny rules.
- When you first create a security group, it has no inbound rules. Therefore, no inbound traffic is allowed until you add inbound rules to the security group.
- When you first create a security group, it has an outbound rule that allows all outbound traffic from the resource. You can remove the rule and add outbound rules that allow specific outbound traffic only. If your security group has no outbound rules, no outbound traffic is allowed.
- When you associate multiple security groups with a resource, the rules from each security group are aggregated to form a single set of rules that are used to determine whether to allow access.
- When you add, update, or remove rules, your changes are automatically applied to all resources associated with the security group. The effect of some rule changes can depend on how the traffic is tracked. For more information, see Connection tracking in the Amazon EC2 User Guide for Linux Instances.
- When you create a security group rule, AWS assigns a unique ID to the rule. You can use the ID of a rule when you use the API or CLI to modify or delete the rule.
Control traffic to subnets using Network ACLs
A network access control list (ACL) is an optional layer of security for your VPC that acts as a firewall for controlling traffic in and out of one or more subnets. You might set up network ACLs with rules similar to your security groups in order to add an additional layer of security to your VPC.
Network ACL basics
The following are the basic things that you need to know about network ACLs:
- Your VPC automatically comes with a modifiable default network ACL. By default, it allows all inbound and outbound IPv4 traffic and, if applicable, IPv6 traffic.
- You can create a custom network ACL and associate it with a subnet. By default, each custom network ACL denies all inbound and outbound traffic until you add rules.
- Each subnet in your VPC must be associated with a network ACL. If you don't explicitly associate a subnet with a network ACL, the subnet is automatically associated with the default network ACL.
- You can associate a network ACL with multiple subnets. However, a subnet can be associated with only one network ACL at a time. When you associate a network ACL with a subnet, the previous association is removed.
- A network ACL contains a numbered list of rules. We evaluate the rules in order, starting with the lowest numbered rule, to determine whether traffic is allowed in or out of any subnet associated with the network ACL. The highest number that you can use for a rule is 32766. We recommend that you start by creating rules in increments (for example, increments of 10 or 100) so that you can insert new rules where you need to later on.
- A network ACL has separate inbound and outbound rules, and each rule can either allow or deny traffic.
- Network ACLs are stateless, which means that responses to allowed inbound traffic are subject to the rules for outbound traffic (and vice versa).
Elastic IP addresses
An Elastic IP address is a static IPv4 address designed for dynamic cloud computing. An Elastic IP address is allocated to your AWS account, and is yours until you release it. By using an Elastic IP address, you can mask the failure of an instance or software by rapidly remapping the address to another instance in your account. Alternatively, you can specify the Elastic IP address in a DNS record for your domain, so that your domain points to your instance. For more information, see the documentation for your domain registrar, or Set up dynamic DNS on Your Amazon Linux instance .
An Elastic IP address is a public IPv4 address, which is reachable from the internet. If your instance does not have a public IPv4 address, you can associate an Elastic IP address with your instance to enable communication with the internet. For example, this allows you to connect to your instance from your local computer.
Elastic IP address pricing
To ensure efficient use of Elastic IP addresses, we impose a small hourly charge if an Elastic IP address is not associated with a running instance, or if it is associated with a stopped instance or an unattached network interface. While your instance is running, you are not charged for one Elastic IP address associated with the instance, but you are charged for any additional Elastic IP addresses associated with the instance.
Elastic IP address basics
The following are the basic characteristics of an Elastic IP address:
- An Elastic IP address is static; it does not change over time.
- To use an Elastic IP address, you first allocate one to your account, and then associate it with your instance or a network interface.
- When you associate an Elastic IP address with an instance, it is also associated with the instance's primary network interface. When you associate an Elastic IP address with a network interface that is attached to an instance, it is also associated with the instance.
- When you associate an Elastic IP address with an instance or its primary network interface, the instance's public IPv4 address (if it had one) is released back into Amazon's pool of public IPv4 addresses. You cannot reuse a public IPv4 address, and you cannot convert a public IPv4 address to an Elastic IP address. For more information, see Public IPv4 addresses.
- You can disassociate an Elastic IP address from a resource, and then associate it with a different resource. To avoid unexpected behavior, ensure that all active connections to the resource named in the existing association are closed before you make the change. After you have associated your Elastic IP address to a different resource, you can reopen your connections to the newly associated resource.
- A disassociated Elastic IP address remains allocated to your account until you explicitly release it. We impose a small hourly charge for Elastic IP addresses that are not associated with a running instance.
- When you associate an Elastic IP address with an instance that previously had a public IPv4 address, the public DNS host name of the instance changes to match the Elastic IP address.
- We resolve a public DNS host name to the public IPv4 address or the Elastic IP address of the instance outside the network of the instance, and to the private IPv4 address of the instance from within the network of the instance.
- An Elastic IP address comes from Amazon's pool of IPv4 addresses, or from a custom IP address pool that you have brought to your AWS account.
- When you allocate an Elastic IP address from an IP address pool that you have brought to your AWS account, it does not count toward your Elastic IP address limits. For more information, see Elastic IP address limit.
- When you allocate the Elastic IP addresses, you can associate the Elastic IP addresses with a network border group. This is the location from which we advertise the CIDR block. Setting the network border group limits the CIDR block to this group. If you do not specify the network border group, we set the border group containing all of the Availability Zones in the Region (for example,
us-west-2).
- An Elastic IP address is for use in a specific network border group only.
- An Elastic IP address is for use in a specific Region only, and cannot be moved to a different Region.
Use reverse DNS for email applications
If you intend to send email to third parties from an instance, we recommend that you provision one or more Elastic IP addresses and assign static reverse DNS records to the Elastic IP addresses that you use to send email. This can help you avoid having your email flagged as spam by some anti-spam organizations. AWS works with ISPs and internet anti-spam organizations to reduce the chance that your email sent from these addresses will be flagged as spam.
Considerations
- Before you create a reverse DNS record, you must set a corresponding forward DNS record (record type A) that points to your Elastic IP address.
- If a reverse DNS record is associated with an Elastic IP address, the Elastic IP address is locked to your account and cannot be released from your account until the record is removed.
Elastic IP address limit
By default, all AWS accounts are limited to five (5) Elastic IP addresses per Region, because public (IPv4) internet addresses are a scarce public resource. We strongly encourage you to use an Elastic IP address primarily for the ability to remap the address to another instance in the case of instance failure, and to use DNS hostnames for all other inter-node communication
Placement Groups
- Placement group determines how the instances are placed on the underlying hardware
- AWS now provides three types of placement groups
- Cluster – clusters instances into a low-latency group in a single AZ
- Partition – spreads instances across logical partitions, ensuring that instances in one partition do not share underlying hardware with instances in other partitions
- Spread – strictly places a small group of instances across distinct underlying hardware to reduce correlated failures
https://jayendrapatil.com/aws-ec2-placement-groups/
What is Elastic Network Interface?
A network interface is the point of interconnection between a computer and a private or public network . A network interface is generally a network interface card (NIC), but does not have to have a physical form. Instead, the network interface can be implemented in software.
AWS Elastic Network Interface is simply a virtual interface that can be attached to an instance in a Virtual Private Cloud (VPC). Followings are the attributes of a network interface:
- A primary private IPv4 address
- One Elastic IP address (IPv4) per private IPv4 address
- One or more secondary private IPv4 addresses
- One public IPv4 address
- One or more security groups
- One or more IPv6 addresses
- A source/destination check flag
- A MAC address
- A description
By default, each instance will have a primary network interface. This can be seen while the instance is being created.
https://www.whizlabs.com/blog/elastic-network-interface/
Load Balancer
A load balancer is a device that acts as a reverse proxy and distributes network or application traffic across a number of servers. Load balancers are used to increase capacity (concurrent users) and reliability of applications. They improve the overall performance of applications by decreasing the burden on servers associated with managing and maintaining application and network sessions, as well as by performing application-specific tasks.
Load balancers are generally grouped into two categories: Layer 4 and Layer 7. Layer 4 load balancers act upon data found in network and transport layer protocols (IP, TCP, FTP, UDP). Layer 7 load balancers distribute requests based upon data found in application layer protocols such as HTTP.
Requests are received by both types of load balancers and they are distributed to a particular server based on a configured algorithm. Some industry standard algorithms are:
- Round robin
- Weighted round robin
- Least connections
- Least response time
Load Balancer Diagram
Layer 7 load balancers can further distribute requests based on application specific data such as HTTP headers, cookies, or data within the application message itself, such as the value of a specific parameter.
Load balancers ensure reliability and availability by monitoring the "health" of applications and only sending requests to servers and applications that can respond in a timely manner.
eg HAProxy
Target groups for your Application Load Balancers
Each target group is used to route requests to one or more registered targets. When you create each listener rule, you specify a target group and conditions. When a rule condition is met, traffic is forwarded to the corresponding target group. You can create different target groups for different types of requests. For example, create one target group for general requests and other target groups for requests to the microservices for your application.
EC2 Auto scaling
https://www.hava.io/blog/what-is-aws-ec2-auto-scaling
Auto-scaling is the capability built into AWS that allows you to ensure you have the right number of EC2 instances provisioned to handle the load of your application. Using Auto-scaling, you can remove the guess work in selecting how many EC2 instances are required to provide an acceptable level of performance for your application without over-provisioning resources and incurring unnecessary costs.
Amazon EC2 Auto Scaling features have no additional fees beyond the service fees for Amazon EC2, CloudWatch (for scaling policies), and the other AWS resources that you use.
When you are running workloads in production it is a good idea to use Amazon CloudWatch to monitor resource usage like CPU utilization, however when desired limits are exceeded, CloudWatch will not automatically provision more resources to handle the increased load, which is where auto-scaling comes into play.
Two of the core AWS best practices are scalability and automation. EC2 Auto-scaling provides scalability which addresses the important question around how to ensure your workload has enough EC2 resources to meet fluctuating performance requirements and how you can automate the provisioning process to occur in response to demand.
Auto scaling undertakes the process of scaling out (adding resources) based on increased demand, or scaling in (reducing resources) the number of EC2 instances you have running in your workload based on conditions you define like cpu usage levels or a predefined schedule.
AUTOSCALING COMPONENTS.
There are 3 components required for auto scaling.
Launch Configuration
This component relates to what will be launched by your autoscaler. Similar to launching an EC2 instance from the console, you define what AMI (machine image) to use, what instance types to add and which security groups and roles the instances should inherit.
Auto Scaling Group
This component of autoscaling relates to where the autoscaling should take place. Which VPC and subnets to use, what load balancer to attach, what the minimum and maximum number of EC2 instances to scale out and in and the desired capacity.
If you set the minimum instance number to 2, then should the instance count drop below 2 for any reason, the autoscaler will add back instances until the minimum number of EC2 instances are running.
If you set the maximum number of instances to 10, then the autoscaler will keep adding EC2 instances when CPU load warrants it until you hit 10, at which point no additional instances will be added even if CPU load is maxed out.
Auto Scaling Policy
This third component of autoscaling relates to when auto-scaling is in invoked. This can be scheduled like a specific day and time or on-demand based on monitored metrics that will invoke the addition or removal of EC2 instances from your workload.
DYNAMIC AWS EC2 AUTOSCALING
One method of dynamic auto scaling is to use Amazon CloudWatch to trigger auto-scaling when desired thresholds are exceeded.
You can trigger actions from the CloudWatch alarm when CPU utilization exceeds or is lower than a pre-defined threshold and you can also define the time period that the out of range condition should persist for. So for instance, if the CPU threshold is greater than 80% for 5 minutes or more, then an auto-scaling action should be performed.
Set up dynamic DNS on Your Amazon Linux instance
https://docs.aws.amazon.com/AWSEC2/latest/UserGuide/dynamic-dns.html
How to Create EC2 Instance in AWS: Step by Step Tutorial
https://www.guru99.com/creating-amazon-ec2-instance.html
In this tutorial, you will learn-(visit above link)
AWS :: Difference b/w Public, Private and Elastic IP
Whenever we launch an EC2 instance, a public and a private IP get allocated to it and can be viewed via:
AWS console -> EC2 instance -> Description
Public DNS/IP: It is allocated from a pool of available IP's and it is mandatory to let you connect from anywhere around the globe to your EC2 instance.
Private IP: Its allocation is based on vpc/subnet in which EC2 is setup. Every subnet has a range of IP's, out of which one IP gets allocated to the launched EC2. Scope or visibility of this IP is only under the defined VPC. Hence, to communicate between two or more EC2 instances using private IP, all must be under the same vpc.
Note: Private IP designated to an EC2 remains same until vpc is same.
Elastic IP: - It is similar to static IP and can be assign to any EC2 instance. Once we assign it, existing public IP gets released and replaced with the newly assigned Elastic IP. They are allocated to the AWS account so that we can release it from specific EC2 and re-assign it to any other EC2 instances (if needed).
- There are many reasons for why we should use Elastic IP. For example - Public IP & DNS records changes if we stop-start an instance. This would lead to a non-functional website until DNS records are re-updated. To avoid such issues, we make use of Elastic IP.
Path: AWS console -> EC2 -> Network & Security -> Elastic IP'sTo assign an Elastic IP, navigate to above path and click on 'Allocate New Address', followed by specifying the required EC2 instance.
Elastic IP can be dissociated anytime per need. Once dissociated, AWS re-assign a new public IP from its pool whereas Elastic IP gets listed in dissociated IP list.
Effects of Restart | stop-start | terminate of EC2 instances on IP addresses:
- Restart of EC2: All 3 IP's remains same as virtual machines remain unchanged.
- Stop-Start: Existing Public IP is released as AWS take away the vm. On start, new public IP/vm is provisioned. It is validated only for EBS-backed AMI. Private IP remains same, whereas if an EC2 is designated with Elastic IP, both Elastic/Public IP will remain same.
- Terminate: Both Public and Private IP are released, whereas Elastic IP gets dissociated, which can be associated again with any other EC2 instance.
X11 forwarding
X11 forwarding is a mechanism that allows a user to start up remote applications, and then forward the application display to their local Windows machine. It enables you to run GUIs from a local server. It's essentially remote desktop software that looks better on your screen and is easier to work with.
connect to an EC2 instance using SSH
https://www.clickittech.com/aws/connect-ec2-instance-using-ssh/
Requirements
on windows : Use putty client
on linux :
- SSH Key (.pem file) provided by Amazon. This SSH key is provided by Amazon when you launch the instance.
- IP address.IP address assigned to your ec2 instance.
- Username. The username depends on the Linux distro you just launched.Usually, these are the usernames for the most common distributions:
- Ubuntu: ubuntu
- Amazon Linux: ec2-user
- Centos: root
Open your terminal and change directory with command cd, where you downloaded your pem file. In this demonstration, pem file is stored in the downloads folder.

2. Type the SSH command with this structure:
ssh -i file.pem username@ip-addressThis is the explanation of the previous command:
- ssh: Command to use SSH protocol
- i: Flag that specifies an alternate identification file to use for public key authentication.
- username: Username that uses your instance
- ip-address: IP address given to your instance
3. After pressing enter, a question will prompt to add the host to your known_hosts file. Type yes. This will help to recognize the host each time you’re trying to connect to your instance.

4. And that’s it! Now you’re logged in on your AWS instance
AWS Exercises https://medium.com/@KerrySheldon/aws-for-the-bootcamp-grad-79dfd91d0ff8
EC2 Exercise : Host a Static Webpage apache(HTTPD)
https://medium.com/@KerrySheldon/ec2-exercise-1-1-host-a-static-webpage-9732b91c78ef
In this exercise, you will do the following:
- Launch an EC2 instance through the AWS console (i.e. build a “virtual laptop” to serve your website)
- SSH into to the EC2 instance and install a web server (i.e. use the terminal to “log in” to the “virtual laptop” and interact with it)
- Host a static webpage on the EC2 instance (i.e. “deploy” a static html file to the web)
step 1 : start an EC2 INSTANCE
step 2 : SSH into the EC2 instance and Install a Web Server
step 3 : Change the permissions on your key-pair file
chmod 400 <path_to_key_pair_file>
step 4 :
SSH into your new EC2 instance
ssh -i <path_to_key_pair_file> ec2-user@<public_ip_from_dashboard>At this point, your terminal is now interacting directly with your EC2 instance
step 5 :
Elevate your privileges
sudo sustep 6 :
update all of the packages on the instance
yum update -yInstall an apache webserver
yum install httpd -ystep 7. Start the webserver
service httpd startstep 8. Configure the web server to restart if it gets stopped
chkconfig httpd onstep 9. Add a static HTML file to be served
By default, the apache web server will display the index.html file found in
/var/www/htmldirectory in the root path of your website.cd /var/www/html
nano index.html
Add valid html to the file (e.g.):
<html><body>My first EC2 instance</body></html>Exit and save. Make sure that the file has content:
cat index.htmlNavigate back to the EC2 dashboard in the AWS console and copy the Public DNS(IPV4) of your instance into your clipboard. Paste that address into your browser. remove https from the address bar in browser. If all went well, you will see the html that you just created!
Default VPCs
When you start using Amazon VPC, you have a default VPC in each AWS Region. A default VPC comes with a public subnet in each Availability Zone, an internet gateway, and settings to enable DNS resolution. Therefore, you can immediately start launching Amazon EC2 instances into a default VPC. You can also use services such as Elastic Load Balancing, Amazon RDS, and Amazon EMR in your default VPC.
A default VPC is suitable for getting started quickly and for launching public instances such as a blog or simple website. You can modify the components of your default VPC as needed.
Default VPC components
When we create a default VPC, we do the following to set it up for you:
- Create a VPC with a size
/16IPv4 CIDR block (172.31.0.0/16). This provides up to 65,536 private IPv4 addresses.
- Create a size
/20default subnet in each Availability Zone. This provides up to 4,096 addresses per subnet, a few of which are reserved for our use.
- Create an internet gateway and connect it to your default VPC.
- Add a route to the main route table that points all traffic (
0.0.0.0/0) to the internet gateway.
- Create a default security group and associate it with your default VPC.
- Create a default network access control list (ACL) and associate it with your default VPC.
- Associate the default DHCP options set for your AWS account with your default VPC.
Default subnets
By default, a default subnet is a public subnet, because the main route table sends the subnet's traffic that is destined for the internet to the internet gateway. You can make a default subnet into a private subnet by removing the route from the destination 0.0.0.0/0 to the internet gateway. However, if you do this, no EC2 instance running in that subnet can access the internet.
Instances that you launch into a default subnet receive both a public IPv4 address and a private IPv4 address, and both public and private DNS hostnames. Instances that you launch into a nondefault subnet in a default VPC don't receive a public IPv4 address or a DNS hostname. You can change your subnet's default public IP addressing behavior.
What is the difference between a security group and a network ACL?
Security groups are tied to an instance whereas Network ACLs are tied to the subnet. Network ACLs are applicable at the subnet level, so any instance in the subnet with an associated NACL will follow rules of NACL. That's not the case with security groups, security groups has to be assigned explicitly to the instance.
Subnet security
AWS provides two features that you can use to increase security in your VPC:
security groups and network ACLs
. Security groups control inbound and outbound traffic for your instances, and network ACLs control inbound and outbound traffic for your subnets.
What’s a CIDR block?
https://digitalcloud.training/aws-ip-ranges-for-your-amazon-vpc/
CIDR stands for Classless Inter-Domain Routing. This is a method through which you use variable-length subnet masking (VLSM) to use bits from the host portion of an address to create additional, smaller ranges of addresses. I won’t teach you the concepts behind CIDR in this article as it’s a lengthy subject but there are plenty of good resources just a Google search away.
When you create a custom Amazon VPC you define the IP CIDR block to use. This block of IP addresses is the overall block from which you will then create your subnets. It’s important to plan your CIDR ranges properly to avoid issues later on. For example in the following default VPC, 172.31.0.0/16 is the CIDR block.
How to determine subnet IPv4 CIDR address in AWS?
172.31.0.0/16represents these IP ranges:CIDR Range 172.31.0.0/16 Netmask 255.255.0.0 Wildcard Bits 0.0.255.255 First IP 172.31.0.0 Last IP 172.31.255.255 Total Host 65536172.31.1.0/16represents the same IP range because of the/16subnet mask which would be like172.31.1.0/255.255.0.0:CIDR Range 172.31.1.0/16 Netmask 255.255.0.0 Wildcard Bits 0.0.255.255 First IP 172.31.0.0 Last IP 172.31.255.255 Total Host 65536Therefore it's not a subset of
172.31.0.0/16.Perhaps you'd be comfortable with 256 IPs per subnet? In which case you could use
172.31.1.0/24which would allow the IP range of172.31.1.0-172.31.1.255:CIDR Range 172.31.1.0/24 Netmask 255.255.255.0 Wildcard Bits 0.0.0.255 First IP 172.31.1.0 Last IP 172.31.1.255 Total Host 256See https://en.wikipedia.org/wiki/Classless_Inter-Domain_Routing.
Tutorial: Setting Up Node.js on an Amazon EC2 Instance
This tutorial assumes that you have already launched a Linux instance with a public DNS name that is reachable from the Internet and to which you are able to connect using SSH. For more information, see Step 1: Launch an Instance in the Amazon EC2 User Guide for Linux Instances.
You must also have configured your security group to allow
SSH(port 22),HTTP(port 80), andHTTPS(port 443) connections. For more information about these prerequisites, see Setting Up with Amazon Amazon EC2 in the Amazon EC2 User Guide for Linux Instances.- Install node version manager (nvm) by typing the following at the command line.
curl -o-https://raw.githubusercontent.com/nvm-sh/nvm/v0.34.0/install.sh| bash- Activate nvm by typing the following at the command line.
. ~/.nvm/nvm.sh
Use nvm to install the latest version of Node.js by typing the following at the command line.
nvm install nodeTest that Node.js is installed and running correctly by typing the following at the command line.
node -e "console.log('Running Node.js ' + process.version)"[Solved error while installing node] node: /lib64/libm.so.6: version `GLIBC_2.27′ not found (required by node)
To Solve node: /lib64/libm.so.6: version `GLIBC_2.27' not found (required by node) Error This error May occurs Because You are using the latest version of the Node But There is NodeJS Is Also Recommending Using their LTS Version (16.15.0 LTS Recommended For Most Users) instead of Latest Version. So My Recommendation Is Just to Use NodeJS 16 LTS Version. To install Nodejs 16 Just Run this Command on your machine: nvm install 16 And Now, Your error will be solved Thanks.
Deploying a Node.js application using NGINX and PM2
https://techblog.geekyants.com/aws-and-ec2-deploying-a-nodejs-application-using-nginx-and-pm2
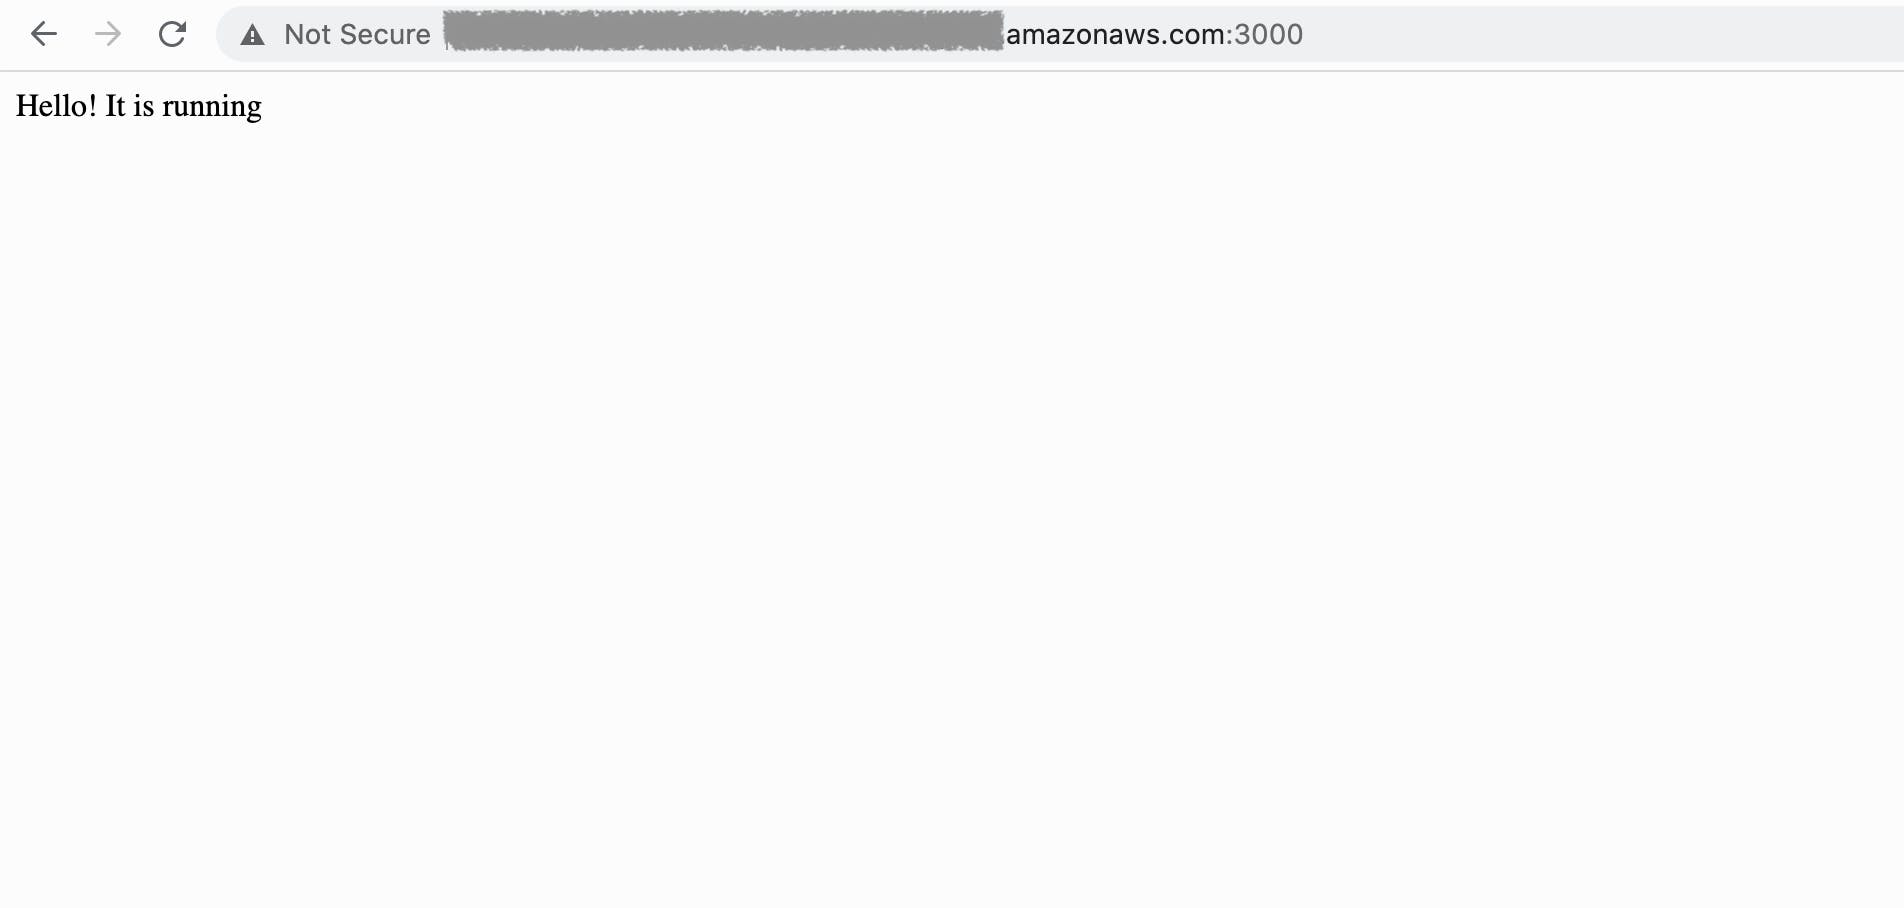
• Create a basic Node.js application ==>
mkdir test cd test npm init npm install express touch index.js vim index.js
index.js
const express = require('express')
const app = express()
app.get('/', (req, res) => { res.send('Hello! It is running') })app.listen(3000, () => console.log('Server running on port 3000'))Now run:
node index.js- Edit Inbound traffic ==> Security -> Security Groups -> Edit Inbound rulesThis is done to allow traffic from port 3000.

You will now get see your output at Public IPv4 DNS of the EC2 instance: publicDNS:3000
However, we neither see nor it is encouraged to have port numbers visible in the public URL. To resolve this we will use NGINX.
Hide port no in public URL using NGINX
NGINX will be used as a reverse proxy here. A Reverse Proxy Server, sometimes also called a reverse proxy web server, is often a feature of a load balancing solution, which stands between web servers and users, similar to a forward proxy. However, unlike the forward proxy which sits in front of users, guarding their privacy, the reverse proxy sits in front of web servers, and intercepts requests. In other words, a reverse proxy acts on behalf of the server, while a proxy acts for the client. Nginx, in front of the application server, will run on port 80 so that it can intercept all internet traffic and route it to port 3000.
Install NGINX and setup:
sudo amazon-linux-extras list | grep nginx
sudo amazon-linux-extras enable nginx1
sudo yum clean metadata
sudo yum -y install nginx
nginx -v #to ensure that nginx is installed
Start the NGINX service:
sudo systemctl start nginxEnsure that on hitting the publuc URL of the instance you get:

Move to nginx folder:
cd /etc/nginx/conf.d
sudo vim default.conf
add this to default.conf
server {
listen 80 default_server;
#access_log logs/default.access.log main;

#server_name_in_redirect off;

#root  /var/www/default/htdocs;
location / {
proxy_set_header  X-Real-IP  $remote_addr;
    proxy_set_header  Host       $http_host;
proxy_pass <http://127.0.0.1:3000>;
}
}
Restart the NGINX service:
better way :
nginx -s reloadcheck if config is correct
nginx -thard restart:
sudo systemctl restart nginxservice nginx statusNow re-run the Node.js application and you will see the output of application on: publicDNS , this time without port number.
Server block
Server Blocks, often referred to as Nginx virtual host are a feature of the Nginx web server that allows you to host multiple websites on one server. As opposed to setting up and configuring a server for each domain, hosting a number of websites on a single machine saves both time and money.
Everything works fine as of now. But here we run into another issue. As soon as we stop the application/close the terminal we receive no output on the public URL of EC2 instance.
To resolve this we use PM2.
Using PM2
PM2 is a production process manager for Node.js applications with a built-in load balancer. It allows you to keep applications alive forever, to reload them without downtime and to facilitate common system admin tasks. You can read more about pm2 here.
It is simple.
npm i -g pm2
pm2 start index.js
pm2 save
to stop the node server:
you can also kill it manually like this:
ps aux | grep nodeFind the process ID (second from the left):
kill -9 PROCESS_IDThis may also work
killall nodeAllocate an Amazon Elastic IP and associate it with your instance
An advantage of using Amazon Elastic Compute Cloud (EC2) is the ability to start, stop, create, and terminate instances at any time. However, this flexibility creates a potential challenge with IP addresses. Restarting a stopped instance (or re-creating an instance after another instance is terminated) results in a new IP address. How do you successfully reference a machine when the IP address is constantly changing?
In response to this problem, Amazon offers the ability to allocate an Elastic IP address. An Elastic IP provides you a single IP address that you can associate with different EC2 instances over time. If your EC2 instance has an Elastic IP and that instance is ever stopped or terminated, you can immediately associate a new EC2 instance with the Elastic IP. Your existing applications will not break because the applications see the IP address they were expecting, even though the back-end EC2 instance has changed.
Note:
An Elastic IP is not the same as an Amazon Load Balancer. An Amazon Load Balancer helps you scale out your site by associating many EC2 instances at the same time under one web address. An Elastic IP, on the other hand, can only be associated with one EC2 instance at a time.
To allocate an Elastic IP and associate it with an Amazon Web Services (AWS) instance, do the following:
1. Open the AWS Management Console, click the EC2 link, and display the page associated with your region. 2. Click the Elastic IPs link in the EC2 Dashboard. 3. Click Allocate New Address and choose VPC or EC2 from the drop-down list, depending whether you're going to associate this IP with an instance in Amazon EC2-Virtual Private Cloud (VPC) or Amazon EC2-Classic, respectively. Click Yes, Allocate to confirm your choice. 4. Right-click the newly created Elastic IP and choose Associate Address. 5. Choose your desired EC2 instance from the drop-down list of running instances and click Associate
How To Create a Self-Signed SSL Certificate for Nginx on CentOS 7
ssl.conf
server { listen 80; listen [::]:80; server_name 54.86.177.7 ec2-54-86-177-7.compute-1.amazonaws.com; if ($http_x_forwarded_proto = "http") { return 301 https://$server_name$request_uri; }
} server{ listen 443 http2 ssl; listen [::]:443 http2 ssl; ssl_certificate /etc/ssl/certs/nginx-selfsigned.crt; ssl_certificate_key /etc/ssl/private/nginx-selfsigned.key; ssl_dhparam /etc/ssl/certs/dhparam.pem; location / { proxy_pass http://127.0.0.1:3000; } }
What's the difference between instance store and EBS?
Some Amazon Elastic Compute Cloud (Amazon EC2) instance types come with a form of directly attached, block-device storage known as the instance store. The instance store is ideal for temporary storage, because the data stored in instance store volumes is not persistent through instance stops, terminations, or hardware failures.
Only the following instance types support an instance store volume as the root device: C3, D2, G2, I2, M3, and R3.
For data you want to retain longer, or if you want to encrypt the data, use Amazon Elastic Block Store (Amazon EBS) volumes instead. EBS volumes preserve their data through instance stops and terminations, can be easily backed up with EBS snapshots, can be removed from one instance and reattached to another, and support full-volume encryption.
Change the instance type
Change the instance type of an existing EBS-backed instance
- In the navigation pane, choose Instances.
- Select the instance and choose Instance state, Stop instance. When prompted for confirmation, choose Stop. It can take a few minutes for the instance to stop.
- With the instance still selected, choose Actions, Instance settings, Change instance type. This option is grayed out if the instance state is not
stopped.
- On the Change instance type page, do the following:
- For Instance type, select the instance type that you want.
If the instance type is not in the list, then it's not compatible with the configuration of your instance. Instead, use the following instructions: Change the instance type by launching a new instance.
- (Optional) If the instance type that you selected supports EBS optimization, select EBS-optimized to enable EBS optimization, or deselect EBS-optimized to disable EBS optimization. If the instance type that you selected is EBS optimized by default, EBS-optimized is selected and you can't deselect it.
- Choose Apply to accept the new settings.
- For Instance type, select the instance type that you want.
- To start the instance, select the instance and choose Instance state, Start instance. It can take a few minutes for the instance to enter the
runningstate.
Change the instance type by launching a new instance
If the current configuration of your EBS-backed instance is incompatible with the new instance type that you want, then you can't change the instance type of the original instance. Instead, you must launch a new instance with a configuration that is compatible with the new instance type that you want, and then migrate your application to the new instance. For example, if you launched your original instance from a PV AMI, but want to change to a current generation instance type that is only supported by an HVM AMI, you'll need to launch a new instance from an HVM AMI. For information about how compatibility is determined, see Compatibility for changing the instance type.
To migrate your application to a new instance, do the following:
- Back up the data on your original instance.
- Launch a new instance with a configuration that is compatible with the new instance type that you want, and attach any EBS volumes that were attached to your original instance.
- Install your application and any software on your new instance.
- Restore any data.
- If your original instance has an Elastic IP address, and you want to ensure that your users can continue uninterrupted to use the applications on your new instance, you must associate the Elastic IP address with your new instance.
- Open the Amazon EC2 console at https://console.aws.amazon.com/ec2/.
- Back up data that you need to keep, as follows:
- For data on your instance store volumes, back up the data to persistent storage.
- For data on your EBS volumes, take a snapshot of the volumes or detach the volumes from the instance so that you can attach them to the new instance later.
- In the navigation pane, choose Instances.
- Choose Launch instances. When you configure the instance, do the following:
- Select an AMI that will support the instance type that you want. Note that current generation instance types require an HVM AMI.
- Select the new instance type that you want. If the instance type that you want isn't available, then it's not compatible with the configuration of the AMI that you selected.
- If you're using an Elastic IP address, select the VPC that the original instance is currently running in.
- If you want to allow the same traffic to reach the new instance, select the security group that is associated with the original instance.
- When you're done configuring your new instance, complete the steps to select a key pair and launch your instance. It can take a few minutes for the instance to enter the
runningstate.
- If required, attach any new EBS volumes based on the snapshots that you created, or any EBS volumes that you detached from the original instance, to the new instance.
- Install your application and any required software on the new instance.
- Restore any data that you backed up from the instance store volumes of the original instance.
- If you are using an Elastic IP address, assign it to the new instance as follows:
- In the navigation pane, choose Elastic IPs.
- Select the Elastic IP address that is associated with the original instance and choose Actions, Disassociate Elastic IP address. When prompted for confirmation, choose Disassociate.
- With the Elastic IP address still selected, choose Actions, Associate Elastic IP address.
- For Resource type, choose Instance.
- For Instance, choose the new instance with which to associate the Elastic IP address.
- (Optional) For Private IP address, specify a private IP address with which to associate the Elastic IP address.
- Choose Associate.
- (Optional) You can terminate the original instance if it's no longer needed. Select the instance, verify that you are about to terminate the original instance and not the new instance (for example, check the name or launch time), and then choose Instance state, Terminate instance.
Change the instance type of an instance store-backed instance
An instance store-backed instance is an instance that has an instance store root volume. You can't change the instance type of an instance that has an instance store root volume. Instead, you must create an AMI from your instance, launch a new instance from this AMI and select the instance type that you want, and then migrate your application to the new instance. Note that the instance type that you want must be compatible with the AMI you create. For information about how compatibility is determined, see Compatibility for changing the instance type.
To migrate your application to a new instance, do the following:
- Back up the data on your original instance.
- Create an AMI from your original instance.
- Launch a new instance from this AMI and select the instance type that you want.
- Install your application on the new instance.
- If your original instance has an Elastic IP address, and you want to ensure that your users can continue uninterrupted to use the applications on your new instance, you must associate the Elastic IP address with your new instance.
Run commands on your Linux instance at launch
Creating AWS AMI Image and using it to create a new EC2 instance
https://docs.aws.amazon.com/AWSEC2/latest/UserGuide/creating-an-ami-ebs.html
https://www.youtube.com/watch?v=kkdr8Av2cQQ
- Create a Linux AMI from an instance
- Create a Linux AMI from a snapshot
Run commands on your Linux instance at launch
https://docs.aws.amazon.com/AWSEC2/latest/UserGuide/user-data.html
When you launch an instance in Amazon EC2, you have the option of passing user data to the instance that can be used to perform common automated configuration tasks and even run scripts after the instance starts. You can pass two types of user data to Amazon EC2: shell scripts and cloud-init directives. You can also pass this data into the launch instance wizard as plain text, as a file (this is useful for launching instances using the command line tools), or as base64-encoded text (for API calls).
If you are interested in more complex automation scenarios, consider using AWS CloudFormation and AWS OpsWorks. For more information, see the AWS CloudFormation User Guide and the AWS OpsWorks User Guide.
In the following examples, the commands from the Install a LAMP Web Server on Amazon Linux 2 are converted to a shell script and a set of cloud-init directives that run when the instance launches. In each example, the following tasks are performed by the user data:
- The distribution software packages are updated.
- The necessary web server,
php, andmariadbpackages are installed.
- The
httpdservice is started and turned on via systemctl.
- The
ec2-useris added to the apache group.
- The appropriate ownership and file permissions are set for the web directory and the files contained within it.
- A simple web page is created to test the web server and PHP engine
The examples in this topic assume the following:
- Your instance has a public DNS name that is reachable from the internet. For more information, see Auto-assign Public IP in the Network settings section and Create a security group.
- Your security group is configured to allow SSH (port 22), HTTP (port 80), and HTTPS (port 443) connections. For more information, see Create a security group.
- Your instance is launched with an Amazon Linux 2 AMI. These instructions are intended for use with Amazon Linux 2, and the commands and directives may not work for other Linux distributions. For more information about other distributions, such as their support for cloud-init, see their specific documentation.
User data and shell scripts
Important
By default, user data scripts and cloud-init directives run only during the boot cycle when you first launch an instance. You can update your configuration to ensure that your user data scripts and cloud-init directives run every time you restart your instance. For more information, see How can I utilize user data to automatically run a script with every restart of my Amazon EC2 Linux instance? in the AWS Knowledge Center.
User data shell scripts must start with the #!
characters and the path to the interpreter you want to read the script (commonly /bin/bash)
For a great introduction on shell scripting, see the BASH Programming HOW-TO at the Linux Documentation Project (tldp.org ).
Scripts entered as user data are run as the root
user, so do not use the sudo
command in the script. Remember that any files you create will be owned by root
; if you need non-root users to have file access, you should modify the permissions accordingly in the script. Also, because the script is not run interactively, you cannot include commands that require user feedback (such as yum update
without the -y
flag).
If you use an AWS API, including the AWS CLI, in a user data script, you must use an instance profile when launching the instance. An instance profile provides the appropriate AWS credentials required by the user data script to issue the API call. For more information, see Using instance profiles in the IAM User Guide. The permissions you assign to the IAM role depend on which services you are calling with the API. For more information, see IAM roles for Amazon EC2.
The cloud-init output log file (/var/log/cloud-init-output.log) captures console output so it is easy to debug your scripts following a launch if the instance does not behave the way you intended.
When a user data script is processed, it is copied to and run from /var/lib/cloud/instances/instance-id/. The script is not deleted after it is run. Be sure to delete the user data scripts from /var/lib/cloud/instances/instance-id/ before you create an AMI from the instance. Otherwise, the script will exist in this directory on any instance launched from the AMI.
Follow the procedure for launching an instance . The User data field is located in the Advanced details section of the launch instance wizard. Enter your shell script in the User data field, and then complete the instance launch procedure.
In the example script below, the script creates and configures our web server.
#!/bin/bash
yum update -y
amazon-linux-extras install -y lamp-mariadb10.2-php7.2 php7.2
yum install -y httpd mariadb-server
systemctl start httpd
systemctl enable httpd
usermod -a -G apache ec2-user
chown -R ec2-user:apache /var/www
chmod 2775 /var/www
find /var/www -type d -exec chmod 2775 {} \;
find /var/www -type f -exec chmod 0664 {} \;
echo "<?php phpinfo(); ?>" > /var/www/html/phpinfo.php
For our example, in a web browser, enter the URL of the PHP test file the script created. This URL is the public DNS address of your instance followed by a forward slash and the file name.
http://my.public.dns.amazonaws.com/phpinfo.phpYou should see the PHP information page. If you are unable to see the PHP information page, check that the security group you are using contains a rule to allow HTTP (port 80) traffic. For more information, see Add rules to a security group.
(Optional) If your script did not accomplish the tasks you were expecting it to, or if you just want to verify that your script completed without errors, examine the cloud-init output log file at /var/log/cloud-init-output.log and look for error messages in the output.
For additional debugging information, you can create a Mime multipart archive that includes a cloud-init data section with the following directive:
output : { all : '| tee -a /var/log/cloud-init-output.log' }This directive sends command output from your script to /var/log/cloud-init-output.log. For more information about cloud-init data formats and creating Mime multi part archive, see cloud-init Formats.
User data and cloud-init directives
The cloud-init package configures specific aspects of a new Amazon Linux instance when it is launched; most notably, it configures the .ssh/authorized_keys file for the ec2-user so you can log in with your own private key. For more information about the configuration tasks that the cloud-init package performs for Amazon Linux instances, see cloud-init.
The cloud-init user directives can be passed to an instance at launch the same way that a script is passed, although the syntax is different. For more information about cloud-init, see http://cloudinit.readthedocs.org/en/latest/index.html.
To pass cloud-init directives to an instance with user data
Follow the procedure for launching an instance. The User data field is located in the Advanced details section of the launch instance wizard. Enter your cloud-init directive text in the User data field, and then complete the instance launch procedure.
In the example below, the directives create and configure a web server on Amazon Linux 2. The #cloud-config line at the top is required in order to identify the commands as cloud-init directives.
#cloud-config
repo_update: true
repo_upgrade: all

packages:
 - httpd
 - mariadb-server

runcmd:
 - [ sh, -c, "amazon-linux-extras install -y lamp-mariadb10.2-php7.2 php7.2" ]
 - systemctl start httpd
 - sudo systemctl enable httpd
 - [ sh, -c, "usermod -a -G apache ec2-user" ]
 - [ sh, -c, "chown -R ec2-user:apache /var/www" ]
 - chmod 2775 /var/www
 - [ find, /var/www, -type, d, -exec, chmod, 2775, {}, \; ]
 - [ find, /var/www, -type, f, -exec, chmod, 0664, {}, \; ]
 - [ sh, -c, 'echo "<?php phpinfo(); ?>" > /var/www/html/phpinfo.php' ]
For this example, in a web browser, enter the URL of the PHP test file the directives created. This URL is the public DNS address of your instance followed by a forward slash and the file name.
http://my.public.dns.amazonaws.com/phpinfo.php(Optional) If your directives did not accomplish the tasks you were expecting them to, or if you just want to verify that your directives completed without errors, examine the output log file at /var/log/cloud-init-output.log and look for error messages in the output. For additional debugging information, you can add the following line to your directives:
output : { all : '| tee -a /var/log/cloud-init-output.log' }This directive sends runcmd output to /var/log/cloud-init-output.log.
User data and the AWS CLI
https://docs.aws.amazon.com/AWSEC2/latest/UserGuide/user-data.html#user-data-api-cli
You can use the AWS CLI to specify, modify, and view the user data for your instance. For information about viewing user data from your instance using instance metadata, see Retrieve instance user data.
Utilize user data to automatically run a script with every restart of my Amazon EC2 Linux instance
https://aws.amazon.com/premiumsupport/knowledge-center/execute-user-data-ec2/
By default, user data scripts and cloud-init directives run only during the first boot cycle when an EC2 instance is launched. However, you can configure your user data script and cloud-init directives with a mime multi-part file. A mime multi-part file allows your script to override how frequently user data is run in the cloud-init package. Then, the file runs the user script. For more information on mime multi-part files, see Mime Multi Part Archive on the cloud-init website.
Note: It's a best practice to create a snapshot of your instance before proceeding with the following resolution.
Resolution
Warning: Before starting this procedure, review the following:
- Stopping and starting the instance erases any data on instance store volumes. Be sure that you back up any data on the instance store volumes that you want to keep. For more information, see Determine the root device type of your AMI.
- If your EC2 instance has an auto-assigned public IPv4 address, then stopping and starting the instance causes the IPv4 address to change. If you need the instance to have a static public IPv4 address, consider using an Elastic IP address. Elastic IP addresses persist after an instance stop and start.
1. Make sure that the latest version of cloud-init is installed and functioning properly on your EC2 instance.
2. For security reasons, create an IAM policy to restrict the users who are allowed to add or remove user data through the ModifyInstanceAttribute API.
3. Open the Amazon EC2 console.
5. Choose Actions, choose Instance Settings, and then choose Edit User Data.
6. Copy your user script into the Edit user data box, and then choose Save.
The following example is a shell script that writes "Hello World" to a testfile.txt file in a /tmp directory.
Content-Type: multipart/mixed; boundary="//"
MIME-Version: 1.0

--//
Content-Type: text/cloud-config; charset="us-ascii"
MIME-Version: 1.0
Content-Transfer-Encoding: 7bit
Content-Disposition: attachment; filename="cloud-config.txt"

#cloud-config
cloud_final_modules:
- [scripts-user, always]

--//
Content-Type: text/x-shellscript; charset="us-ascii"
MIME-Version: 1.0
Content-Transfer-Encoding: 7bit
Content-Disposition: attachment; filename="userdata.txt"

#!/bin/bash
/bin/echo "Hello World" >> /tmp/testfile.txt
--//--
By default, cloud-init allows only one content type in user data at a time. However, this example shows both text/cloud-config and text/x-shellscript content-types in a mime-multi part file.
The text/cloud-config content type overrides how frequently user data is run in the cloud-init package by setting the SCRIPTS-USER parameter to ALWAYS.
The text/x-shellscript content type provides the actual user script to be run by the cloud-init cloud_final_modules module. In this example, there is only one line to be run, which is /bin/echo "Hello World." >> /tmp/testfile.txt.
Note: Replace the line /bin/echo "Hello World." >> /tmp/testfile.txt with the shell script that you want to run during the instance boot.
7. Start your EC2 instance again, and validate that your script runs correctly.
AWS & EC2: Achieving Elastic Load Balancing & Auto Scaling
https://techblog.geekyants.com/aws-and-ec2-achieving-elastic-load-balancing-and-auto-scaling
Load balancer is a service which uniformly distributes network traffic and workloads across multiple servers or cluster of servers. Load balancer in AWS increases the availability and fault tolerance of an application.
It allows auto scaling and, at the same time, allows single point access. It keeps the health of registered instances in check and if any instance is unhealthy, traffic is redirected to another instance.
AWS has 3 types of Load Balancers
- Classical Load Balancer (v1-old generation)
- Application Load Balancer (v2-new generation)
- Network Load Balancer (v2-new generation)
It is recommended to use the new generation Load Balancers as they provide more features.
Application Loads Balancers
- It is a Layer 7 Load Balancer.
- It is used for HTTP traffic.
- It Load Balances application on the same machine.
- It load balances based on route in URL or Hostname in URL
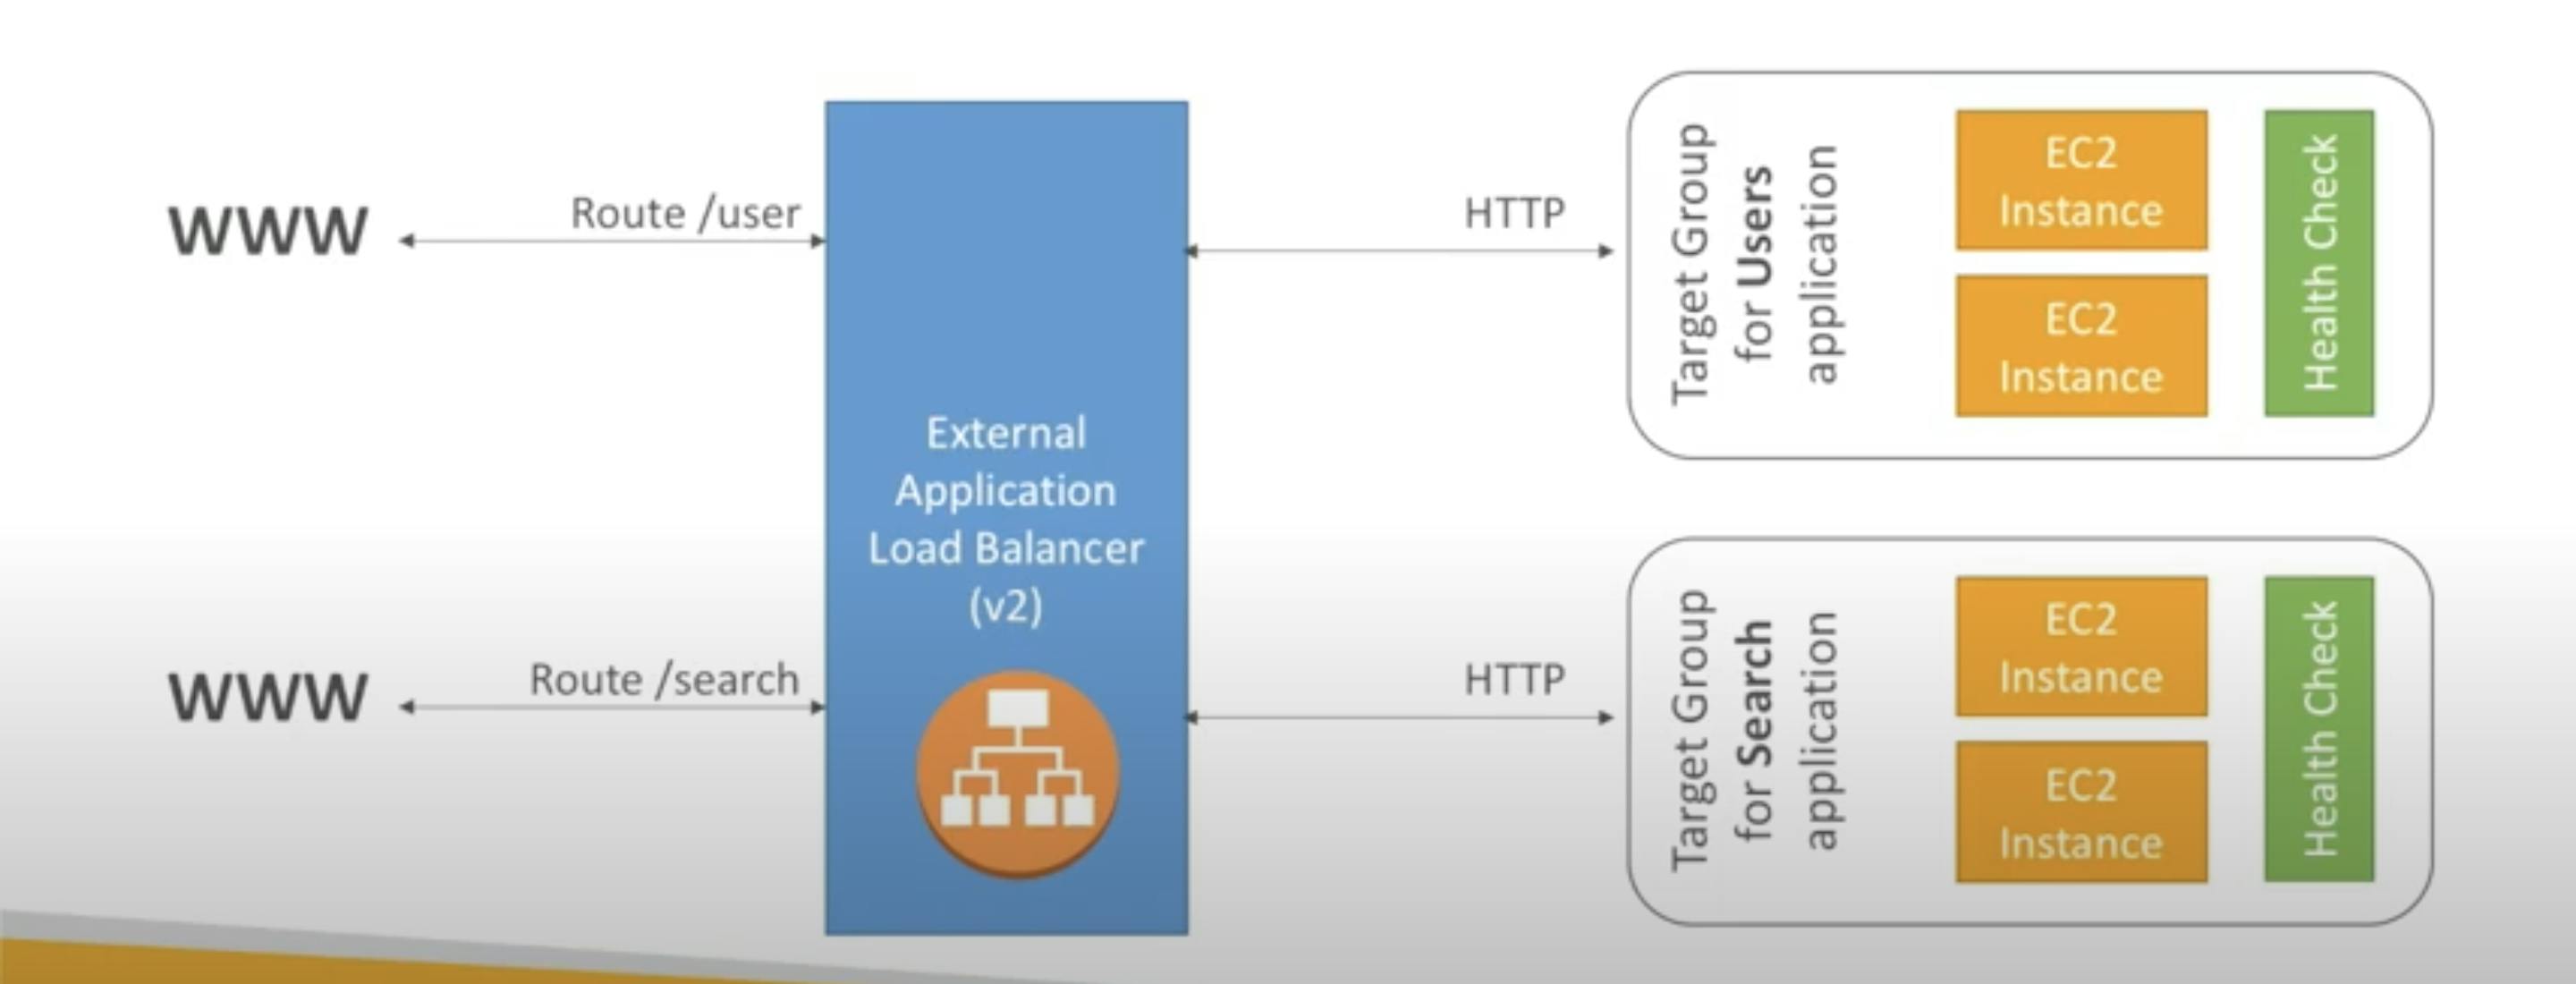
- As many Target Groups are behind ELB, each Target Group can have as many EC2 instances.
- It allows stickiness, i.e. same user's request will be served by the same EC2 instance.
- The ALB sees Client IP but does not allow the EC2 instance to see the client IP. The instance sees private IP of the ALB.
Network Loads Balancers
- It is a Layer 4 Load Balancer.
- It is used for TCP traffic.
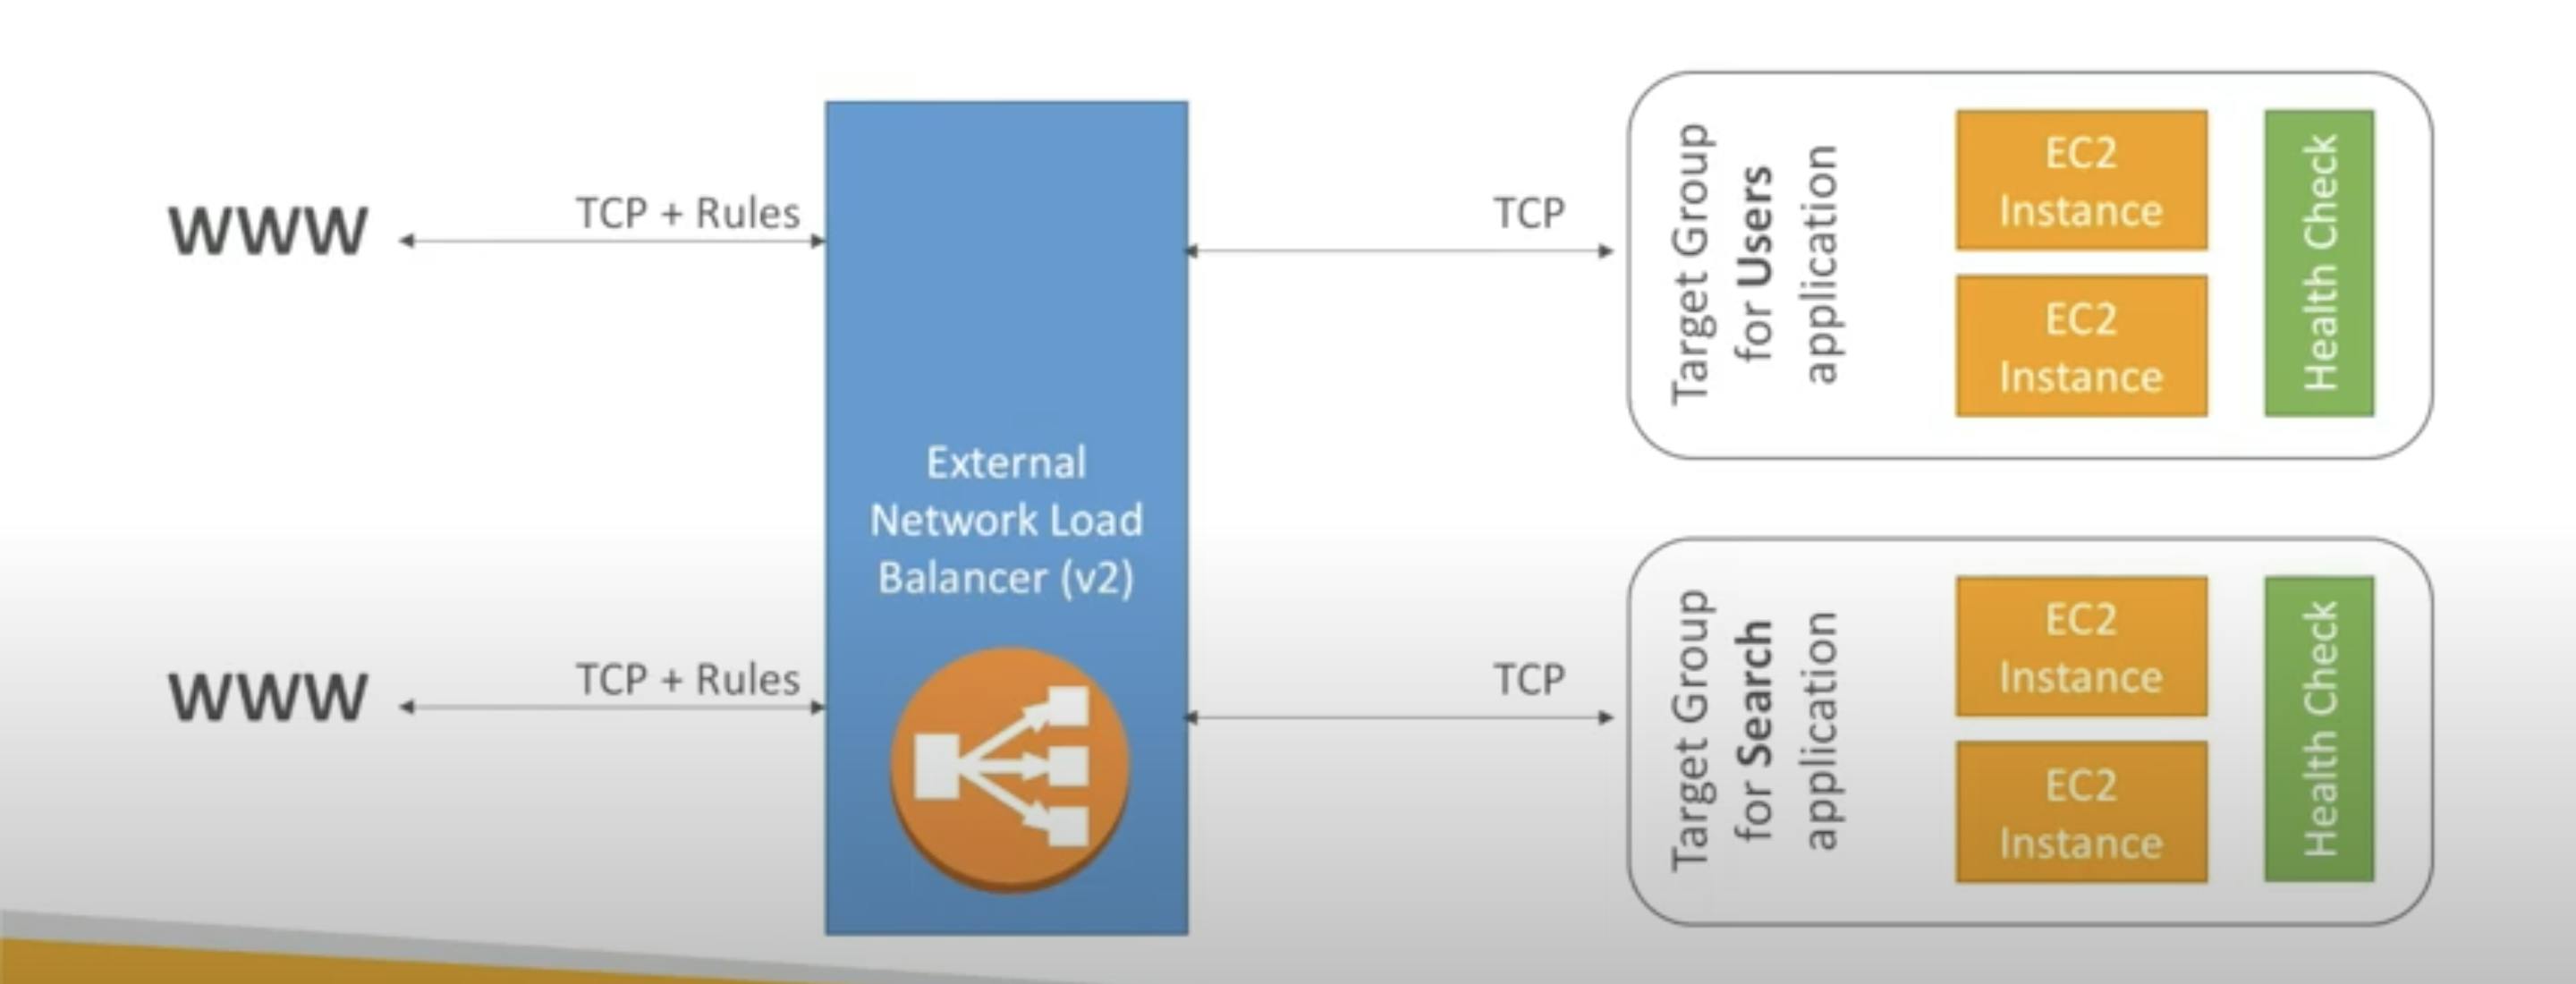
- It has comparatively higher performance.
- NLBs supports source IP preserving.
If LB doesn't connect to application, check the Security Groups
For this article, I have already setup an EC2 instance and deployed a basic Node.js application using Nginx and PM2.
follow the link for complete instructions
https://techblog.geekyants.com/aws-and-ec2-achieving-elastic-load-balancing-and-auto-scaling
AWS Auto Scaling
Auto-scaling is a way to automatically scale up or down the number of compute resources that are being allocated to your application based on its needs at any given time. AWS Auto Scaling lets you build scaling plans that automate how groups of different resources respond to changes in demand.
In simple words, in Auto Scaling, when the load increases on a server, it is this concept that will scale-in or scale-out number of active servers, so that there is no increase in response time of requests.
Advantages
- Better fault tolerance.
- Better cost management.
- Reliability.
- Scalability.
- Flexibility.
- Better availability.
Load balancing test script
#!/bin/bash
yum update -y
yum install -y httpd.x86_64
systemctl start httpd.service
systemctl enable httpd.service
echo "Hello, world from $(hostname -f)" > /var/www/html/index.html
Step by Step Instructions to setup Application Load Balancer
https://www.youtube.com/watch?v=WLu41jAYjYk
https://techblog.geekyants.com/aws-and-ec2-achieving-elastic-load-balancing-and-auto-scaling
Install a LAMP web server on Amazon Linux 2
The following procedures help you install an Apache web server with PHP and MariaDB (a community-developed fork of MySQL) support on your Amazon Linux 2 instance (sometimes called a LAMP web server or LAMP stack). You can use this server to host a static website or deploy a dynamic PHP application that reads and writes information to a database.
Important
If you are trying to set up a LAMP web server on a different distribution, such as Ubuntu or Red Hat Enterprise Linux, this tutorial will not work. For Amazon Linux AMI, see Tutorial: Install a LAMP web server on the Amazon Linux AMI. For Ubuntu, see the following Ubuntu community documentation: ApacheMySQLPHP. For other distributions, see their specific documentation.
Tasks
You must also have configured your security group to allow SSH (port 22), HTTP (port 80), and HTTPS (port 443) connections.
To prepare the LAMP server
The -y option installs the updates without asking for confirmation. If you would like to examine the updates before installing, you can omit this option.
[ec2-user ~]$sudo yum update -yInstall the lamp-mariadb10.2-php7.2 and php7.2 Amazon Linux Extras repositories to get the latest versions of the LAMP MariaDB and PHP packages for Amazon Linux 2.
[ec2-user ~]$sudo amazon-linux-extras install -y lamp-mariadb10.2-php7.2 php7.2Now that your instance is current, you can install the Apache web server, MariaDB, and PHP software packages.
Use the yum install command to install multiple software packages and all related dependencies at the same time.
[ec2-user ~]$sudo yum install -y httpd mariadb-serverYou can view the current versions of these packages using the following command:
yum infopackage_nameStart the Apache web server.
[ec2-user ~]$sudo systemctl start httpdUse the systemctl command to configure the Apache web server to start at each system boot.
[ec2-user ~]$sudo systemctl enable httpdYou can verify that httpd is on by running the following command:
[ec2-user ~]$sudo systemctl is-enabled httpdTest your web server. In a web browser, type the public DNS address (or the public IP address) of your instance. If there is no content in /var/www/html
, you should see the Apache test page. You can get the public DNS for your instance using the Amazon EC2 console (check the Public DNS
column; if this column is hidden, choose Show/Hide Columns
(the gear-shaped icon) and choose Public DNS
).
Apache httpd serves files that are kept in a directory called the Apache document root. The Amazon Linux Apache document root is /var/www/html, which by default is owned by root.
To allow the ec2-user account to manipulate files in this directory, you must modify the ownership and permissions of the directory. There are many ways to accomplish this task. In this tutorial, you add ec2-user to the apache group, to give the apache group ownership of the /var/www directory and assign write permissions to the group.
To set file permissions
- Add your user (in this case,
ec2-user) to theapachegroup.[ec2-user ~]$sudo usermod -a -G apacheec2-user
Log out and then log back in again to pick up the new group, and then verify your membership.
- Log out (use the exit command or close the terminal window):
[ec2-user ~]$exit
- To verify your membership in the
apachegroup, reconnect to your instance, and then run the following command:[ec2-user ~]$groups ec2-user adm wheel apache systemd-journal
- Change the group ownership of
/var/wwwand its contents to theapachegroup.[ec2-user ~]$sudo chown -R ec2-user:apache /var/www
To add group write permissions and to set the group ID on future subdirectories, change the directory permissions of /var/www and its subdirectories.
[ec2-user ~]$sudo chmod 2775 /var/www && find /var/www -ty- To add group write permissions, recursively change the file permissions of
/var/wwwand its subdirectories:[ec2-user ~]$find /var/www -type f -exec sudo chmod 0664 {} \;
Now, ec2-user
(and any future members of the apache
group) can add, delete, and edit files in the Apache document root, enabling you to add content, such as a static website or a PHP application.
Test your LAMP server
If your server is installed and running, and your file permissions are set correctly, your ec2-user account should be able to create a PHP file in the /var/www/html directory that is available from the internet.
Create a PHP file in the Apache document root.
[ec2-user ~]$echo "<?php phpinfo(); ?>" > /var/www/html/phpinfo.phpIn a web browser, type the URL of the file that you just created. This URL is the public DNS address of your instance followed by a forward slash and the file name. For example:
http://my.public.dns.amazonaws.com/phpinfo.php- Delete the
phpinfo.phpfile. Although this can be useful information, it should not be broadcast to the internet for security reasons.[ec2-user ~]$rm /var/www/html/phpinfo.php
Secure the database server
The default installation of the MariaDB server has several features that are great for testing and development, but they should be disabled or removed for production servers. The mysql_secure_installation command walks you through the process of setting a root password and removing the insecure features from your installation. Even if you are not planning on using the MariaDB server, we recommend performing this procedure.
- Start the MariaDB server.
[ec2-user ~]$sudo systemctl start mariadb
Run mysql_secure_installation.
[ec2-user ~]$sudo mysql_secure_installation- When prompted, type a password for the root account.
- Type the current root password. By default, the root account does not have a password set. Press Enter.
- Type
Yto set a password, and type a secure password twice. For more information about creating a secure password, see https://identitysafe.norton.com/password-generator/. Make sure to store this password in a safe place.Setting a root password for MariaDB is only the most basic measure for securing your database. When you build or install a database-driven application, you typically create a database service user for that application and avoid using the root account for anything but database administration.
- Type
Yto remove the anonymous user accounts.
- Type
Yto disable the remote root login.
- Type
Yto remove the test database.
- Type
Yto reload the privilege tables and save your changes.
- (Optional) If you do not plan to use the MariaDB server right away, stop it. You can restart it when you need it again.
[ec2-user ~]$sudo systemctl stop mariadb
- (Optional) If you want the MariaDB server to start at every boot, type the following command.
[ec2-user ~]$sudo systemctl enable mariadb
(Optional) Install phpMyAdmin
To install phpMyAdmin
- Install the required dependencies.
[ec2-user ~]$sudo yum install php-mbstring php-xml -y
- Restart Apache.
[ec2-user ~]$sudo systemctl restart httpd
- Restart
php-fpm.[ec2-user ~]$sudo systemctl restart php-fpm
- Navigate to the Apache document root at
/var/www/html.[ec2-user ~]$cd /var/www/html
- Select a source package for the latest phpMyAdmin release from https://www.phpmyadmin.net/downloads. To download the file directly to your instance, copy the link and paste it into a wget command, as in this example:
[ec2-user html]$wgethttps://www.phpmyadmin.net/downloads/phpMyAdmin-latest-all-languages.tar.gz
- Create a
phpMyAdminfolder and extract the package into it with the following command.[ec2-user html]$mkdir phpMyAdmin && tar -xvzfphpMyAdmin-latest-all-languages.tar.gz -C phpMyAdmin --strip-components 1
- Delete the
phpMyAdmin-latest-all-languages.tar.gztarball.[ec2-user html]$rmphpMyAdmin-latest-all-languages.tar.gz
- (Optional) If the MySQL server is not running, start it now.
[ec2-user ~]$sudo systemctl start mariadb
- In a web browser, type the URL of your phpMyAdmin installation. This URL is the public DNS address (or the public IP address) of your instance followed by a forward slash and the name of your installation directory. For example:
http://my.public.dns.amazonaws.com/phpMyAdminYou should see the phpMyAdmin login page:
- Log in to your phpMyAdmin installation with the
rootuser name and the MySQL root password you created earlier.
Your installation must still be configured before you put it into service. We suggest that you begin by manually creating the configuration file, as follows:
- To start with a minimal configuration file, use your favorite text editor to create a new file, and then copy the contents of
config.sample.inc.phpinto it.
- Save the file as
config.inc.phpin the phpMyAdmin directory that containsindex.php.
- Refer to post-file creation instructions in the Using the Setup script section of the phpMyAdmin installation instructions for any additional setup.
Host a WordPress blog on Amazon Linux 2
https://docs.aws.amazon.com/AWSEC2/latest/UserGuide/hosting-wordpress.html
The following procedures will help you install, configure, and secure a WordPress blog on your Amazon Linux 2 instance. This tutorial is a good introduction to using Amazon EC2 in that you have full control over a web server that hosts your WordPress blog, which is not typical with a traditional hosting service.
You are responsible for updating the software packages and maintaining security patches for your server. For a more automated WordPress installation that does not require direct interaction with the web server configuration, the AWS CloudFormation service provides a WordPress template that can also get you started quickly. For more information, see Get started in the AWS CloudFormation User Guide. If you'd prefer to host your WordPress blog on a Windows instance, see Deploy a WordPress blog on your Amazon EC2 Windows instance in the Amazon EC2 User Guide for Windows Instances. If you need a high-availability solution with a decoupled database, see Deploying a high-availability WordPress website in the AWS Elastic Beanstalk Developer Guide.
To complete this tutorial using AWS Systems Manager Automation instead of the following tasks, run the automation document
⚠️⚠️⚠️⚠️ VERY IMPORTANT : IT IS ABSOLUTELY IMPORTANT TO ASSOCIATE AN ELASTIC IP TO THE EC2 INSTANCE BEFORE INSTALLING WORDPRESS. OTHERWISE YOU WILL BROKE IT. ⚠️⚠️⚠️⚠️Help! My public DNS name changed and now my blog is broken
Your WordPress installation is automatically configured using the public DNS address for your EC2 instance. If you stop and restart the instance, the public DNS address changes (unless it is associated with an Elastic IP address) and your blog will not work anymore because it references resources at an address that no longer exists (or is assigned to another EC2 instance). A more detailed description of the problem and several possible solutions are outlined in https://wordpress.org/support/article/changing-the-site-url/.
If this has happened to your WordPress installation, you may be able to recover your blog with the procedure below, which uses the wp-cli command line interface for WordPress.
To change your WordPress site URL with the wp-cli
- Connect to your EC2 instance with SSH.
- Note the old site URL and the new site URL for your instance. The old site URL is likely the public DNS name for your EC2 instance when you installed WordPress. The new site URL is the current public DNS name for your EC2 instance. If you are not sure of your old site URL, you can use curl to find it with the following command.
[ec2-user ~]$curl localhost | grep wp-contentYou should see references to your old public DNS name in the output, which will look like this (old site URL in red):
<script type='text/javascript' src='http://ec2-52-8-139-223.us-west-1.compute.amazonaws.com/wp-content/themes/twentyfifteen/js/functions.js?ver=20150330'></script>
- Download the wp-cli with the following command.
[ec2-user ~]$curl -O https://raw.githubusercontent.com/wp-cli/builds/gh-pages/phar/wp-cli.phar
- Search and replace the old site URL in your WordPress installation with the following command. Substitute the old and new site URLs for your EC2 instance and the path to your WordPress installation (usually
/var/www/htmlor/var/www/html/blog).[ec2-user ~]$php wp-cli.phar search-replace'old_site_url''new_site_url' --path=/path/to/wordpress/installation --skip-columns=guid[ec2-user ~]$php wp-cli.phar search-replace'http://old-ip''http://new-ip' --path=/path/to/wordpress/installation --skip-columns=guidexample:——→
[ec2-user@ip-172-31-80-100 ~]$ php wp-cli.phar search-replace 'http://ec2-184-73-148-109.compute-1.amazonaws.com'
	'http://ec2-52-44-7-165.compute-1.amazonaws.com'
	--path=/home/ec2-user/wordpress --skip-columns=guid
[ec2-user@ip-172-31-80-100 ~]$ php wp-cli.phar search-replace 'http://184.73.148.109' 'http://52.44.7.165' --path=/home/ec2-user/wordpress --skip-columns=guid
- In a web browser, enter the new site URL of your WordPress blog to verify that the site is working properly again. If it is not, see https://wordpress.org/support/article/changing-the-site-url/ and https://wordpress.org/support/article/how-to-install-wordpress/#common-installation-problems for more information.
Resizing & Changing Type, EBS Snapshot, Attach & Detach EBS
https://www.youtube.com/watch?v=HTefwhNticU
Root device volume linux -> : /dev/xvda
Amazon EC2 instance root device volume
Deployed React JS application on EC2 ubuntu
- update the system
- install git
- add ssh key for git
- clone repo
- install node and npm and then npm install the application dependencies
- npm start or npm build
- port 3000 should be made accessible
How to install and setup Git on EC2
simple
git is already installed ..just add ssh and git config